
This is the first time I have managed to make this work in a GNS3 environment in several years of working with ISE I think it is down to the updated switch image. All the steps and config will be detailed from the switch to ISE.
To see the configuration, go here
– The device that is authenticating to the network is CORP_PC (172.17.4.11)
– CORP_PC is connected to eth0/1 on access-switch1
– access-switch1 is configured in ISE as a network access device using IP 172.17.99.11
– access-switch1 version: 15.2
– access-switch1 image: vios_l2-adventerprisek9-m.ssa.high_iron_20200929.qcow2
EAP Messages
The EAP messages are the first part. Without EAP the authentication cannot take place. EAP is initiated from the switch, it asks the client for the authentication method. In this example, a username/password.
The client is also able to initiate the EAP process with an EAPOL Start message sent to the switch. This did not happen in my example, the switch initiated EAP.
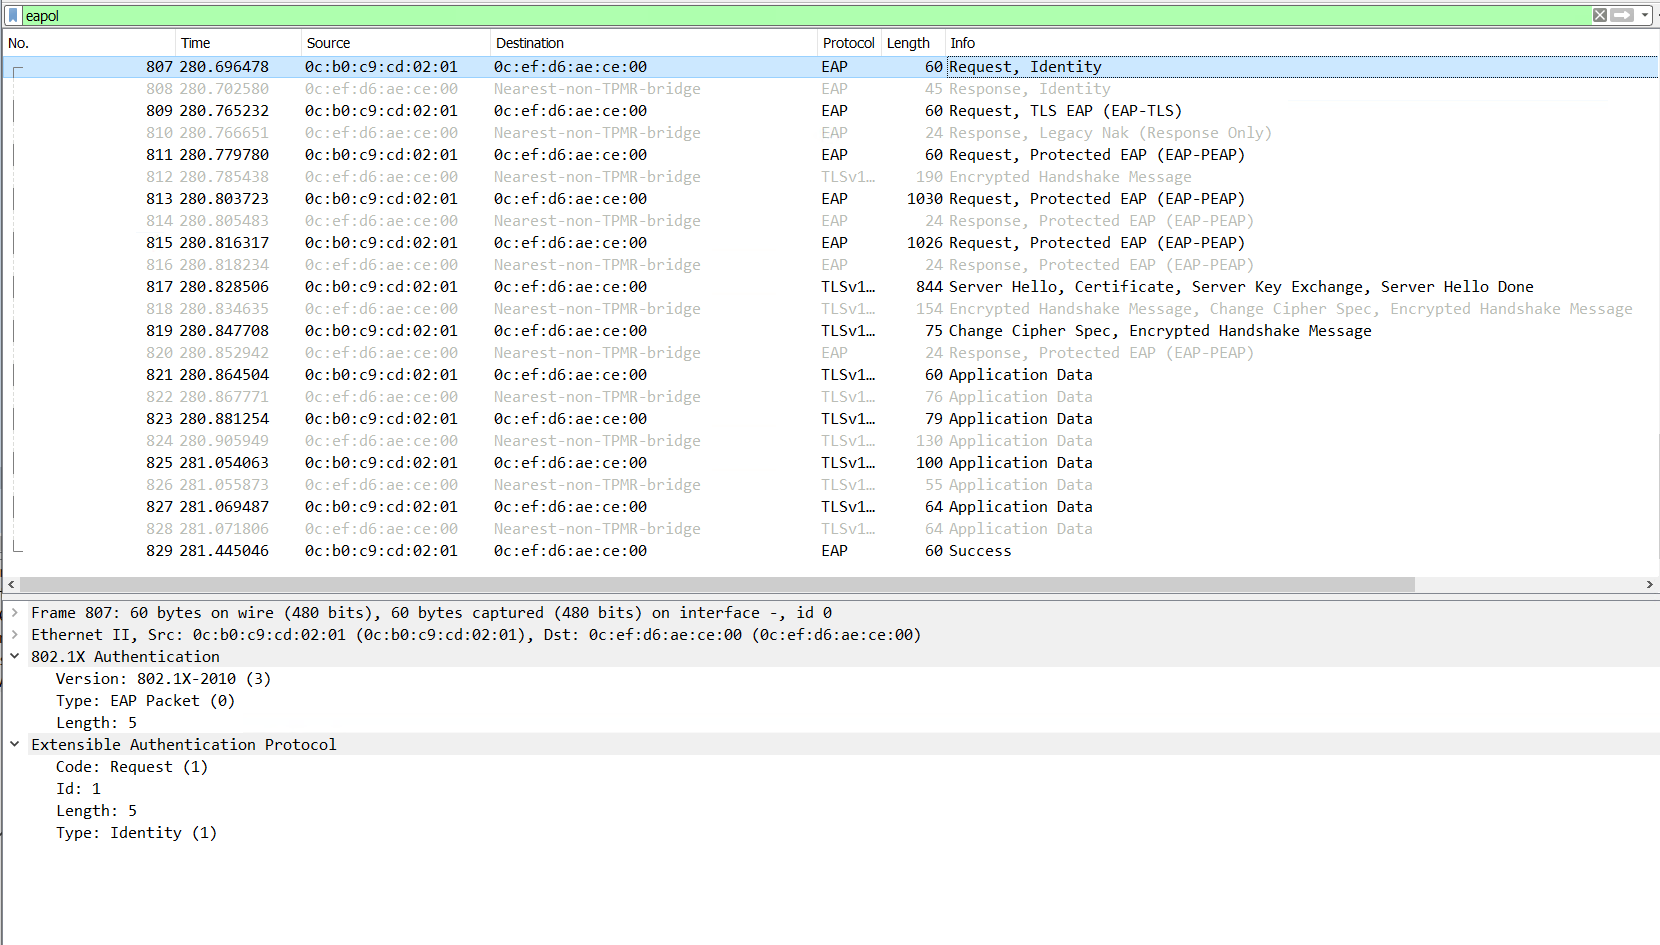
Switch to ISE RADIUS Exchange
Below are screenshots of the RADIUS exchange between the switch and the ISE server.
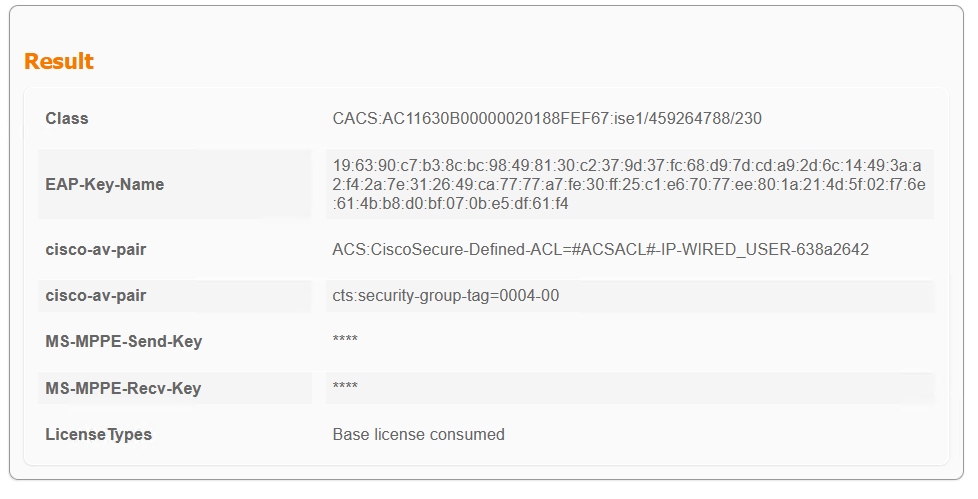
The switch is requesting the authentication on behalf of the user with the username SECURITYDEMO\Employee1.
ISE responds with the ACL for this user as configured in the the ISE policy set.

EAP Completed – Switch Session
Now that the EAP process has been completed, the switch has the session information.
|
0 1 2 3 4 5 |
*Dec 7 14:40:27.850: %EPM-6-POLICY_REQ: IP 172.17.4.11| MAC 0cef.d6ae.ce00| AuditSessionID AC11630B00000020188FEF67| EVENT APPLY *Dec 7 14:40:28.039: %EPM-6-AAA: POLICY xACSACLx-IP-WIRED_USER-638a2642| EVENT DOWNLOAD_REQUEST *Dec 7 14:40:28.051: %EPM-6-AAA: POLICY xACSACLx-IP-WIRED_USER-638a2642| EVENT DOWNLOAD-SUCCESS *Dec 7 14:40:28.105: %EPM-6-POLICY_APP_SUCCESS: Policy Application succeded for Client [172.17.4.11] MAC [0cef.d6ae.ce00] AuditSession ID [AC11630B00000020188FEF67] for POLICY_TYPE [Named Acl] POLICY_NAME [xACSACLx-IP-WIRED_USER-638a2642] |
|
0 1 2 3 4 5 6 7 8 9 10 11 12 13 14 15 16 17 18 19 20 21 22 23 24 25 26 27 28 29 30 31 32 |
access-switch1#sh access-session inter gi0/1 details Interface: GigabitEthernet0/1 MAC Address: 0cef.d6ae.ce00 IPv6 Address: Unknown IPv4 Address: 172.17.4.11 User-Name: SECURITYDEMO\Employee1 Status: Authorized Domain: DATA Oper host mode: multi-auth Oper control dir: both Session timeout: N/A Restart timeout: N/A Periodic Acct timeout: 900s (local), Remaining: 679s Session Uptime: 220s Common Session ID: AC11630B00000020188FEF67 Acct Session ID: 0x00000010 Handle: 0xA800000E Current Policy: DOT1X-DEFAULT Server Policies: Security Policy: None Security Status: Link Unsecure ACS ACL: xACSACLx-IP-WIRED_USER-638a2642 SGT Value: 4 Method status list: Method State dot1x Authc Success mab Stopped |
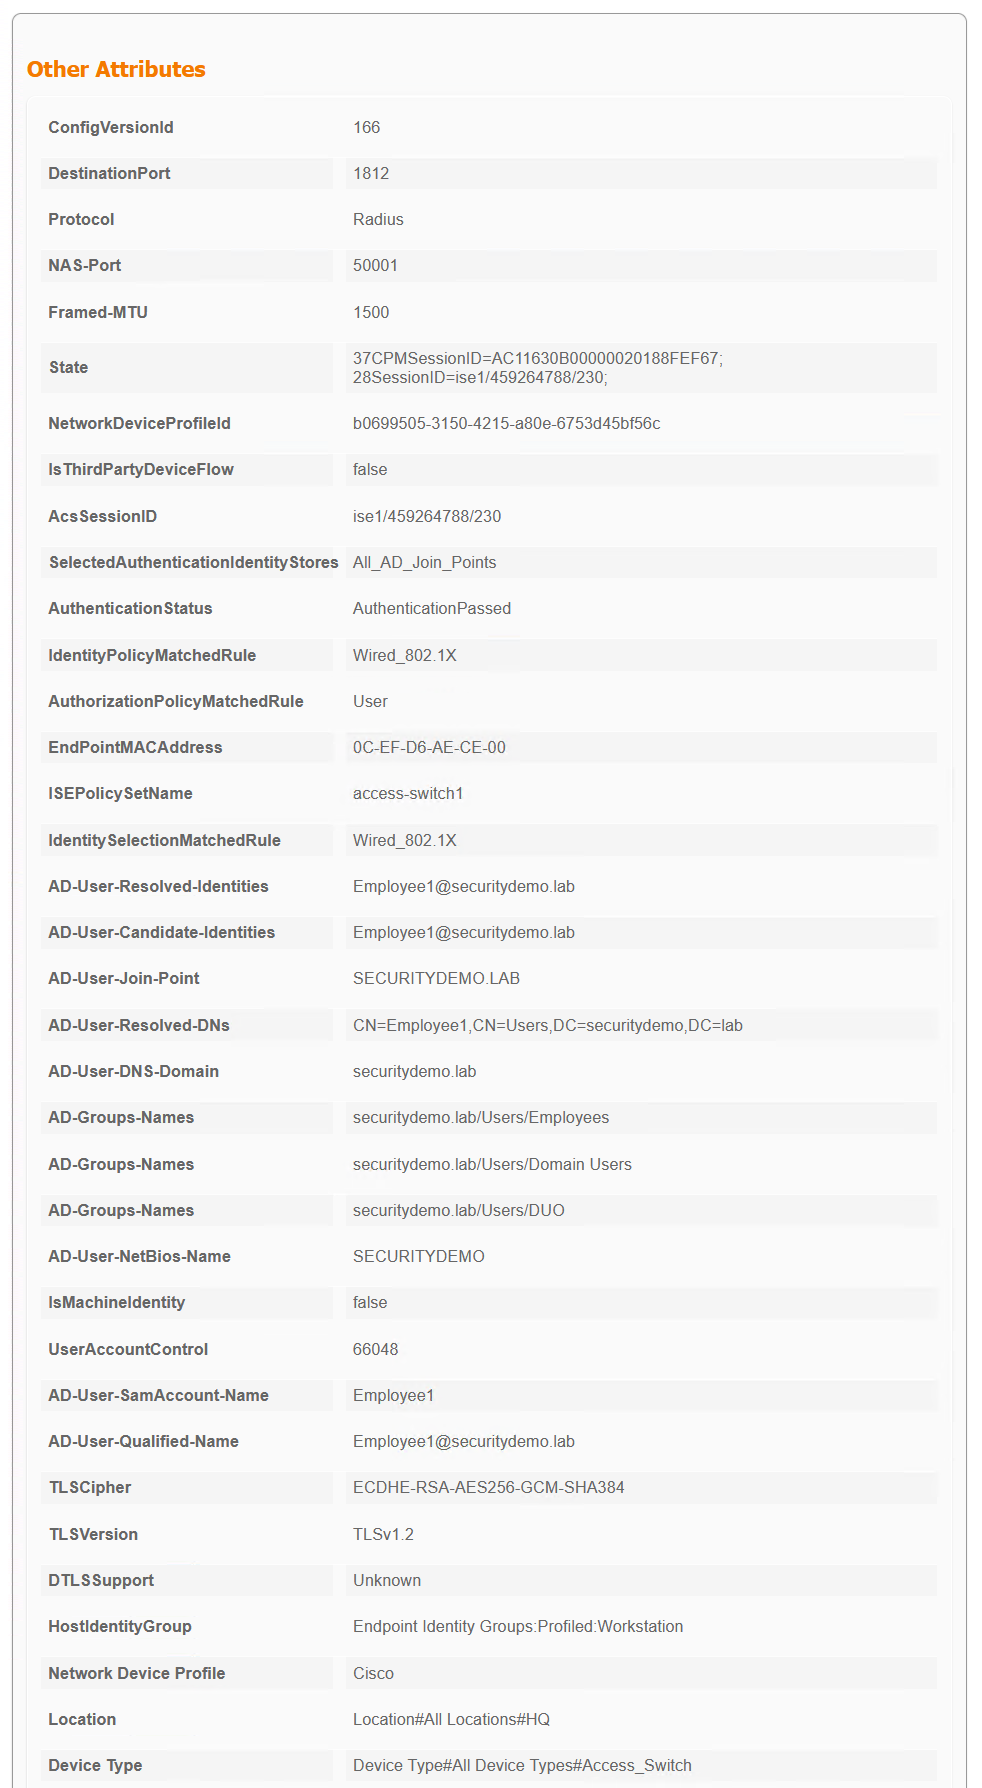
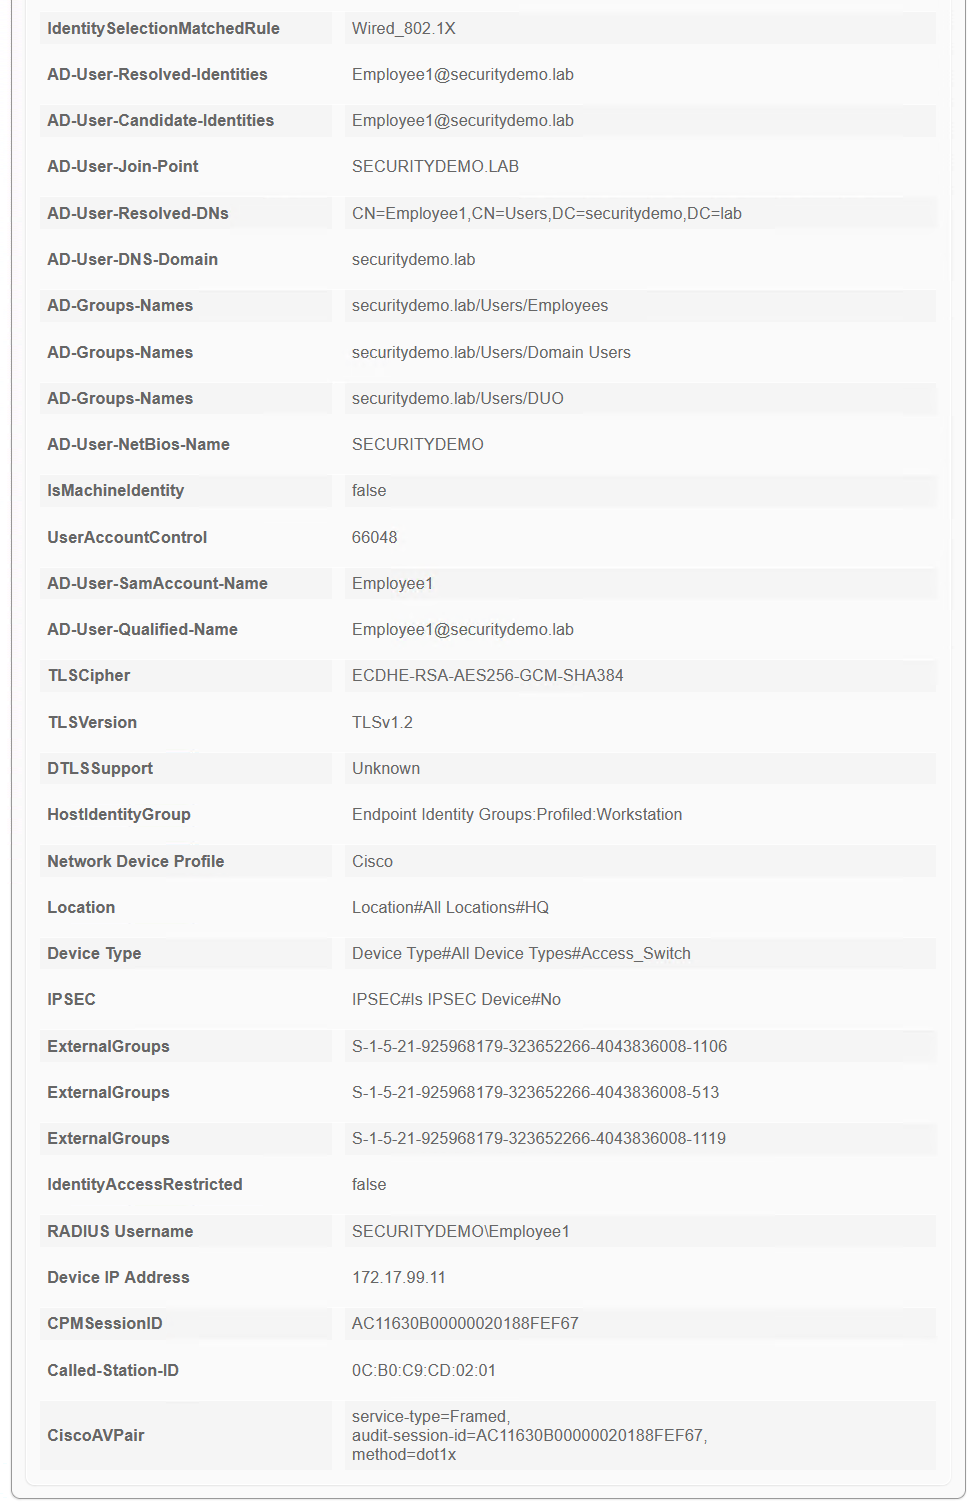
ISE Session Info
ISE contains all of the session information with each step that has been applied to the client.
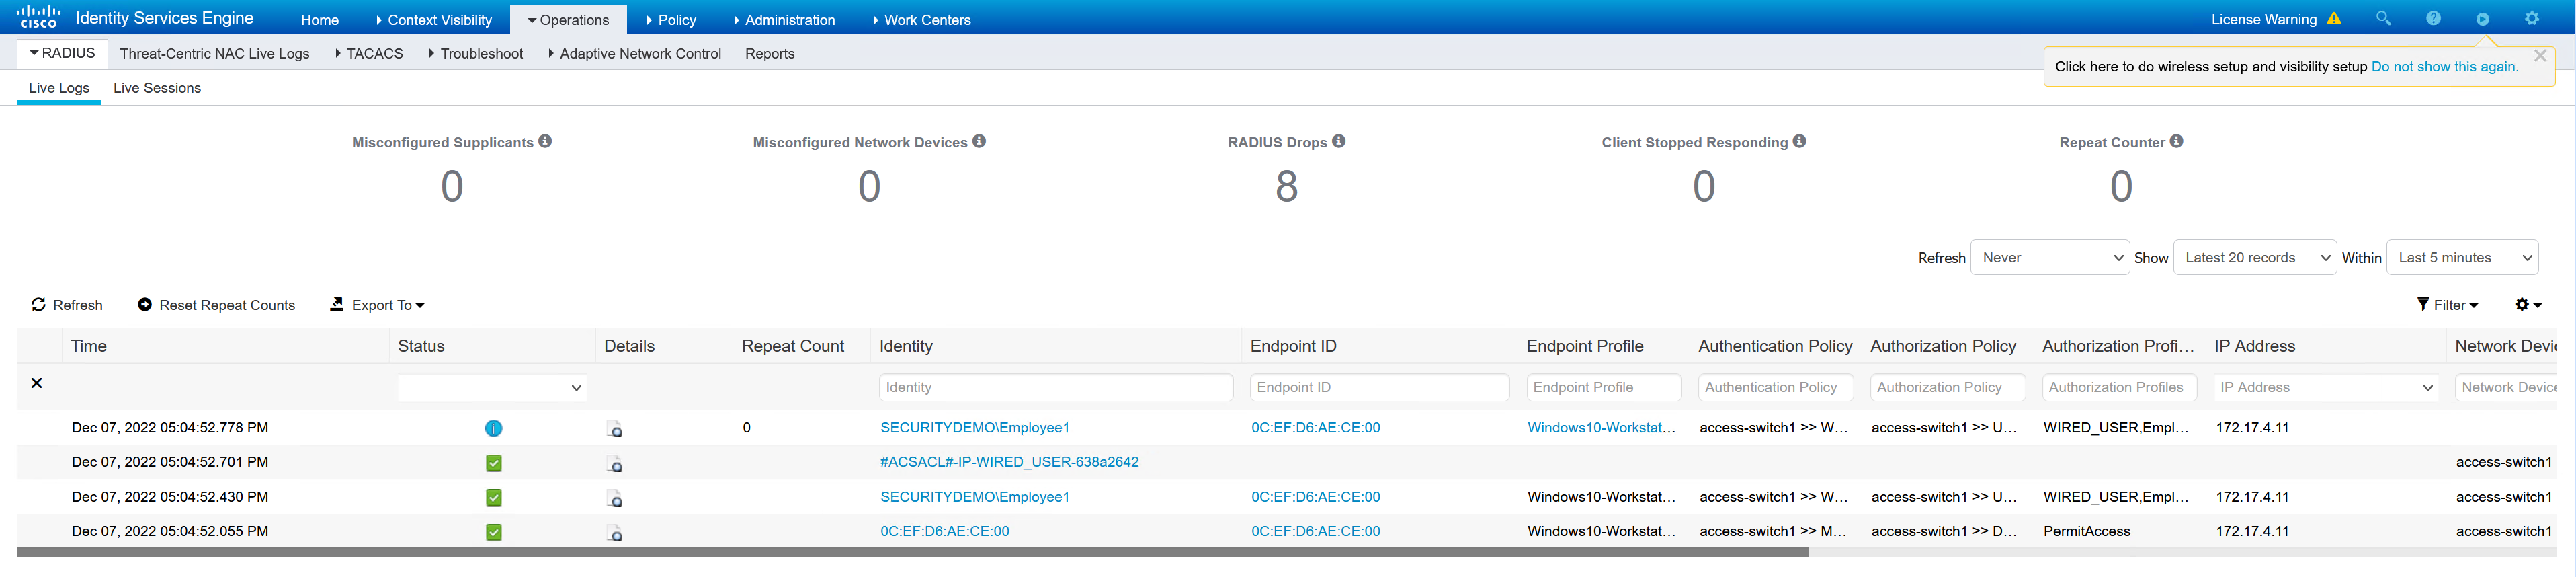
ISE goes through multiple steps to determine the authentication and authorisation of the client.

|
0 1 2 3 4 5 6 7 8 9 10 11 12 13 14 15 16 17 18 19 20 21 22 23 24 25 26 27 28 29 30 31 32 33 34 35 36 37 38 39 40 41 42 43 44 45 46 47 48 49 50 51 52 53 54 55 56 57 58 59 60 61 62 63 64 65 66 67 68 69 70 71 72 73 74 75 76 77 78 79 80 81 82 83 84 85 86 87 88 89 90 91 92 93 94 95 96 97 98 99 100 101 102 103 104 105 106 107 108 109 110 111 112 |
Steps 11001 Received RADIUS Access-Request 11017 RADIUS created a new session 15049 Evaluating Policy Group 15008 Evaluating Service Selection Policy 11507 Extracted EAP-Response/Identity 12500 Prepared EAP-Request proposing EAP-TLS with challenge 12625 Valid EAP-Key-Name attribute received 11006 Returned RADIUS Access-Challenge 11001 Received RADIUS Access-Request 11018 RADIUS is re-using an existing session 12301 Extracted EAP-Response/NAK requesting to use PEAP instead 12300 Prepared EAP-Request proposing PEAP with challenge 12625 Valid EAP-Key-Name attribute received 11006 Returned RADIUS Access-Challenge 11001 Received RADIUS Access-Request 11018 RADIUS is re-using an existing session 12302 Extracted EAP-Response containing PEAP challenge-response and accepting PEAP as negotiated 12318 Successfully negotiated PEAP version 0 12800 Extracted first TLS record; TLS handshake started 12805 Extracted TLS ClientHello message 12806 Prepared TLS ServerHello message 12807 Prepared TLS Certificate message 12808 Prepared TLS ServerKeyExchange message 12810 Prepared TLS ServerDone message 12811 Extracted TLS Certificate message containing client certificate 12305 Prepared EAP-Request with another PEAP challenge 11006 Returned RADIUS Access-Challenge 11001 Received RADIUS Access-Request 11018 RADIUS is re-using an existing session 12304 Extracted EAP-Response containing PEAP challenge-response 12305 Prepared EAP-Request with another PEAP challenge 11006 Returned RADIUS Access-Challenge 11001 Received RADIUS Access-Request 11018 RADIUS is re-using an existing session 12304 Extracted EAP-Response containing PEAP challenge-response 12305 Prepared EAP-Request with another PEAP challenge 11006 Returned RADIUS Access-Challenge 11001 Received RADIUS Access-Request 11018 RADIUS is re-using an existing session 12304 Extracted EAP-Response containing PEAP challenge-response 12318 Successfully negotiated PEAP version 0 12812 Extracted TLS ClientKeyExchange message 12813 Extracted TLS CertificateVerify message 12804 Extracted TLS Finished message 12801 Prepared TLS ChangeCipherSpec message 12802 Prepared TLS Finished message 12816 TLS handshake succeeded 12310 PEAP full handshake finished successfully 12305 Prepared EAP-Request with another PEAP challenge 11006 Returned RADIUS Access-Challenge 11001 Received RADIUS Access-Request 11018 RADIUS is re-using an existing session 12304 Extracted EAP-Response containing PEAP challenge-response 12313 PEAP inner method started 11521 Prepared EAP-Request/Identity for inner EAP method 12305 Prepared EAP-Request with another PEAP challenge 11006 Returned RADIUS Access-Challenge 11001 Received RADIUS Access-Request 11018 RADIUS is re-using an existing session 12304 Extracted EAP-Response containing PEAP challenge-response 11522 Extracted EAP-Response/Identity for inner EAP method 11806 Prepared EAP-Request for inner method proposing EAP-MSCHAP with challenge 12305 Prepared EAP-Request with another PEAP challenge 11006 Returned RADIUS Access-Challenge 11001 Received RADIUS Access-Request 11018 RADIUS is re-using an existing session 12304 Extracted EAP-Response containing PEAP challenge-response 11808 Extracted EAP-Response containing EAP-MSCHAP challenge-response for inner method and accepting EAP-MSCHAP as negotiated 15041 Evaluating Identity Policy 15013 Selected Identity Source - All_AD_Join_Points 24430 Authenticating user against Active Directory - All_AD_Join_Points 24325 Resolving identity - SECURITYDEMO\Employee1 24313 Search for matching accounts at join point - securitydemo.lab 24315 Single matching account found in domain - securitydemo.lab 24323 Identity resolution detected single matching account 24343 RPC Logon request succeeded - Employee1@securitydemo.lab 24402 User authentication against Active Directory succeeded - All_AD_Join_Points 22037 Authentication Passed 11824 EAP-MSCHAP authentication attempt passed 12305 Prepared EAP-Request with another PEAP challenge 11006 Returned RADIUS Access-Challenge 11001 Received RADIUS Access-Request 11018 RADIUS is re-using an existing session 12304 Extracted EAP-Response containing PEAP challenge-response 11810 Extracted EAP-Response for inner method containing MSCHAP challenge-response 11814 Inner EAP-MSCHAP authentication succeeded 11519 Prepared EAP-Success for inner EAP method 12314 PEAP inner method finished successfully 12305 Prepared EAP-Request with another PEAP challenge 11006 Returned RADIUS Access-Challenge 11001 Received RADIUS Access-Request 11018 RADIUS is re-using an existing session 12304 Extracted EAP-Response containing PEAP challenge-response 24715 ISE has not confirmed locally previous successful machine authentication for user in Active Directory 15036 Evaluating Authorization Policy 24209 Looking up Endpoint in Internal Endpoints IDStore - SECURITYDEMO\Employee1 24211 Found Endpoint in Internal Endpoints IDStore 11055 User name change detected for the session. Attributes for the session will be removed from the cache 24432 Looking up user in Active Directory - ad1 24355 LDAP fetch succeeded - securitydemo.lab 24416 User's Groups retrieval from Active Directory succeeded - ad1 15048 Queried PIP - ad1.ExternalGroups 15016 Selected Authorization Profile - WIRED_USER,Employees 11022 Added the dACL specified in the Authorization Profile 15016 Selected Authorization Profile - WIRED_USER,Employees 22081 Max sessions policy passed 22080 New accounting session created in Session cache 12306 PEAP authentication succeeded 11503 Prepared EAP-Success 11002 Returned RADIUS Access-Accept |
Configuration
The configuration is basic and enough to get what is required for ISE to be able to respond to 802.1x authentication requests.
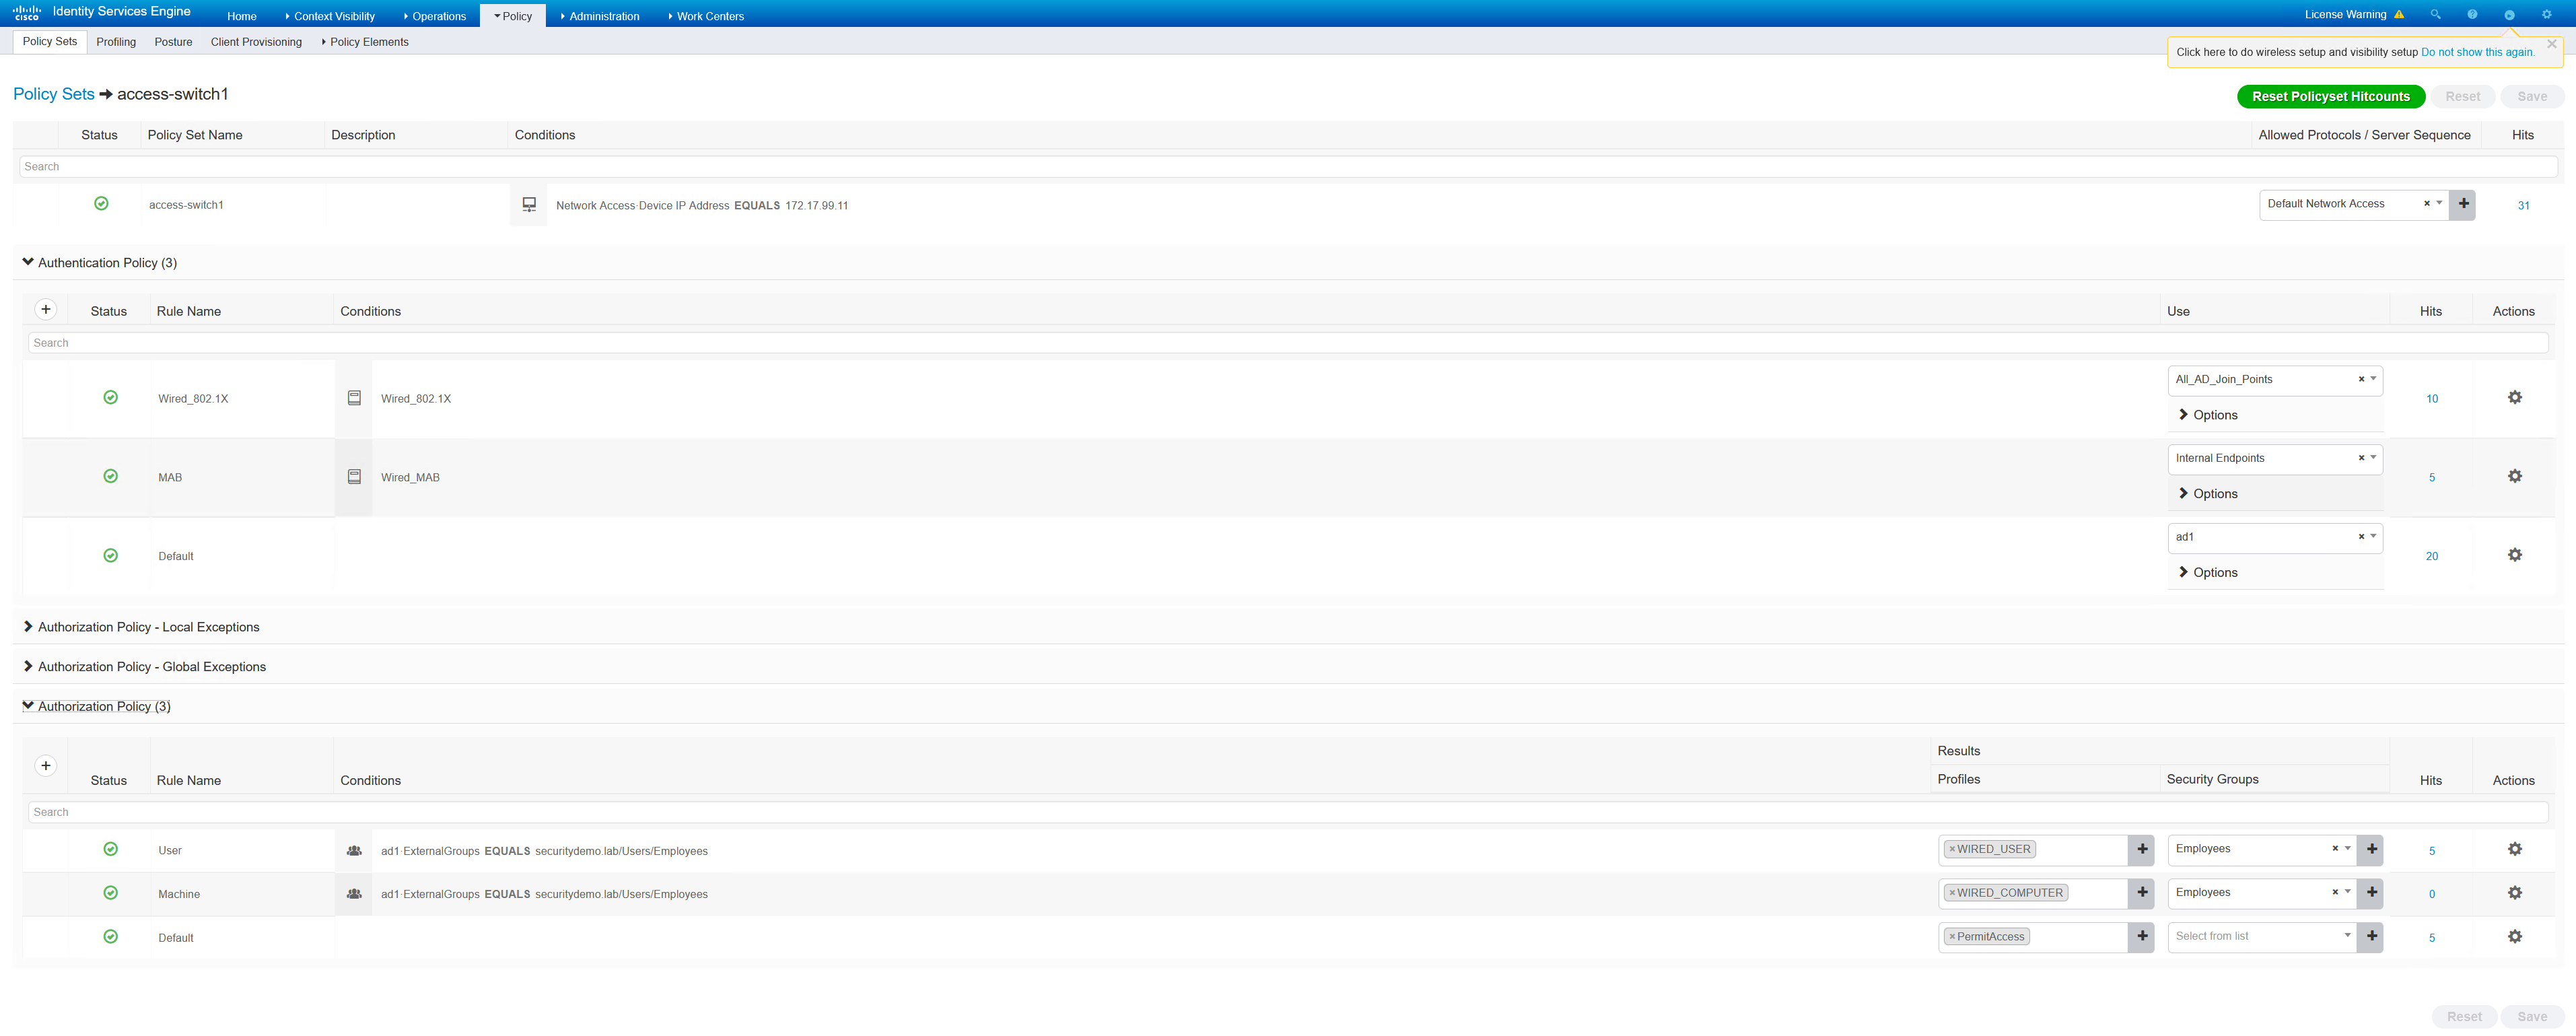
ISE Policy Set Configuration
The ISE policies used in the policy set are quite basic. The conditions for authentication being set to “Wired_802.1x” is very important.
In the authorisation policies, User and Machine are matching on the same condition. Only the profiles are different. Both of the profiles are basic as they are permit IP any any dACLs.
Switch Configuration
There are several parts to the switch config. There is the base config to get it talking to ISE using RADIUS. I have detailed this in a previous post.
What will be explained in this post is the specific config to get dot1x working. This includes the following points;
– Service Policy
– Dot1x global commands
– Interface configuration
The service policy is the most confusing, as Cisco have made changes to how it was originally configured. It was previously configured with a lot of authorisation commands on the interfaces. This did duplicate a lot of lines for each interface, it is now more compact but the syntax and logic needs to be learnt and understood.
Everything is performed from the policy-map. This is what ties the class-maps and access list together. I have configured a basic dot1x policy that will perform the following;
– Try to authenticate with dot1x and MAB
– dot1x is preferred if it is possible
– If there are any frames passed into the switch “restrict” (drop) the traffic
– If there is a supplicant agent found, use 802.1x
– If there is a failure, are the AAA servers down, if so apply ACL to permit ip any any
– If there is a failure in dot1x, terminate that process and use MAB
|
0 1 2 3 4 5 6 7 8 9 10 11 12 13 14 15 16 17 18 19 20 21 22 23 24 25 26 27 28 29 30 31 32 33 |
ip access-list extended PERMIT-ANY permit ip any any service-template CRITICAL description Apply When none of the RADIUS servers are reachable access-group PERMIT-ANY class-map type control subscriber match-any AAA-DOWN match result-type aaa-timeout class-map type control subscriber match-all DOT1X-FAILED match method dot1x match result-type method dot1x authoritative policy-map type control subscriber DOT1X-DEFAULT event session-started match-all 10 class always do-all 10 authenticate using dot1x priority 10 20 authenticate using mab priority 20 event violation match-all 10 class always do-all 10 restrict event agent-found match-all 10 class always do-all 10 authenticate using dot1x event authentication-failure match-all 10 class AAA-DOWN do-all 10 authorize 20 activate service-template CRITICAL 30 terminate dot1x 40 terminate mab 20 class DOT1X-FAILED do-all 10 authenticate using mab |
Dot1x global commands are required
|
0 1 2 3 |
dot1x system-auth-control dot1x critical eapol |
Finally is the switchport configuration
|
0 1 2 3 4 5 6 7 8 9 10 11 12 13 14 15 16 |
interface GigabitEthernet0/1 description DOT1X Enabled Ports switchport access vlan 4 switchport mode access ip access-group DEFAULT-ACL in negotiation auto authentication periodic authentication timer reauthenticate server access-session port-control auto mab dot1x pae authenticator dot1x timeout tx-period 10 spanning-tree portfast edge service-policy type control subscriber DOT1X-DEFAULT end |