
As a Network Engineer, my development workflows are not very disciplined or strong. I mainly use Git as a place to store my completed work, in the form of GitHub. This does work, however, I am missing out on many very useful features that Git version control has to offer and any collaboration with a team larger than just myself.
Here, I am going to outline basic Git usage and GitHub integration. Once these two things are completed, it is nice and easy to use Git in Visual Studio Code.
Quick Command Reference
nformational commands:
|
0 1 2 3 4 5 6 7 |
git status: Shows the current status of the repository, including modified, staged, and untracked files. git branch: Lists all the branches in the repository. git branch -r: Lists remote branches. git branch -a: Lists both local and remote branches. git log: Displays the commit history. git show HEAD: Shows the details of the most recent commit. |
Change commands:
|
0 1 2 3 4 5 6 7 8 9 10 11 12 |
git init: Initializes a new Git repository in the current directory. git add <file>: Adds a specific file to the staging area. git add .: Adds all modified and new files to the staging area. git checkout -b <new_branch>: Creates a new branch and checks it out. git switch -c <new_branch>: Creates a new branch and switches to it (Git 2.23 or higher). git push -u origin: Pushes the current branch to the remote repository and sets it as the upstream branch. git commit -am "first commit": Creates a new commit with the changes in the tracked files and includes a commit message. git merge <branch_name>: Merges the specified branch into the current branch. git rebase <branch_name>: Applies the commits from the specified branch onto the current branch. git revert: Creates a new commit that undoes the changes made in a previous commit. git reset: Moves the branch pointer to a specific commit, discarding subsequent commits (use with caution). |
Note: Some commands, like git add, git commit, git merge, and git reset, require additional arguments or options to work properly.
Basic Git Commands
Git Status
git status is used to display the current git repository status. Nothing here.
|
0 1 2 3 |
stefankelly@Stefans-MacBook-Pro gitTest % git status fatal: not a git repository (or any of the parent directories): .git |
Git Init
git init will initialise a new git repository in that current directory location.
|
0 1 2 3 |
stefankelly@Stefans-MacBook-Pro gitTest % git init Initialized empty Git repository in /Users/stefankelly/Documents/gitTest/.git/ |
Now that a new repository has been created, the git status command can be rerun to see the difference.
|
0 1 2 3 4 5 6 7 |
stefankelly@Stefans-MacBook-Pro gitTest % git status On branch master No commits yet nothing to commit (create/copy files and use "git add" to track) |
The git init command has created a hidden directory .git. This is what Git uses to store all the files that are being tracked. If deleted, all the version control performed has been lost, hence the reason it is hidden.
|
0 1 2 3 |
stefankelly@Stefans-MacBook-Pro gitTest % ls -a . .. .git |
Do not run git init inside a repo that you have already created. Git will be then tracking changes of the original .git directory in the new .git directory. This will eventually cause issues. Use a single git repository per project.
Now that git has been initialised, there are no files for it to keep track of. This is the role of git add and git commit.
I’ll create a new file in my gitTest directory. Git has recognised a new file, but is warning that this is an untracked file and to use git add to track it.
|
0 1 2 3 4 5 6 7 8 9 10 11 12 13 |
stefankelly@Stefans-MacBook-Pro gitTest % touch networkconfig1.cfg stefankelly@Stefans-MacBook-Pro gitTest % stefankelly@Stefans-MacBook-Pro gitTest % git status On branch master No commits yet Untracked files: (use "git add <file>..." to include in what will be committed) networkconfig1.cfg nothing added to commit but untracked files present (use "git add" to track) |
When adding a file to Git, this is a staging area. This is where Git knows about a file or multiple files, but has not tracked any changes made in them yet. If there are ten files in my gitTest directory, I can add as many or a few as required. After they have been added I can use git commit which will start to track the changes made in the files.
I have added multiple new files to the directory, however only added a single file for Git to track.
|
0 1 2 3 4 5 6 7 8 9 10 11 12 13 14 15 16 17 18 |
stefankelly@Stefans-MacBook-Pro gitTest % ls -a . .git bgp1.cfg .. anyconnectvpn1.cfg networkconfig1.cfg stefankelly@Stefans-MacBook-Pro gitTest % git add networkconfig1.cfg stefankelly@Stefans-MacBook-Pro gitTest % git status On branch master No commits yet Changes to be committed: (use "git rm --cached <file>..." to unstage) new file: networkconfig1.cfg Untracked files: (use "git add <file>..." to include in what will be committed) anyconnectvpn1.cfg bgp1.cfg |
Git Add
Multiple files can be added got git add in a single line. The remaining two files will be added to the staging area. Nothing has been committed yet, and therefore not tracked.
|
0 1 2 3 4 5 6 7 8 9 10 11 12 |
stefankelly@Stefans-MacBook-Pro gitTest % git add anyconnectvpn1.cfg bgp1.cfg stefankelly@Stefans-MacBook-Pro gitTest % git status On branch master No commits yet Changes to be committed: (use "git rm --cached <file>..." to unstage) new file: anyconnectvpn1.cfg new file: bgp1.cfg new file: networkconfig1.cfg |
Git Commit
Before any files are committed, it is a good idea to write a message to describe the changes made for the group of files that are being committed. To do this, the command git commit -m "commit message goes here" is used.
The command git commit can be used without any flags, this will then open up the default text editor for the user to enter the commit message. It is easier to use the -m flag.
Committing the files shows the results, three files have changed. It is best practice to keep the commits focussed on specific changes. This can be handled by using git add for only a select number of files that are part of the change you want to commit. This way, the commit message relates to the actual changes that were made. This approach is useful when wanting to go back to earlier versions. Only the work that needs to be undone is undone. This practice is known as Atomic Commits.
|
0 1 2 3 4 5 6 7 |
stefankelly@Stefans-MacBook-Pro gitTest % git commit -m "created new network config files" [master (root-commit) 2d23b3e] created new network config files 3 files changed, 0 insertions(+), 0 deletions(-) create mode 100644 anyconnectvpn1.cfg create mode 100644 bgp1.cfg create mode 100644 networkconfig1.cfg |
git status now shows that there is nothing to do, the files are upto date and committed. The working tree is clean.
|
0 1 2 3 4 |
stefankelly@Stefans-MacBook-Pro gitTest % git status On branch master nothing to commit, working tree clean |
If any of the files were to be modified, then the working tree would not be clean as the file has been changed and Git will be aware. I have added a line to the bgp1.cfg file. git status is now reporting that this file has changed.
|
0 1 2 3 4 5 6 7 8 9 10 11 12 |
stefankelly@Stefans-MacBook-Pro gitTest % echo bgp 65001 > bgp1.cfg stefankelly@Stefans-MacBook-Pro gitTest % cat bgp1.cfg bgp 65001 stefankelly@Stefans-MacBook-Pro gitTest % git status On branch master Changes not staged for commit: (use "git add <file>..." to update what will be committed) (use "git restore <file>..." to discard changes in working directory) modified: bgp1.cfg no changes added to commit (use "git add" and/or "git commit -a") |
This is where the process starts to repeat itself. The changes need to be added to the staging environment, and then committed.
|
0 1 2 3 4 5 6 7 8 9 10 11 12 13 14 |
stefankelly@Stefans-MacBook-Pro gitTest % git add bgp1.cfg stefankelly@Stefans-MacBook-Pro gitTest % git status On branch master Changes to be committed: (use "git restore --staged <file>..." to unstage) modified: bgp1.cfg stefankelly@Stefans-MacBook-Pro gitTest % git commit -m "Added BGP config to file" [master 32e8bf9] Added BGP config to file 1 file changed, 1 insertion(+) stefankelly@Stefans-MacBook-Pro gitTest % git status On branch master nothing to commit, working tree clean |
If there were multiple files that were changed and need to be added, a quick way is to use git add ., this will add all the files in the current directory. It is better to be specific, as maybe you only want to commit files with different messages. That is possible, by specifying the files with git add file1 and then committing them with git commit -m "message for specific files".
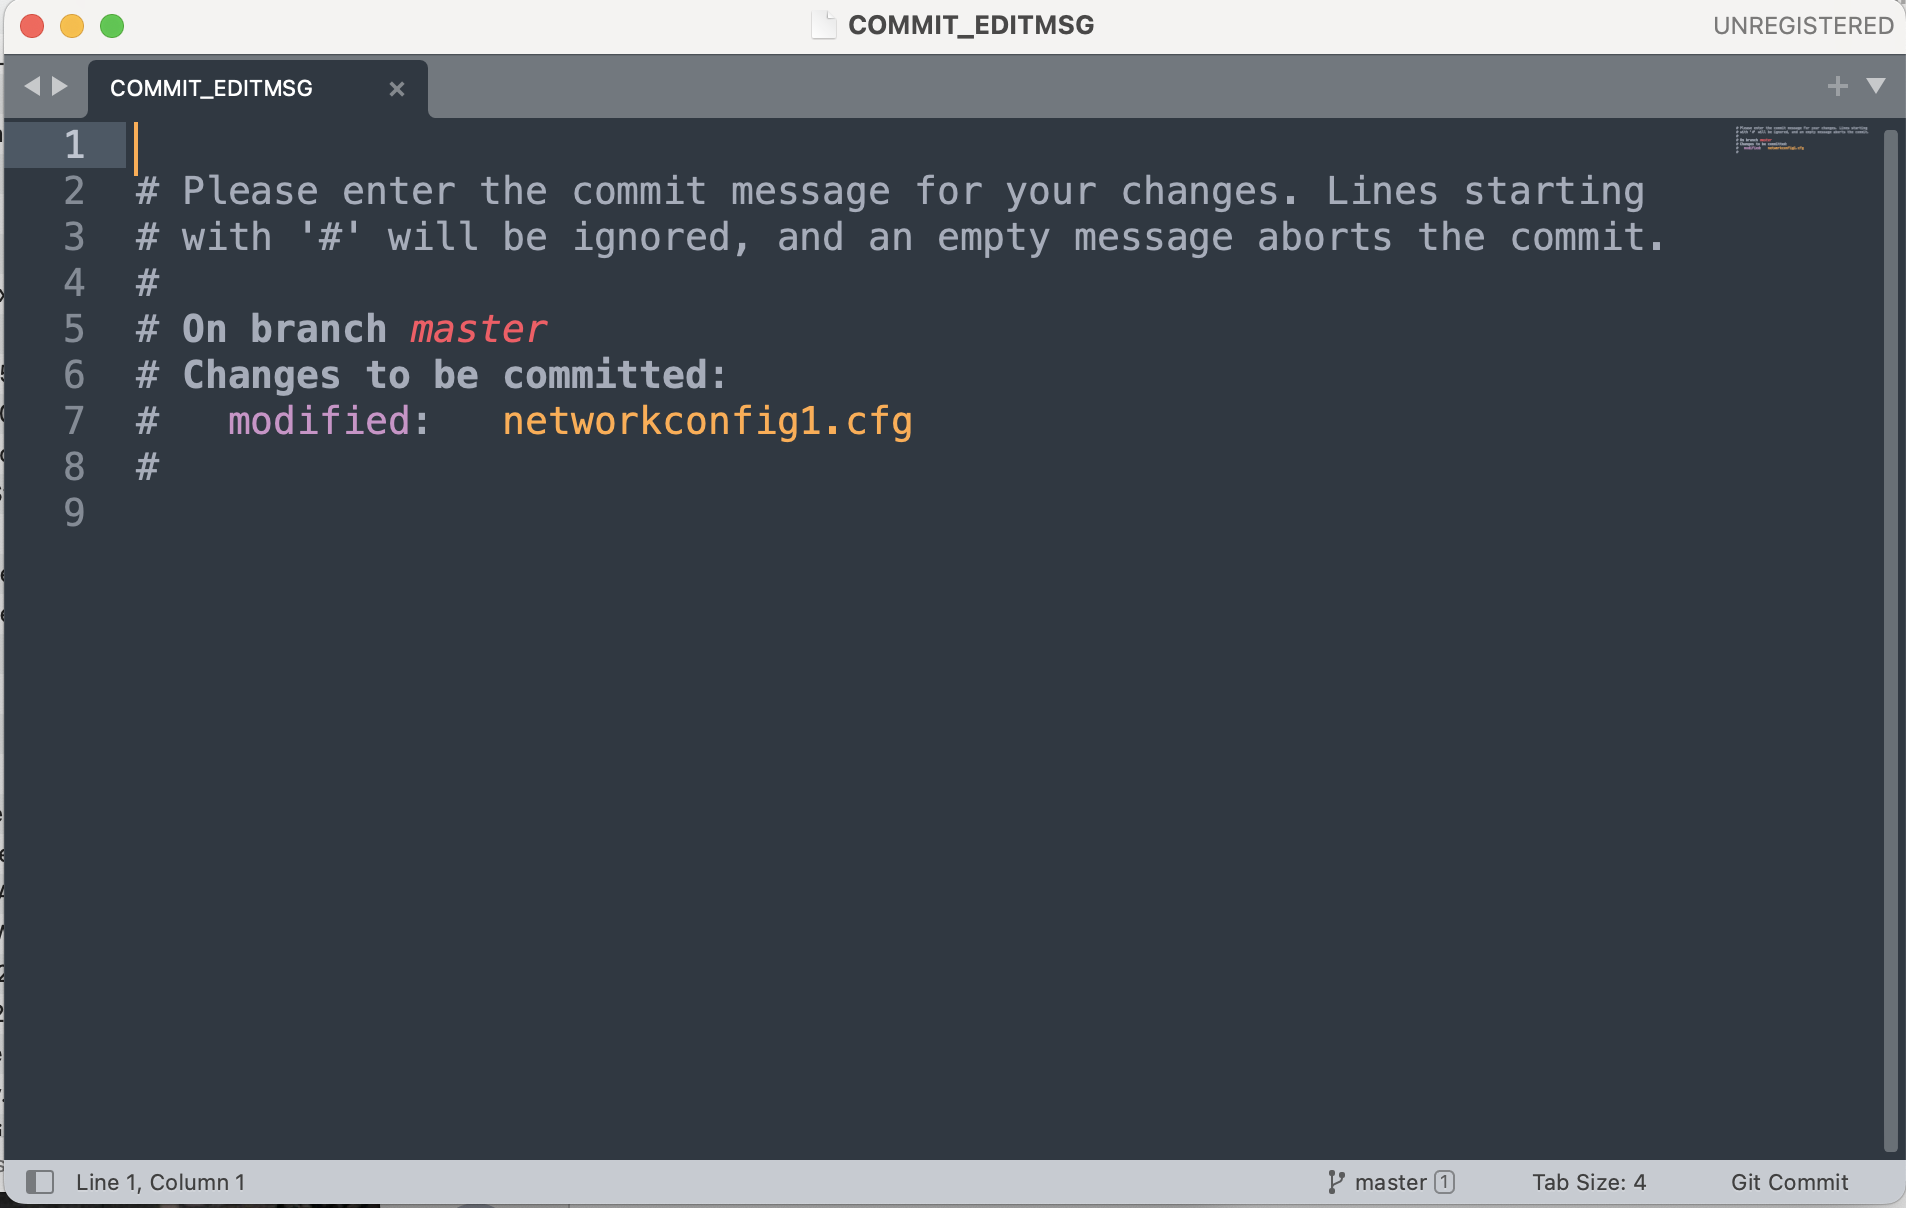
For larger projects, commit messages can be large and detailed. The -m flag makes it difficult to write a long and detailed commit message, or add any sort of formatting to it. This is where using just git commit is useful. git commit will open up the default text editor for Git and allow you to write a message.
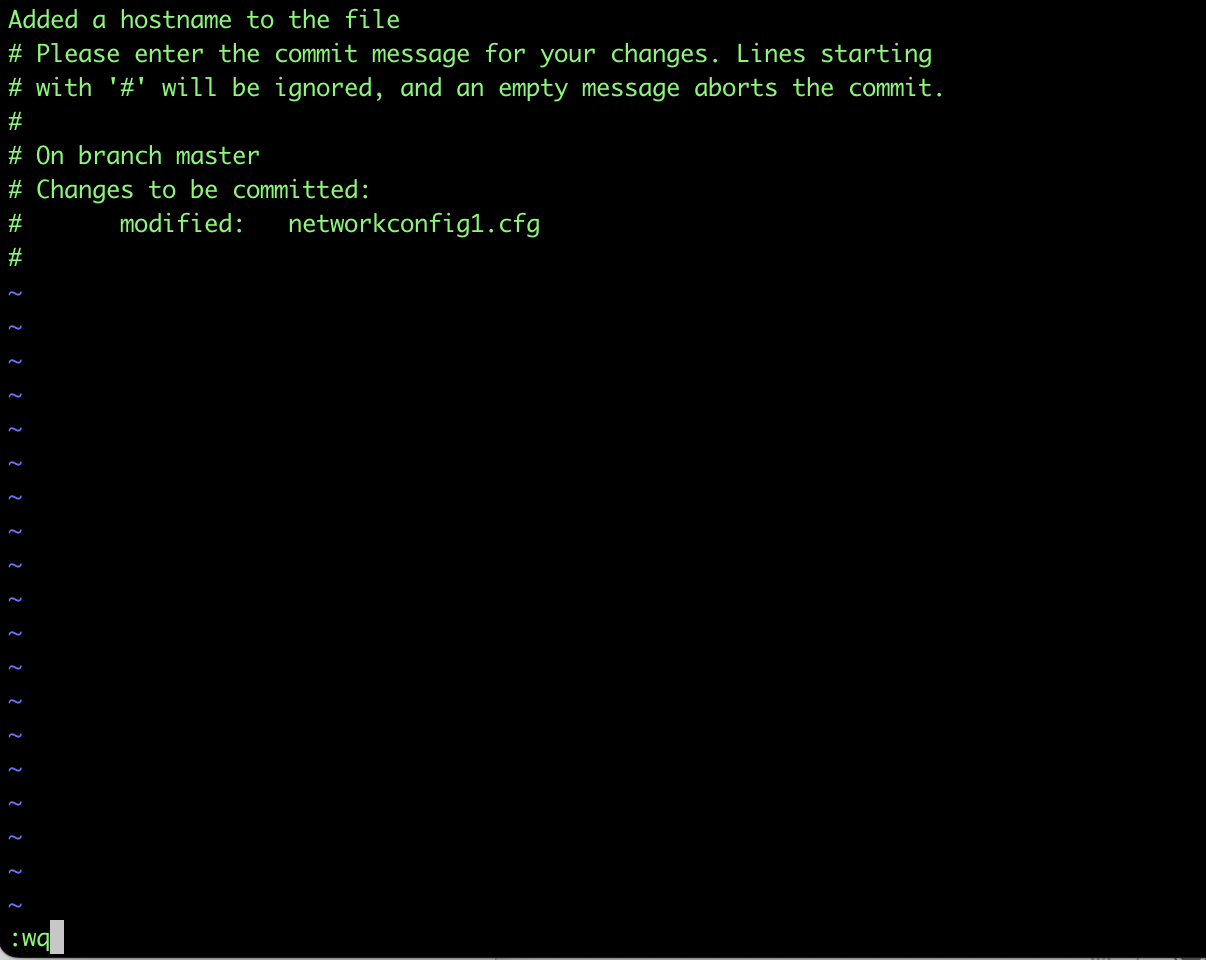
By default, in MacOS the commit message that opens is vi. This can be difficult to use, however it can be changed from default. Git has a reference for multiple different text editors. I will modify this to use Sublime.
|
0 1 2 |
git config --global core.editor "/Applications/Sublime\ Text.app/Contents/SharedSupport/bin/subl --new-window --wait" |
|
0 1 2 3 4 5 6 7 8 9 10 |
stefankelly@Stefans-MacBook-Pro gitTest % git status On branch master Changes to be committed: (use "git restore --staged <file>..." to unstage) modified: networkconfig1.cfg stefankelly@Stefans-MacBook-Pro gitTest % git config --global core.editor "/Applications/Sublime\ Text.app/Contents/SharedSupport/bin/subl --new-window --wait" stefankelly@Stefans-MacBook-Pro gitTest % git commit hint: Waiting for your editor to close the file... |
Git Log
There is a way to view the committed files to Git using git log. This will display the details of the commit such as; the commit hash, author, date, and commit message.
|
0 1 2 3 4 5 6 7 8 9 10 11 12 13 |
stefankelly@Stefans-MacBook-Pro gitTest % git log commit 32e8bf9a25b195043a23abb66442de2430af7cba (HEAD -> master) Author: stefan <stefan@testinggit.co.uk> Date: Mon Jan 23 01:59:24 2023 +0000 Added BGP config to file commit 2d23b3ec7e35fb21b6376ef57251198f6832a6d2 Author: stefan <stefan@testinggit.co.uk> Date: Mon Jan 23 01:48:13 2023 +0000 created new network config files |
The git log output is not exactly user-friendly, and if there is a very large commit message, then it will display a large section of it. This reduces the readability of the log even further. A good way to improve this is to use the --oneline flag.
|
0 1 2 3 4 5 6 7 8 9 10 11 12 13 14 15 16 17 18 19 20 21 22 23 24 25 26 27 28 29 30 31 32 33 34 35 36 37 38 39 40 41 42 43 |
stefankelly@Stefans-MacBook-Pro gitTest % git log commit 342f33a6679faf8a7fa3374f932b9014a1d8bb25 (HEAD -> master) Author: stkel <stefan.kelly@live.co.uk> Date: Mon Jan 23 13:29:12 2023 +0000 This is a long git commit message Git Commit Message Structure There are two main components of a Git commit message: the title or summary, and the description. The commit message title is limited to 72 characters, and the description has no character limit. While those are the established character limits, most developers suggest that the commit message summary be no longer than 50 characters, and the description be limited to 72. Ultimately, the trick to structuring an exceptional commit message is to find the proper balance between brevity and detail. Brief enough that it’s easy to read, but detailed enough that it’s easy to understand. Standardize Git Commit Message Structure When writing commit messages, consistency is key. Whether you’re working solo or collaborating on an open source project with hundreds of contributors, maintaining a consistent style and adhering to the established commit message conventions is of paramount importance. Establishing a standardized commit message structure helps keep your repository clean, legible, and makes it easier for project contributors to understand the purpose behind each commit. If you’re working on a team, a project lead should communicate the expected commit message guidelines. Most open source projects have instructions in their documentation on commit message best practices. If you’re unable to find clear documentation, you can always take a look at the commit history and model your messages based on past commits. Admittedly, following a standardized commit message can feel tedious at times, but taking the time to construct a thoughtfu l message now will not only save you time in the long run during code reviews or project audits, it’s a simple way to distinguish yourself from your peers, and is much appreciated by project managers. ProTip: Some teams include a special character like * in their commit message summaries to indicate that there is more information written in the commit message description. commit 486c170c2ed7f111114871241369cc362e920c57 Author: stkel <stefan.kelly@live.co.uk> Date: Mon Jan 23 13:07:15 2023 +0000 Aded hostname commit 32e8bf9a25b195043a23abb66442de2430af7cba Author: stkel <stefan.kelly@live.co.uk> Date: Mon Jan 23 01:59:24 2023 +0000 Added BGP config to file commit 2d23b3ec7e35fb21b6376ef57251198f6832a6d2 Author: stkel <stefan.kelly@live.co.uk> Date: Mon Jan 23 01:48:13 2023 +0000 created new network config files (END) |
|
0 1 2 3 4 5 6 |
stefankelly@Stefans-MacBook-Pro gitTest % git log --oneline 342f33a (HEAD -> master) This is a long git commit message Git Commit Message Structure 486c170 Aded hostname 32e8bf9 Added BGP config to file 2d23b3e created new network config files |
Amending Commits
If any mistakes were made in the git commit message or files were not added using git add and then committed, this can be fixed using git amend.
Below I have made changes to all three .cfg files, however only added and then committed two of them. But I want to add the third file anyconnectvpn1.cfg using the same commit.
|
0 1 2 3 4 5 6 7 8 9 |
stefankelly@Stefans-MacBook-Pro gitTest % echo changes to networkconfig1.cfg > networkconfig1.cfg stefankelly@Stefans-MacBook-Pro gitTest % echo changes to bgp1.cfg > bgp1.cfg stefankelly@Stefans-MacBook-Pro gitTest % echo changes to anyconnectvpn1.cfg > anyconnectvpn1.cfg stefankelly@Stefans-MacBook-Pro gitTest % git add networkconfig1.cfg bgp1.cfg stefankelly@Stefans-MacBook-Pro gitTest % git commit -m "added new config line" [master de2532c] added new config line 2 files changed, 2 insertions(+), 2 deletions(-) stefankelly@Stefans-MacBook-Pro gitTest % |
This method will only work for the last commit. If nothing else has been committed, then it’s OK.
The forgotten file anyconnectvpn1.cfg
|
0 1 2 3 4 5 6 7 8 9 |
stefankelly@Stefans-MacBook-Pro gitTest % git status On branch master Changes not staged for commit: (use "git add <file>..." to update what will be committed) (use "git restore <file>..." to discard changes in working directory) modified: anyconnectvpn1.cfg no changes added to commit (use "git add" and/or "git commit -a") |
Using git commit --amend has opened the last commit file in the text editor, which is Sublime for me. Here is where any mistakes made in the last commit message can be fixed and for this example the file anyconnectvpn1.cfg will be committed.
|
0 1 2 3 4 |
stefankelly@Stefans-MacBook-Pro gitTest % git add anyconnectvpn1.cfg stefankelly@Stefans-MacBook-Pro gitTest % git commit --amend hint: Waiting for your editor to close the file... |
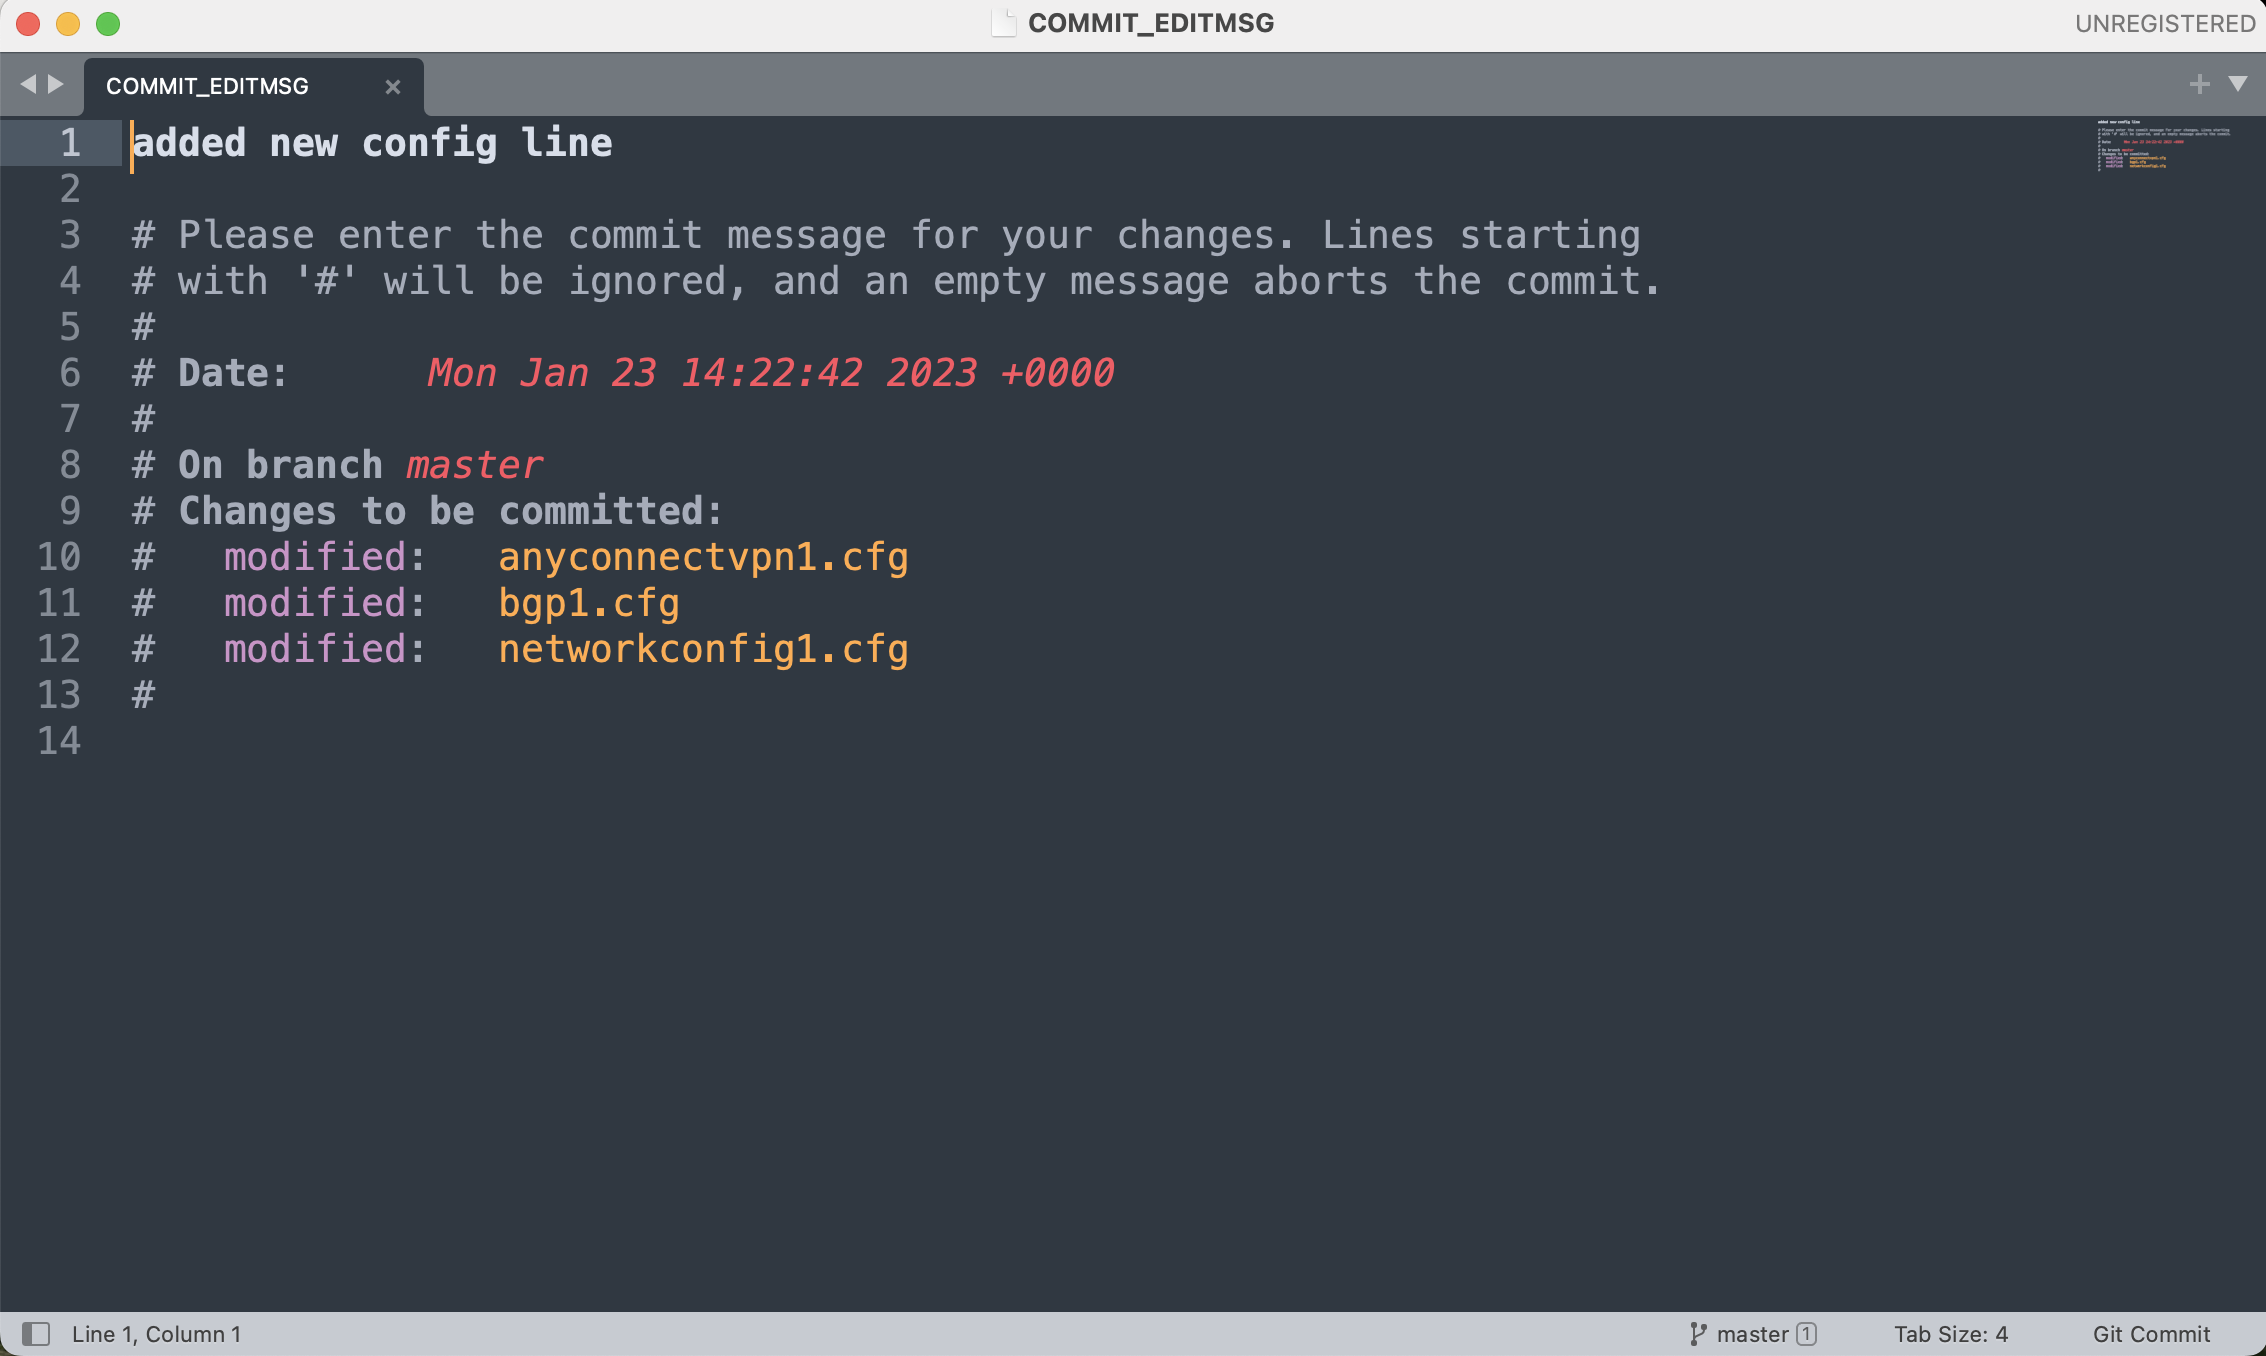
After saving the commit file, Git has added in the file to the same commit it was missed off before. This can be reviewed in the log using git log -oneline to view the commit messages.
|
0 1 2 3 4 5 6 7 8 9 10 11 12 13 14 15 16 17 |
stefankelly@Stefans-MacBook-Pro gitTest % git add anyconnectvpn1.cfg stefankelly@Stefans-MacBook-Pro gitTest % git commit --amend [master 265784f] added new config line Date: Mon Jan 23 14:22:42 2023 +0000 3 files changed, 3 insertions(+), 2 deletions(-) stefankelly@Stefans-MacBook-Pro gitTest % stefankelly@Stefans-MacBook-Pro gitTest % git status On branch master nothing to commit, working tree clean stefankelly@Stefans-MacBook-Pro gitTest % stefankelly@Stefans-MacBook-Pro gitTest % git log --oneline 265784f (HEAD -> master) added new config line 342f33a This is a long git commit message Git Commit Message Structure 486c170 Aded hostname 32e8bf9 Added BGP config to file 2d23b3e created new network config files |
Git Ignore
This is a hidden file created by the user and added to the repository root, it will contain a list of files that are not to be tracked by Git. The list of files could be sensitive files such as API keys, credentials, or it could be output files such as logs from the application or script, or it could even be dependencies or packages that the application created is using. Anything that is either sensitive, not applicable or can easily be recreated. Even entire directories can be ignored and not just specific files.
|
0 1 2 3 4 5 6 7 8 9 10 11 12 13 14 15 16 17 18 19 |
stefankelly@Stefans-MacBook-Pro gitTest % vi .gitignore stefankelly@Stefans-MacBook-Pro gitTest % cat .gitignore credentials.txt stefankelly@Stefans-MacBook-Pro gitTest % git status On branch master Untracked files: (use "git add <file>..." to include in what will be committed) .gitignore nothing added to commit but untracked files present (use "git add" to track) stefankelly@Stefans-MacBook-Pro gitTest % git add .gitignore stefankelly@Stefans-MacBook-Pro gitTest % git commit -m "add .gitignore" [master 466e0fa] add .gitignore 1 file changed, 1 insertion(+) create mode 100644 .gitignore stefankelly@Stefans-MacBook-Pro gitTest % git status On branch master nothing to commit, working tree clean |
Branches
Every Git repository has a master branch by default. A new branch can be added as an alternative timeline without impacting other branches. Branches are used to work on an aspect of the project without impacting the current code base. This could be to add a new feature or a fix a bug. The separate branches can be merged back into the master branch. So a bug can be fixed in a separate branch and then merged back in to the master branch.
There can be multiple branches of work going on at the same time without any impacting the other.
In git log there is a line specifying (HEAD -> master). Head is always referring to the latest commit on the branch that you are looking at. So switching from the master branch to a different user’s branch, HEAD would be pointing to that user’s branches latest commit.
To view the branches, use the command git branches. If there were more branches, the * would point tot the one currently in use.
|
0 1 2 3 |
stefankelly@Stefans-MacBook-Pro gitTest % git branch * master |
I have created a new branch with the git branch command. This will only create the branch and not switch to it.
|
0 1 2 3 4 5 6 7 8 9 |
stefankelly@Stefans-MacBook-Pro gitTest % git branch bugfix stefankelly@Stefans-MacBook-Pro gitTest % git branches git: 'branches' is not a git command. See 'git --help'. stefankelly@Stefans-MacBook-Pro gitTest % stefankelly@Stefans-MacBook-Pro gitTest % stefankelly@Stefans-MacBook-Pro gitTest % git branch bugfix * master |
Right now both branches, the master and the bugfix branch are pointing to the same last commit, this can be seen in git log --oneline.
|
0 1 2 3 4 5 6 7 8 |
stefankelly@Stefans-MacBook-Pro gitTest % git log --oneline 466e0fa (HEAD -> master, bugfix) add .gitignore 265784f added new config line 342f33a This is a long git commit message Git Commit Message Structure 486c170 Aded hostname 32e8bf9 Added BGP config to file 2d23b3e created new network config files |
To switch into the new branch git switch <branch-name> is used. Here it shows that the commits are the same for each branch.
|
0 1 2 3 4 5 6 7 8 9 10 11 12 13 |
stefankelly@Stefans-MacBook-Pro gitTest % git switch bugfix Switched to branch 'bugfix' stefankelly@Stefans-MacBook-Pro gitTest % git status On branch bugfix nothing to commit, working tree clean stefankelly@Stefans-MacBook-Pro gitTest % git log --oneline 466e0fa (HEAD -> bugfix, master) add .gitignore 265784f added new config line 342f33a This is a long git commit message Git Commit Message Structure 486c170 Aded hostname 32e8bf9 Added BGP config to file 2d23b3e created new network config files |
Next I will add some more lines to the networkconfig1.cfg file and commit this file. This new change that has added in a default route will only be available for the bugfix branch.
The git log --oneline shows the commits where the bugfix and the master branches are upto. If a new branch was to be created, from either the master or the bugfix the log would show another branch and that would be shown as commits were made.
|
0 1 2 3 4 5 6 7 8 9 10 11 12 13 14 15 16 17 18 19 20 21 22 23 24 25 |
stefankelly@Stefans-MacBook-Pro gitTest % echo ip route 0 0 10.10.10.1 > networkconfig1.cfg stefankelly@Stefans-MacBook-Pro gitTest % git status On branch bugfix Changes not staged for commit: (use "git add <file>..." to update what will be committed) (use "git restore <file>..." to discard changes in working directory) modified: networkconfig1.cfg no changes added to commit (use "git add" and/or "git commit -a") stefankelly@Stefans-MacBook-Pro gitTest % git add networkconfig1.cfg stefankelly@Stefans-MacBook-Pro gitTest % git commit -m "added default route" [bugfix 5b98e11] added default route 1 file changed, 1 insertion(+), 1 deletion(-) stefankelly@Stefans-MacBook-Pro gitTest % git status On branch bugfix nothing to commit, working tree clean stefankelly@Stefans-MacBook-Pro gitTest % git log --oneline 5b98e11 (HEAD -> bugfix) added default route 466e0fa (master) add .gitignore 265784f added new config line 342f33a This is a long git commit message Git Commit Message Structure 486c170 Aded hostname 32e8bf9 Added BGP config to file 2d23b3e created new network config files |
When switching from branch to branch, the file will be updated with those changes made in the branch.
|
0 1 2 3 4 5 6 7 8 9 10 11 |
stefankelly@Stefans-MacBook-Pro gitTest % git switch master Switched to branch 'master' stefankelly@Stefans-MacBook-Pro gitTest % cat networkconfig1.cfg changes to networkconfig1.cfg stefankelly@Stefans-MacBook-Pro gitTest % git switch bugfix Switched to branch 'bugfix' stefankelly@Stefans-MacBook-Pro gitTest % cat networkconfig1.cfg ip route 0 0 10.10.10.1 stefankelly@Stefans-MacBook-Pro gitTest % |
git switch can will only create the new branch, but not switch into it. To switch into the new branch when creating use git switch -c
|
0 1 2 3 4 5 6 |
stefankelly@Stefans-MacBook-Pro gitTest % git status On branch bugfix nothing to commit, working tree clean stefankelly@Stefans-MacBook-Pro gitTest % git switch -c newfeature Switched to a new branch 'newfeature' |
Switching branches with changes that have not yet been committed will result in an error message. There is an option to use git stash that will save what is half completed work. Documentation can be found here.
Git Checkout vs Git Switch
git switch is the newer way to switch between branches, the older method was git checkout. The checkout command does more than just switch between branches, hence the reason to create a new command only for switching between branches. Any documentation that references git checkout the new command git switch can be used.
Deleting and Renaming Branches
Deleting a branch. In this example, I have created a new branch called deleteMe, git switch -c deleteMe.
Unable to delete when on the branch deleteMe
|
0 1 2 3 4 5 6 |
stefankelly@Stefans-MacBook-Pro gitTest % git switch -c deleteMe Switched to a new branch 'deleteMe' stefankelly@Stefans-MacBook-Pro gitTest % git branch -d deleteMe error: Cannot delete branch 'deleteMe' checked out at '/Users/stefankelly/Documents/gitTest' |
Move to the Master branch, and delete again. However, this time it complains that the deleteMe branch is not fully merged. This is because for the new branch deleteMe, nothing has been committed. To delete, the uppercase D flag must be used, as the error message advises.
|
0 1 2 3 4 |
stefankelly@Stefans-MacBook-Pro gitTest % git branch -d deleteMe error: The branch 'deleteMe' is not fully merged. If you are sure you want to delete it, run 'git branch -D deleteMe'. |
|
0 1 2 3 4 5 6 7 |
stefankelly@Stefans-MacBook-Pro gitTest % git branch -D deleteMe Deleted branch deleteMe (was 5b98e11). stefankelly@Stefans-MacBook-Pro gitTest % git branch bugfix * master newfeature |
To rename a branch, the flag is similar to the Linux command to rename something using the move mv command. In Git, the -m flag is used. To rename you must be on the branch, unlike to delete where you cannot be on the branch.
|
0 1 2 3 4 5 6 7 8 9 |
stefankelly@Stefans-MacBook-Pro gitTest % git switch -c renameMe Switched to a new branch 'renameMe' stefankelly@Stefans-MacBook-Pro gitTest % git branch -m renamed stefankelly@Stefans-MacBook-Pro gitTest % git branch bugfix master newfeature * renamed |
Merging Branches
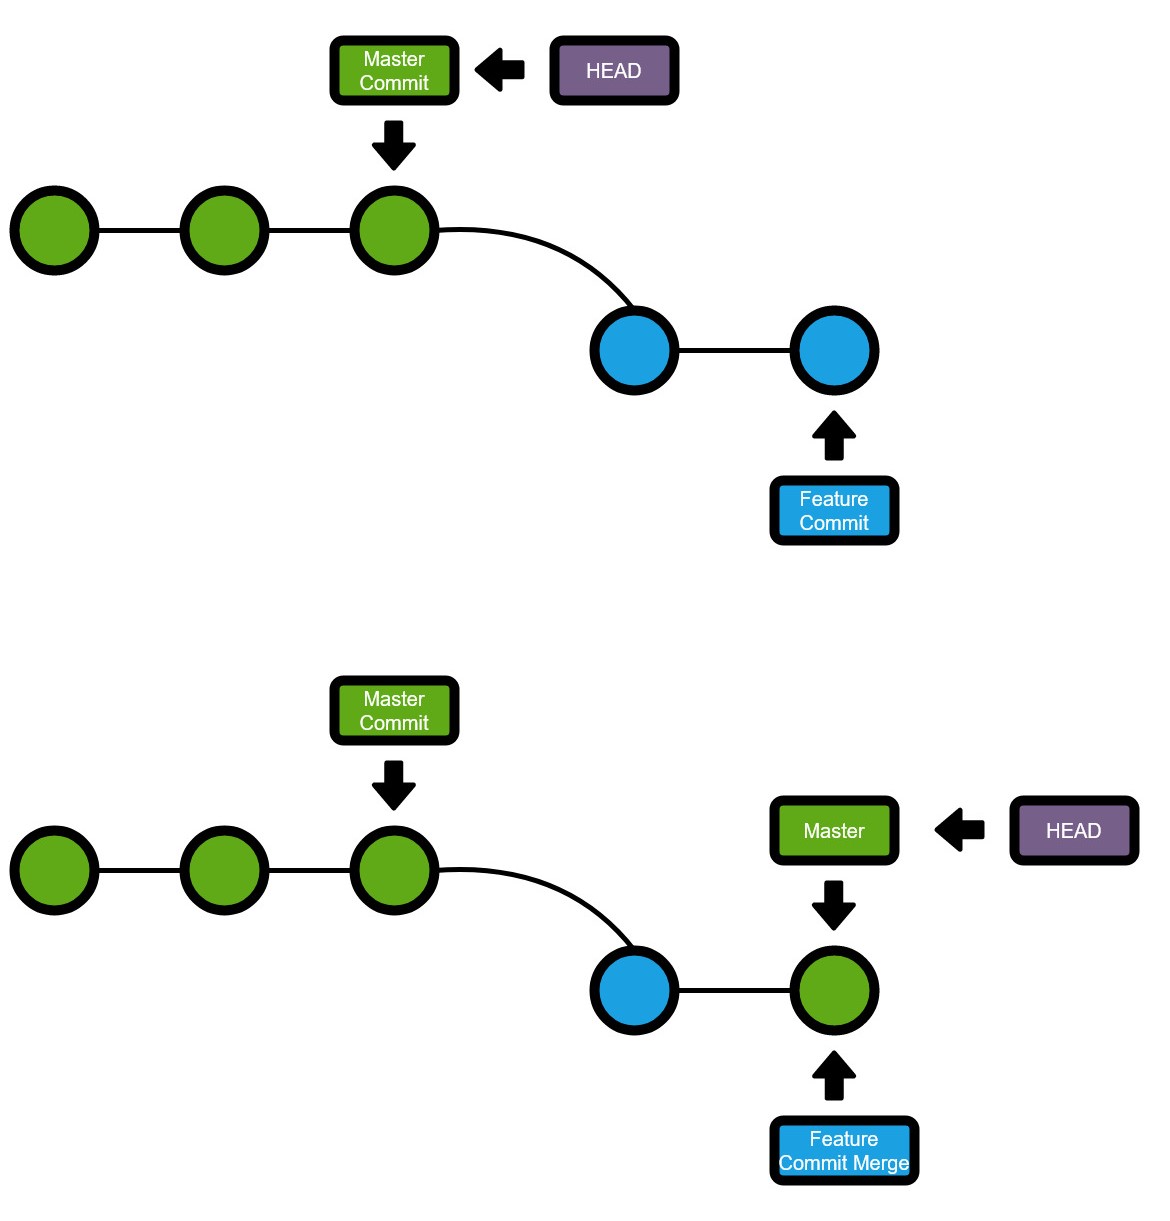
Before going into the specifics of how to merge a branch, I think it is important to understand how it is used. The Master branch should be the branch with the working and most upto date version on it. Any new features or fixes should be separate branches. When these new features are complete or the bugs fixed, these branches are merged back to the Master branch, adding new completed work to it. This is a simplified version, but it helps get things straight as to how branches can be used. This is knows as a fast-forward merge.
To perform a merge from newfeature to Master switch into Master and run git merge newfeature. This will move the latest Master commit to reference the latest newfeature commit.
There are issues with merging when work has continued on the Master branch while the newfeature branch was being worked on. So in this case, say a bug was found in the Master just after the newfeature branch had been added. A third branch was created called bugfix, this work was completed and merged back to Master before the newfeature was completed. Leaving the original bug still inside the newfeature branches code.
Merge Types – Fast Forward
A fast-forward merge is the most common type of merge and very simple. This occurs when both the master and feature branch has the same commit history.
For example, say the master branch has had 7 commits. A new feature branch has been created, this branch has had some changes. The new feature branch is then to be merged into the master branch. The commit history of both the master and feature branches are the same, except for the new commit on the feature branch. All that will happen is the marker for the master branch is moved upto include the feature branch. The marker moves forward, hence fast-forward.
|
0 1 2 3 4 5 6 |
stefankelly@Stefans-MacBook-Pro gitTest % git merge newfeature Updating 466e0fa..5b98e11 Fast-forward networkconfig1.cfg | 2 +- 1 file changed, 1 insertion(+), 1 deletion(-) |
Merge Types – Merge Commit No Conflicts
This type of merge has two or more parent commits from different branches. There won’t be any merge conflicts and Git can still automatically merge the branches.
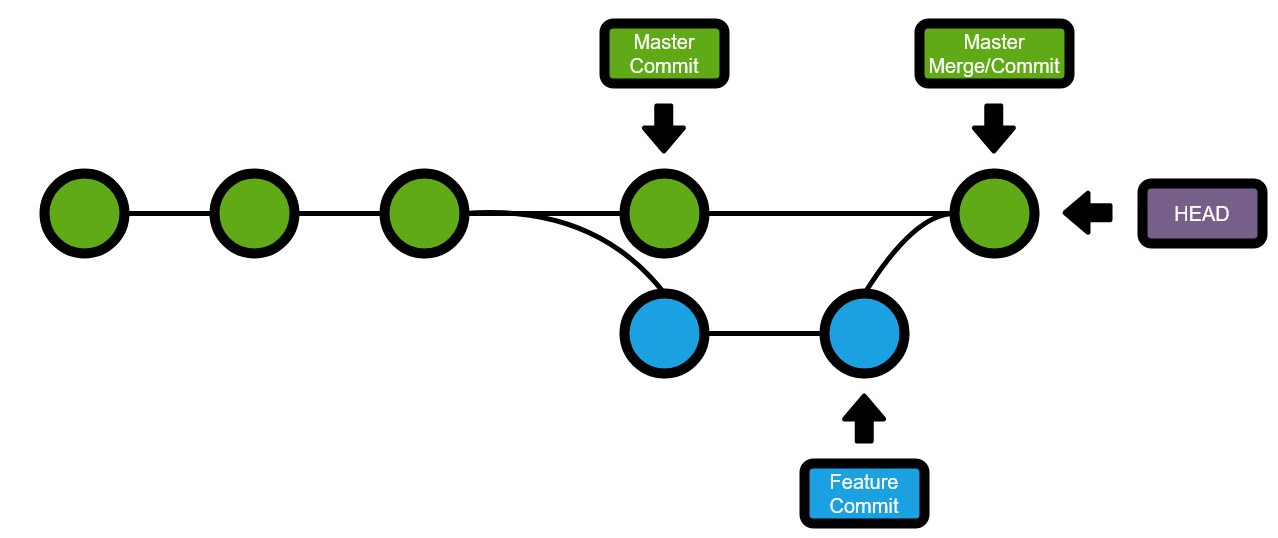
In the diagram below, there are two branches, Master and Feature. Feature is a branch from Master, but since the Feature branch was created, there have been other commits to the Master branch. In this example, there won’t be any conflicts which would mean changes to the same line. This will be additional lines or files.
|
0 1 2 3 4 5 6 7 8 9 10 11 12 13 14 15 16 17 18 19 20 |
stefankelly@Stefans-MacBook-Pro gitTest % git switch newfeature Switched to branch 'newfeature' stefankelly@Stefans-MacBook-Pro gitTest % git commit -am "added 172.16.0.0/24 to networkconfig1. cfg" [newfeature bdfd722] added 172.16.0.0/24 to networkconfig1.cfg 1 file changed, 1 insertion(+) stefankelly@Stefans-MacBook-Pro gitTest % git switch master Switched to branch 'master' stefankelly@Stefans-MacBook-Pro gitTest % git commit -am "adding change to bgp1.cfg" [master 125ea4e] adding change to bgp1.cfg 1 file changed, 1 insertion(+) stefankelly@Stefans-MacBook-Pro gitTest % git merge newfeature Merge made by the 'recursive' strategy. networkconfig1.cfg | 1 + 1 file changed, 1 insertion(+) |
Merge Types – Merge Commit Conflicts
Git will try to automatically merge branches, and in the previous examples it has been able to do that. If there is a conflict, Git won’t know what to and won’t merge automatically. A conflict will be something like changes to the same line of the same file in the branches being merged. Or the deletion of a file on one branch but additional changes to that same file on another.
Git will recognise the conflict and will ask the user what to do.
Git will have a file containing conflict markers that show where the conflicts are and in which branches. All the user needs to do is delete what they don’t want and delete the conflict markers and save. The tree of the commits/merges will look the same as the previous diagram.
|
0 1 2 3 4 5 6 7 8 9 10 11 12 13 14 15 16 17 |
stefankelly@Stefans-MacBook-Pro gitTest % git commit -am "deleted line2 in bgp1.cfg" [newfeature 1659e03] deleted line2 in bgp1.cfg 1 file changed, 1 insertion(+), 2 deletions(-) stefankelly@Stefans-MacBook-Pro gitTest % git switch master Switched to branch 'master' stefankelly@Stefans-MacBook-Pro gitTest % git commit -am "updated line2 in bgp1.cfg" [master 9e2e0ae] updated line2 in bgp1.cfg 1 file changed, 1 insertion(+), 1 deletion(-) tefankelly@Stefans-MacBook-Pro gitTest % git merge newfeature -m "merging newfeature to master" Auto-merging bgp1.cfg CONFLICT (content): Merge conflict in bgp1.cfg Automatic merge failed; fix conflicts and then commit the result. |
In VSCode the merge conflict message has been displayed and the file to manually amend are shown.
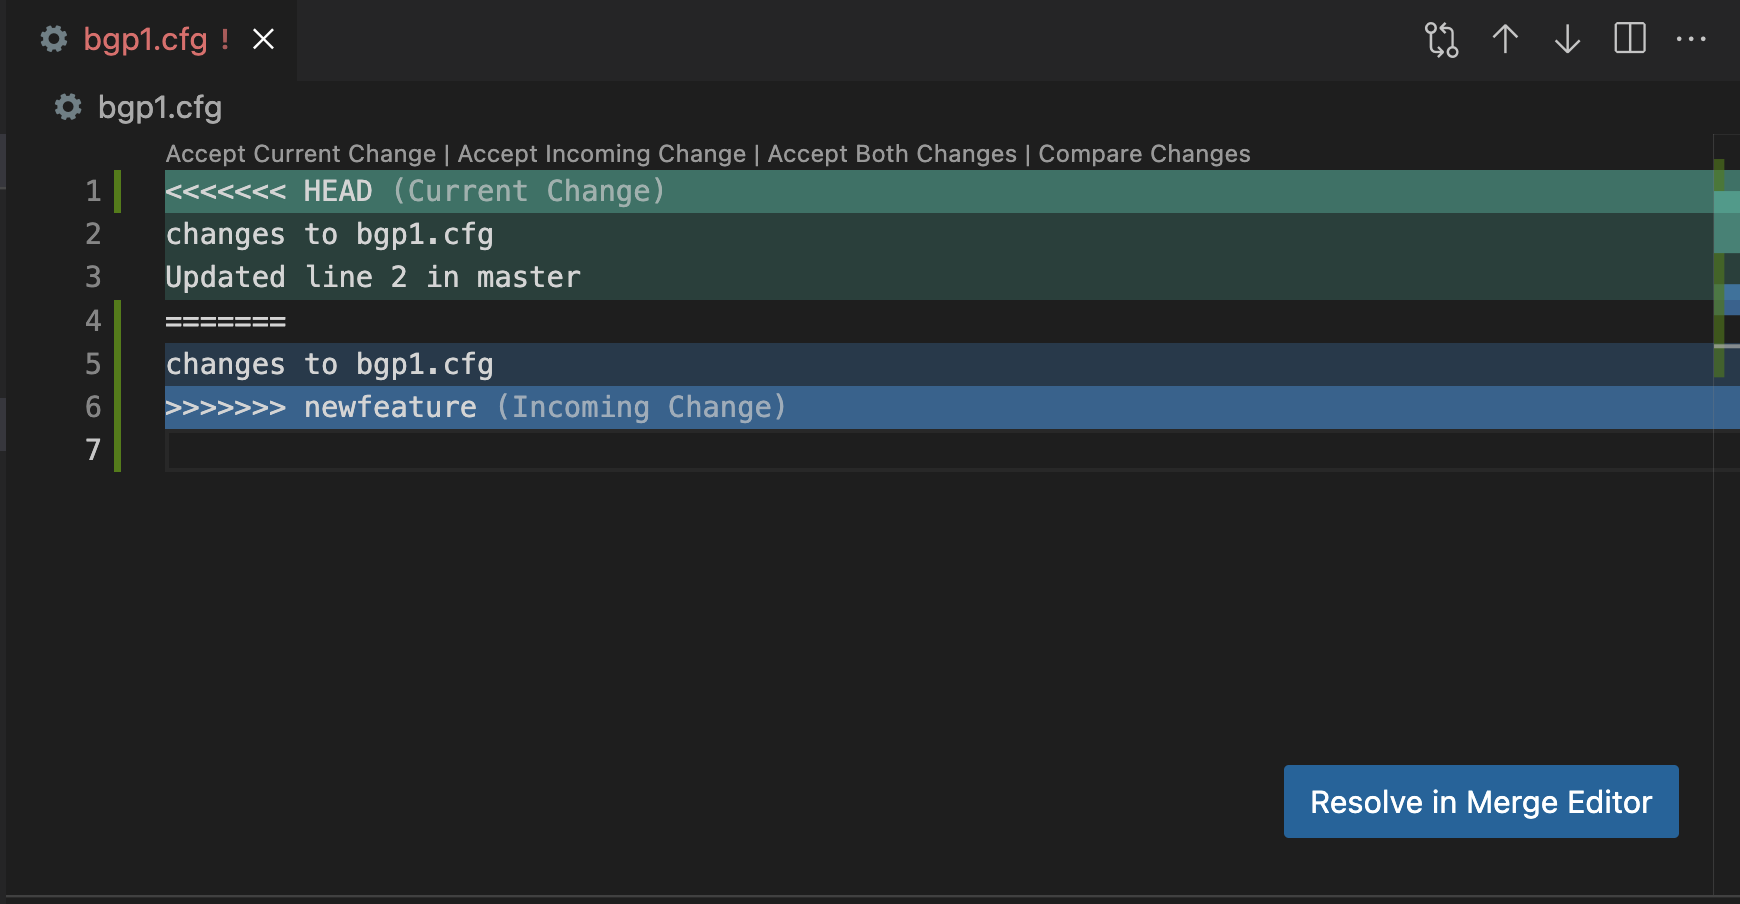
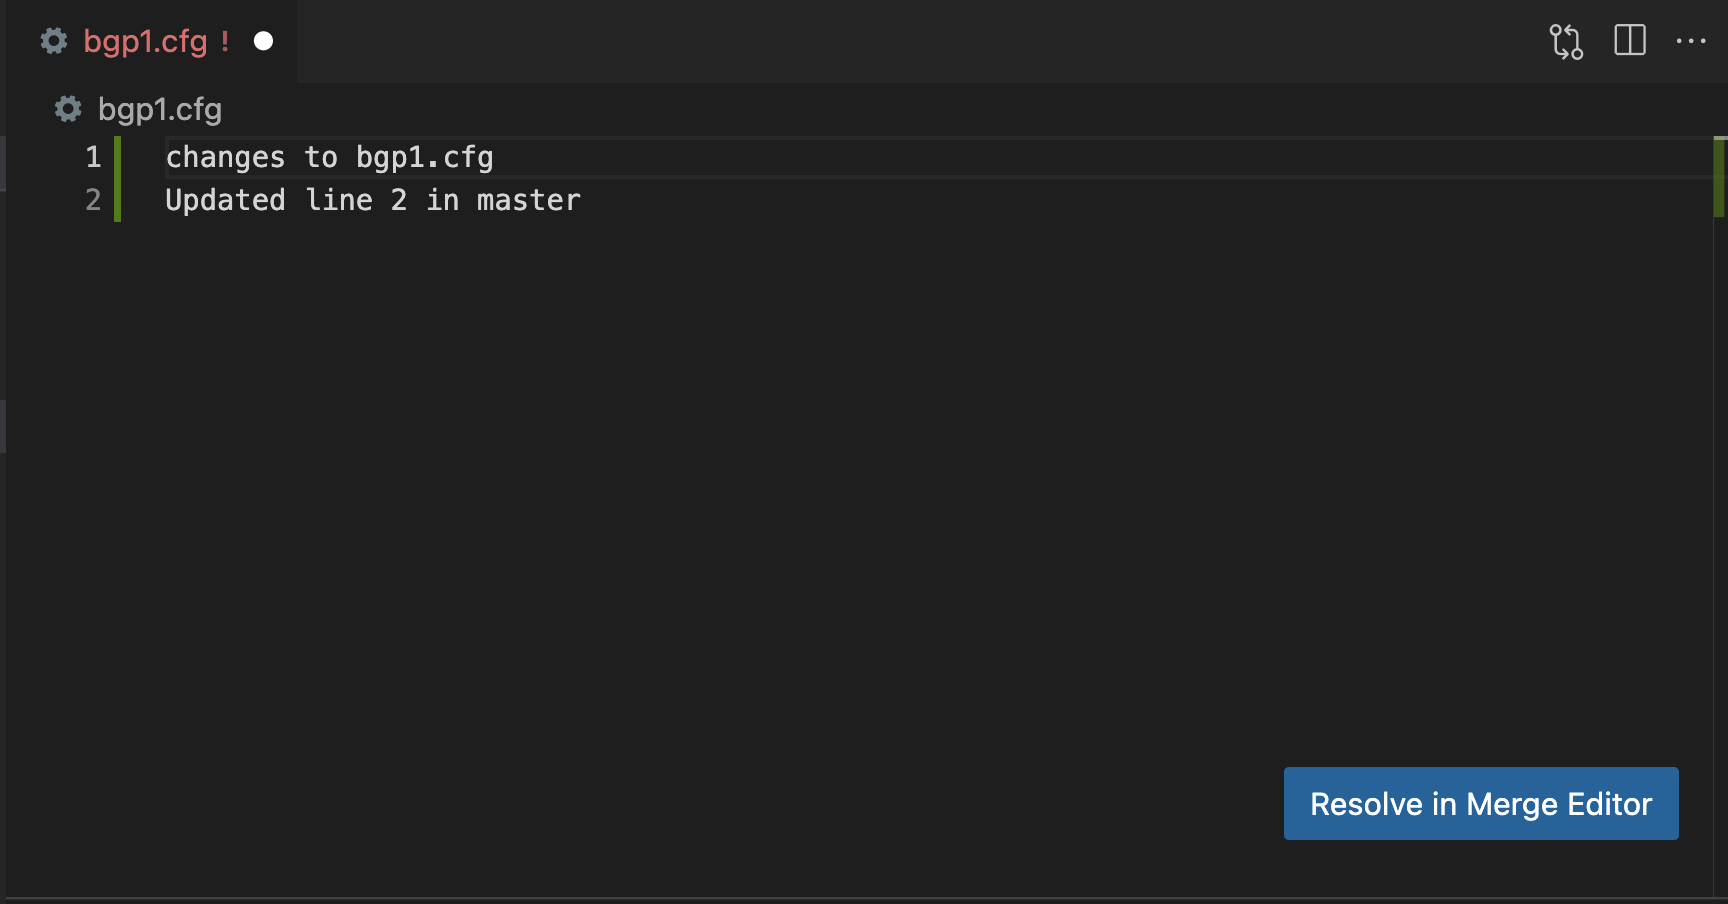
To amend, all I do is select what needs to stay and what can be deleted. This is the file bgp1.cfg. I will keep the change from master and not from the newfeature branch.
Commit the result of the manual merge.
|
0 1 2 3 |
stefankelly@Stefans-MacBook-Pro gitTest % git commit -am "merge change from newfeature after conflict" [master 8ef8bd6] merge change from newfeature after conflict |
Rebase Before Merging
Rebasing is generally used to keep a feature branch upto date with any new commits to the master branch. Rebasing the feature branch adds in any changes to the master to the feature branch. This should be done before merging the feature to the master branch. If this isn’t done, we will be merging in the new feature and also old files.
The process is straightforward
- Switch to the master branch
- Pull the latest changes to the repo
- Switch back to the feature branch
- Rebase the master branch onto the feature branch
|
0 1 2 3 4 5 |
git checkout master git pull git checkout feature git rebase master |
|
0 1 2 3 4 5 6 7 |
stefankelly@Stefans-MacBook-Pro gitTest % git switch newfeature Switched to branch 'newfeature' stefankelly@Stefans-MacBook-Pro gitTest % git rebase master First, rewinding head to replay your work on top of it... Fast-forwarded newfeature to master. |
Git Diff
Used to show the differences or changes between;
- Viewing changes between commits
- Inspecting changes in the working directory
- Comparing branches
- Viewing changes within a specific file
- Showing changes introduced by a commit
Viewing Changes Between Commits
You can compare different commits to see what changes were made.
Make some changes and commit them.
|
0 1 2 3 4 |
stefankelly@Stefans-MacBook-Pro gitTest % git commit -am "multiple changes to multiple files" [master e4a8dea] multiple changes to multiple files 2 files changed, 3 insertions(+), 1 deletion(-) |
Git log to show the commits.
|
0 1 2 3 4 5 6 7 8 9 10 11 12 13 14 |
stefankelly@Stefans-MacBook-Pro gitTest % git log commit e4a8dea10309ea2daef67fd5ff409ffc823c94bd (HEAD -> master) Author: stkel <stefan.kelly@live.co.uk> Date: Wed Jun 21 22:05:00 2023 +0100 multiple changes to multiple files commit 8ef8bd6d8bd25df20253c14d7fe4f2c203c6194b Merge: 9e2e0ae 1659e03 Author: stkel <stefan.kelly@live.co.uk> Date: Wed Jun 21 18:29:55 2023 +0100 merge change from newfeature after conflict |
Use git diff commitA commitB to see the differences.
|
0 1 2 3 4 5 6 7 8 9 10 11 12 13 14 15 16 17 18 |
stefankelly@Stefans-MacBook-Pro gitTest % git diff e4a8dea10309ea2daef67fd5ff409ffc823c94bd 8ef8bd6d8bd25df20253c14d7fe4f2c203c6194b diff --git a/anyconnectvpn1.cfg b/anyconnectvpn1.cfg index 8c51e46..62160be 100644 --- a/anyconnectvpn1.cfg +++ b/anyconnectvpn1.cfg @@ -1,2 +1 @@ changes to anyconnectvpn1.cfg -Adding line 2 to anyconnectvpn1.cfg file \ No newline at end of file diff --git a/bgp1.cfg b/bgp1.cfg index 44de97f..d17719f 100644 --- a/bgp1.cfg +++ b/bgp1.cfg @@ -1,3 +1,2 @@ changes to bgp1.cfg -Updated line 2 in master -Adding line three to the bgp1.cfg file |
Inspecting Changes in the Working Directory
Git will display the modifications that have been made to tracked files in your working directory compared to the most recent commit.
To do this, use git diff.
|
0 1 2 3 4 5 6 7 8 9 10 11 12 13 14 |
stefankelly@Stefans-MacBook-Pro gitTest % git diff diff --git a/bgp1.cfg b/bgp1.cfg index 44de97f..036ec49 100644 --- a/bgp1.cfg +++ b/bgp1.cfg @@ -1,3 +1,4 @@ changes to bgp1.cfg Updated line 2 in master -Adding line three to the bgp1.cfg file \ No newline at end of file +Adding line three to the bgp1.cfg file +working changes no commit made yet. \ No newline at end of file |
Comparing Branches
You can use git diff branchA branchB to compare the differences between two branches.
|
0 1 2 3 4 5 6 7 8 9 10 11 12 13 14 15 16 17 18 19 20 21 22 23 24 25 26 |
stefankelly@Stefans-MacBook-Pro gitTest % git diff newfeature master diff --git a/bgp1.cfg b/bgp1.cfg index 56017a8..e96e890 100644 --- a/bgp1.cfg +++ b/bgp1.cfg @@ -2,6 +2,4 @@ changes to bgp1.cfg Updated line 2 in master Adding line three to the bgp1.cfg file working changes no commit made yet. -changes to the file in newfeature branch -making a change for newfeature branch -Adding changes to bgp1.cfg +changes to the file in newfeature branch \ No newline at end of file diff --git a/newfile.txt b/newfile.txt index b96f4f5..49963ca 100644 --- a/newfile.txt +++ b/newfile.txt @@ -1,3 +1 @@ -New changes to newfile.txt -adding a second line -More changes to newfile.txt \ No newline at end of file +here is a new file \ No newline at end of file |
Viewing Changes Within a Specific File
|
0 1 2 3 4 5 6 7 8 9 10 11 |
stefankelly@Stefans-MacBook-Pro gitTest % git diff bgp1.cfg diff --git a/bgp1.cfg b/bgp1.cfg index 56017a8..584f9e5 100644 --- a/bgp1.cfg +++ b/bgp1.cfg @@ -5,3 +5,4 @@ working changes no commit made yet. changes to the file in newfeature branch making a change for newfeature branch Adding changes to bgp1.cfg +uncommitted changes for git diff compare |
Showing Changes Introduced by a Commit
Allows you to examine the changes made in a particular commit compared to its parent commit.
|
0 1 2 3 4 5 6 7 8 9 10 11 12 13 |
stefankelly@Stefans-MacBook-Pro gitTest % git log commit 654d05524a1448c2dd918fd03cf1a4fbc0d1bd9b (HEAD -> newfeature) Author: stkel <stefan.kelly@live.co.uk> Date: Wed Jun 21 22:57:03 2023 +0100 changes to newfile.txt and bgp1.cfg commit 92ea2ef13bfd055aba3abcd292c29f7d1f59050c Author: stkel <stefan.kelly@live.co.uk> Date: Wed Jun 21 22:55:22 2023 +0100 changes to newfile.txt |
|
0 1 2 3 4 5 6 7 8 9 10 11 12 13 14 15 16 17 18 19 20 21 22 23 24 |
stefankelly@Stefans-MacBook-Pro gitTest % git diff 92ea2ef13bfd055aba3abcd292c29f7d1f59050c diff --git a/bgp1.cfg b/bgp1.cfg index 3f8d55f..584f9e5 100644 --- a/bgp1.cfg +++ b/bgp1.cfg @@ -4,4 +4,5 @@ Adding line three to the bgp1.cfg file working changes no commit made yet. changes to the file in newfeature branch making a change for newfeature branch - +Adding changes to bgp1.cfg +uncommitted changes for git diff compare diff --git a/newfile.txt b/newfile.txt index d3b0371..b96f4f5 100644 --- a/newfile.txt +++ b/newfile.txt @@ -1,2 +1,3 @@ New changes to newfile.txt -adding a second line \ No newline at end of file +adding a second line +More changes to newfile.txt \ No newline at end of file |
Git Revert, Git Reset
There are two Git commands to undo changes made after a commit Git Revert and Git Reset.
Git Revert will revert the changes, keeping the history in the git log. The command creates a new commit that undoes the changes made in a previous commit. This approach is recommended when you want to keep a record of the rollback in the commit history.
|
0 1 2 3 4 5 6 7 8 9 10 11 12 13 14 15 16 17 18 |
stefankelly@Stefans-MacBook-Pro gitTest % git log commit fe8a8dc9bed6a453e4eecaf42c867039e5f1f086 (HEAD -> newfeature) Author: stkel <stefan.kelly@live.co.uk> Date: Wed Jun 21 22:47:48 2023 +0100 removed a line from bgp1.cfg commit bb879d47de028fb360904be758a2396ca0facc77 Author: stkel <stefan.kelly@live.co.uk> Date: Wed Jun 21 22:46:55 2023 +0100 upto date stefankelly@Stefans-MacBook-Pro gitTest % git revert bb879d47de028fb360904be758a2396ca0facc77 [newfeature c516378] Revert "upto date" 1 file changed, 1 insertion(+) create mode 100644 newfile.txt |
Git reset allows you to move the branch pointer to a specific commit, discarding the commits that come after it. This approach is more aggressive as it removes commits from the commit history, use carefully.
|
0 1 2 3 4 5 6 7 8 9 10 11 12 13 14 15 16 17 18 19 20 21 22 |
stefankelly@Stefans-MacBook-Pro gitTest % git commit -am "made changes to newfile.txt" [newfeature 366ad47] made changes to newfile.txt 1 file changed, 2 insertions(+), 1 deletion(-) commit 366ad4791fc62323d4fa0f57134b7aac69201517 (HEAD -> newfeature) Author: stkel <stefan.kelly@live.co.uk> Date: Wed Jun 21 22:51:55 2023 +0100 made changes to newfile.txt commit c516378a513a0d87e0c024ceff1b5754163926eb Author: stkel <stefan.kelly@live.co.uk> Date: Wed Jun 21 22:48:14 2023 +0100 Revert "upto date" This reverts commit bb879d47de028fb360904be758a2396ca0facc77. stefankelly@Stefans-MacBook-Pro gitTest % git reset c516378a513a0d87e0c024ceff1b5754163926eb Unstaged changes after reset: M newfile.txt |
Git Command Reference
nformational commands:
|
0 1 2 3 4 5 6 7 |
git status: Shows the current status of the repository, including modified, staged, and untracked files. git branch: Lists all the branches in the repository. git branch -r: Lists remote branches. git branch -a: Lists both local and remote branches. git log: Displays the commit history. git show HEAD: Shows the details of the most recent commit. |
Change commands:
|
0 1 2 3 4 5 6 7 8 9 10 11 12 |
git init: Initializes a new Git repository in the current directory. git add <file>: Adds a specific file to the staging area. git add .: Adds all modified and new files to the staging area. git checkout -b <new_branch>: Creates a new branch and checks it out. git switch -c <new_branch>: Creates a new branch and switches to it (Git 2.23 or higher). git push -u origin: Pushes the current branch to the remote repository and sets it as the upstream branch. git commit -am "first commit": Creates a new commit with the changes in the tracked files and includes a commit message. git merge <branch_name>: Merges the specified branch into the current branch. git rebase <branch_name>: Applies the commits from the specified branch onto the current branch. git revert: Creates a new commit that undoes the changes made in a previous commit. git reset: Moves the branch pointer to a specific commit, discarding subsequent commits (use with caution). |
Note: Some commands, like git add, git commit, git merge, and git reset, require additional arguments or options to work properly.
GitHub
Generate an SSH Key for GitHub & Clone Private Repo
I have used this as the repo I was using at the time was private. Another good learning exercise.
Generate an SSH key pair
The email must be your GitHub email.
|
0 1 2 |
ssh-keygen -t rsa -b 4096 -C "your_email@example.com" |
Add your SSH key to your GitHub account, copy the key first.
|
0 1 2 |
cat ~/.ssh/id_rsa.pub |
Open your GitHub account settings in a web browser, go to “SSH and GPG keys”, and click on “New SSH key”. Paste the copied public key into the “Key” field and give it a descriptive title.
Install Git
|
0 1 2 3 |
sudo apt update sudo apt install git |
Clone Private Repo
|
0 1 2 |
git clone git@github.com:<username>/<repository>.git |
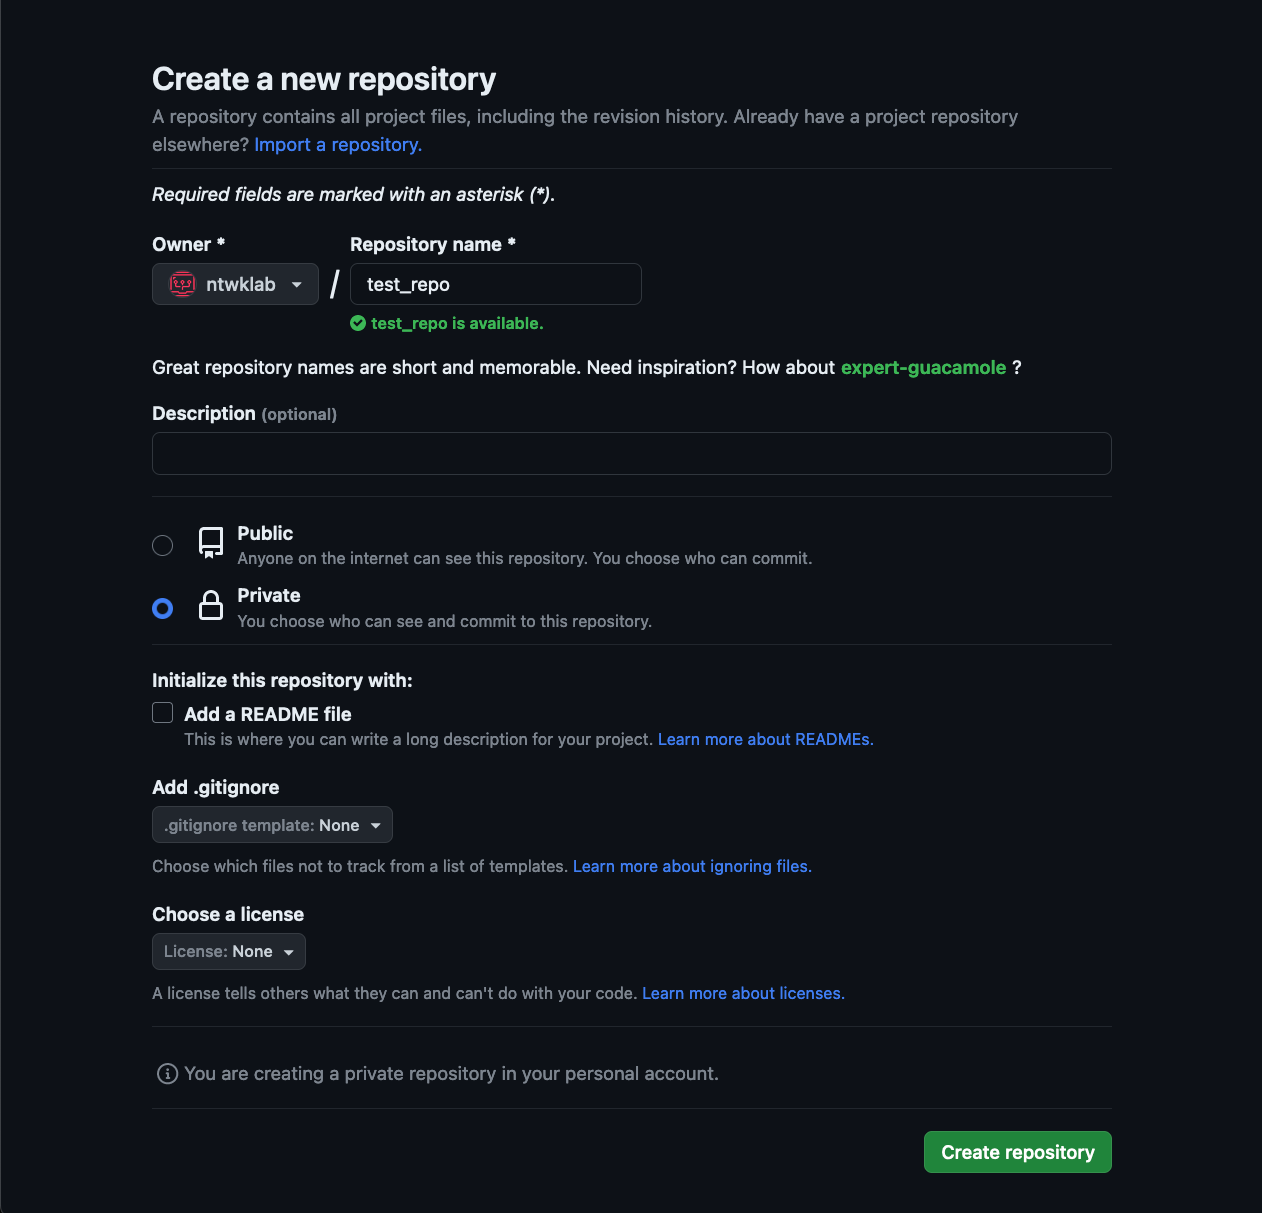
Creating a Repo in GitHub and Adding Files
To create a new or push and existing repo to GitHub, it all starts with creating a repo in GitHub.
If you need to initialise the local repo
|
0 1 2 |
git init |
Setup GitHub account and add the remote repository. An SSH key needs to be setup for this to work. Username and password will no longer work.
|
0 1 2 3 4 5 |
git config --global user.name ntwklab git config --global user.email youremail git remote add origin git@github.com:ntwklab/test_repo.git |
Check it is all correct
|
0 1 2 3 4 5 6 7 |
stefankelly@Stefans-MacBook-Pro gitTest % git config -l user.email=youremail user.name=ntwklab ... remote.origin.url=git@github.com:ntwklab/test_repo.git remote.origin.fetch=+refs/heads/*:refs/remotes/origin/* |
I’m going to push a new new branch called uploadbranch
|
0 1 2 |
git push -u origin uploadbranch |