
Zero Touch Provisioning is a way for Arista switches to get a configuration file via DHCP options and configure itself with no interaction from an admin. All there is to do is connect up the switch and IP/config will be applied to the switch.
ZTP will only run when there is no startup-config file, so first boot of new device, or deletion of the startup-config file.
DHCP Options
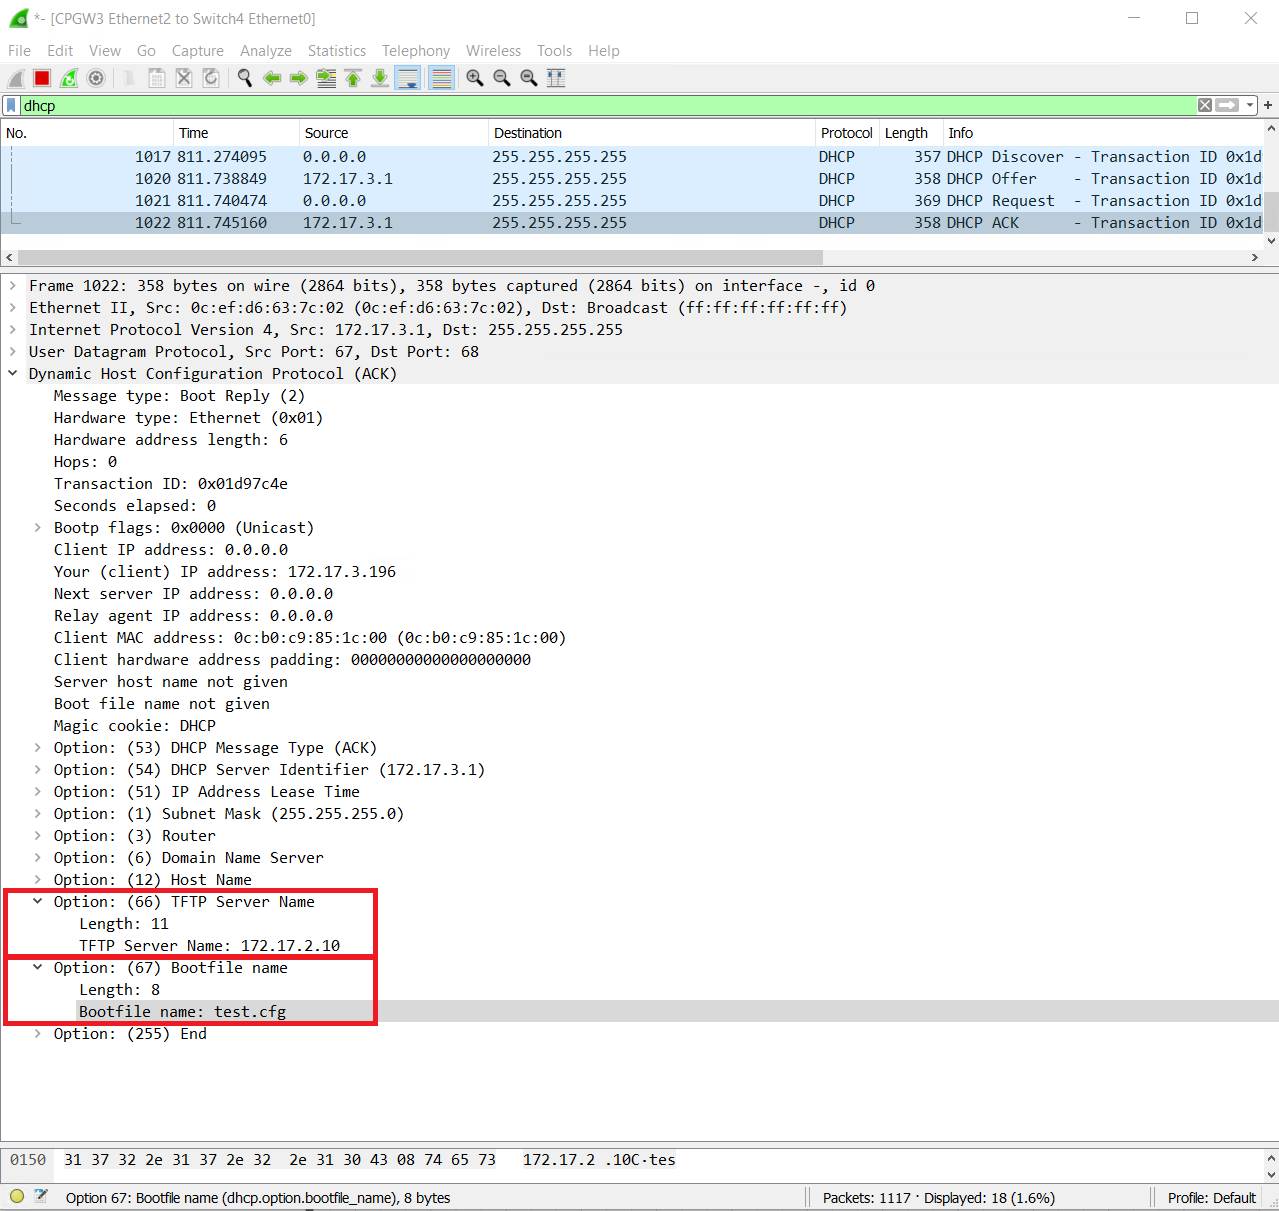
Arista ZTP uses DHCP options 66 and 67. I have used a Checkpoint firewall as the DHCP server. This configuration can be found in a previous post.
DHCP option 66 and 67 direct devices to download configuration.
– Option 66: provides a TFTP address. This would be the URL – tftp://10.10.10.10
– Option 67: provides the path to the file. This could be the URI – test.cfg
DHCP returned options create: tftp://10.10.10.10/test.cfg
Option 67 can also be alone to return a full path using FTP or HTTP. Instead of using just a file name, an entire path can be given such as HTTP://172.17.2.10/test.cfg or FTP://172.17.2.10/testing_configs/test.cfg
TFTP Server Configuration & ZTP Download
Without the TFTP configuration or if the Arista switch is unable to reach the TFTP server, it will display error messages in the console. The Arista switch will continue to try to reach the TFTP server.
|
0 1 2 3 4 5 6 7 8 9 10 11 12 |
Dec 12 13:01:57 dhcp-172-17-3-196 ZeroTouch: %ZTP-6-CONFIG_DOWNLOAD: Attempting to download the startup-config from tftp://172.17.2.10/test.cfg Dec 12 13:02:57 dhcp-172-17-3-196 ZeroTouch: %ZTP-4-CONFIG_DOWNLOAD_FAIL: Failed to download the startup-config from tftp://172.17.2.10/test.cfg. Error: Timeout was reached Dec 12 13:03:12 dhcp-172-17-3-196 ZeroTouch: %ZTP-6-CONFIG_DOWNLOAD: Attempting to download the startup-config from tftp://172.17.2.10/test.cfg Dec 12 13:04:12 dhcp-172-17-3-196 ZeroTouch: %ZTP-4-CONFIG_DOWNLOAD_FAIL: Failed to download the startup-config from tftp://172.17.2.10/test.cfg. Error: Timeout was reached Dec 12 13:04:42 dhcp-172-17-3-196 ZeroTouch: %ZTP-6-CONFIG_DOWNLOAD: Attempting to download the startup-config from tftp://172.17.2.10/test.cfg Dec 12 13:05:42 dhcp-172-17-3-196 ZeroTouch: %ZTP-4-CONFIG_DOWNLOAD_FAIL: Failed to download the startup-config from tftp://172.17.2.10/test.cfg. Error: Timeout was reached Dec 12 13:06:27 dhcp-172-17-3-196 ZeroTouch: %ZTP-6-CONFIG_DOWNLOAD: Attempting to download the startup-config from tftp://172.17.2.10/test.cfg Dec 12 13:07:27 dhcp-172-17-3-196 ZeroTouch: %ZTP-4-CONFIG_DOWNLOAD_FAIL: Failed to download the startup-config from tftp://172.17.2.10/test.cfg. Error: Timeout was reached Dec 12 13:07:27 dhcp-172-17-3-196 ZeroTouch: %ZTP-6-RETRY: Retrying Zero Touch Provisioning from the beginning (attempt 1) Dec 12 13:07:42 dhcp-172-17-3-196 ZeroTouch: %ZTP-6-DHCPv4_QUERY: Sending DHCPv4 request on [ Ethernet1, Ethernet2, Ethernet3, Ethernet4, Ethernet5, Ethernet6, Ethernet7, Ethernet8, Ethernet9, Ethernet10, Ethernet11, Ethernet12, Management1 ] Dec 12 13:07:57 localhost ZeroTouch: %ZTP-4-DHCPv4_QUERY_FAIL: Failed to get a valid DHCPv4 response |
With a TFTP server configured and a file named test.cfg. The Arista switch has downloaded the config and reboots
|
0 1 2 3 4 5 6 7 8 9 10 11 12 13 14 15 16 17 18 19 20 21 22 23 24 25 26 27 28 |
?! hostname provision-me ip name-server vrf default 8.8.8.8 ! ! username admin privilege 15 role network-admin secret Stefan2020 ! interface Management1 ip address 172.17.3.11/24 ! ip access-list open 10 permit ip any any ! ip route 0.0.0.0/0 172.17.3.1 ! ip routing ! management api http-commands no shutdown ! ! banner login ! Welcome to $(hostname)! ! This switch has been provisioned using the ZTPServer from Arista Networks ! Docs: http://ztpserver.readthedocs.org/ ! Source Code: https://github.com/arista-eosplus/ztpserver ! EOF ! |
|
0 1 2 3 4 |
Dec 12 15:59:02 dhcp-172-17-3-196 ZeroTouch: %ZTP-6-CONFIG_DOWNLOAD: Attempting to download the startup-config from tftp://172.17.2.10/test.cfg Dec 12 15:59:02 dhcp-172-17-3-196 ZeroTouch: %ZTP-6-CONFIG_DOWNLOAD_SUCCESS: Successfully downloaded startup-config from tftp://172.17.2.10/test.cfg Dec 12 15:59:03 dhcp-172-17-3-196 ZeroTouch: %ZTP-6-RELOAD: Rebooting the system |
|
0 1 2 3 4 5 6 |
provision-me#sh ip int brief Address Interface IP Address Status Protocol MTU Owner --------------- ------------------- ----------- ------------- --------- ------- Management1 172.17.3.11/24 up up 1500 |
Multiple ZTP Switch Provisioning
The current ZTP config can only deal with a single Arista switch at a time due to the IP being hard set. There is another option for ZTP, which is to use a script over a configuration file.
In theory, the Arista switch should be able to execute a python or bash script that it is provided. It does this based on the #! line at the top of the file. If there isn’t a #! line, then the file is treated as a startup config file.
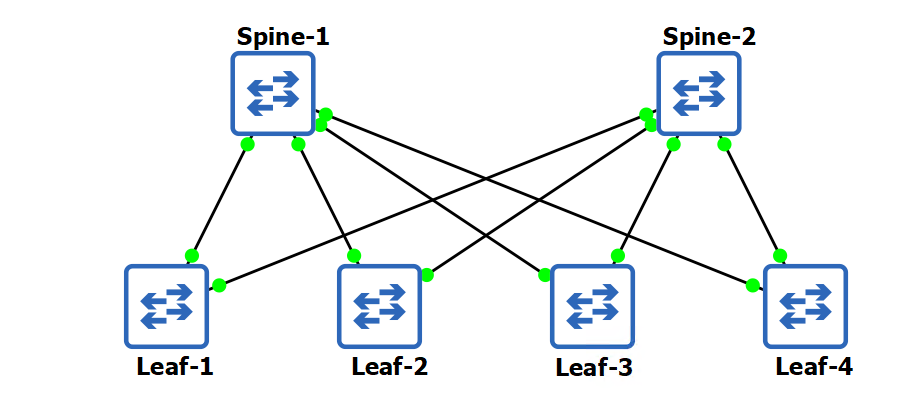
In this example, I will demonstrate a python file being downloaded and providing basic IP and hostname assignment. The idea of the script is to determine if a switch is a spine or a leaf.
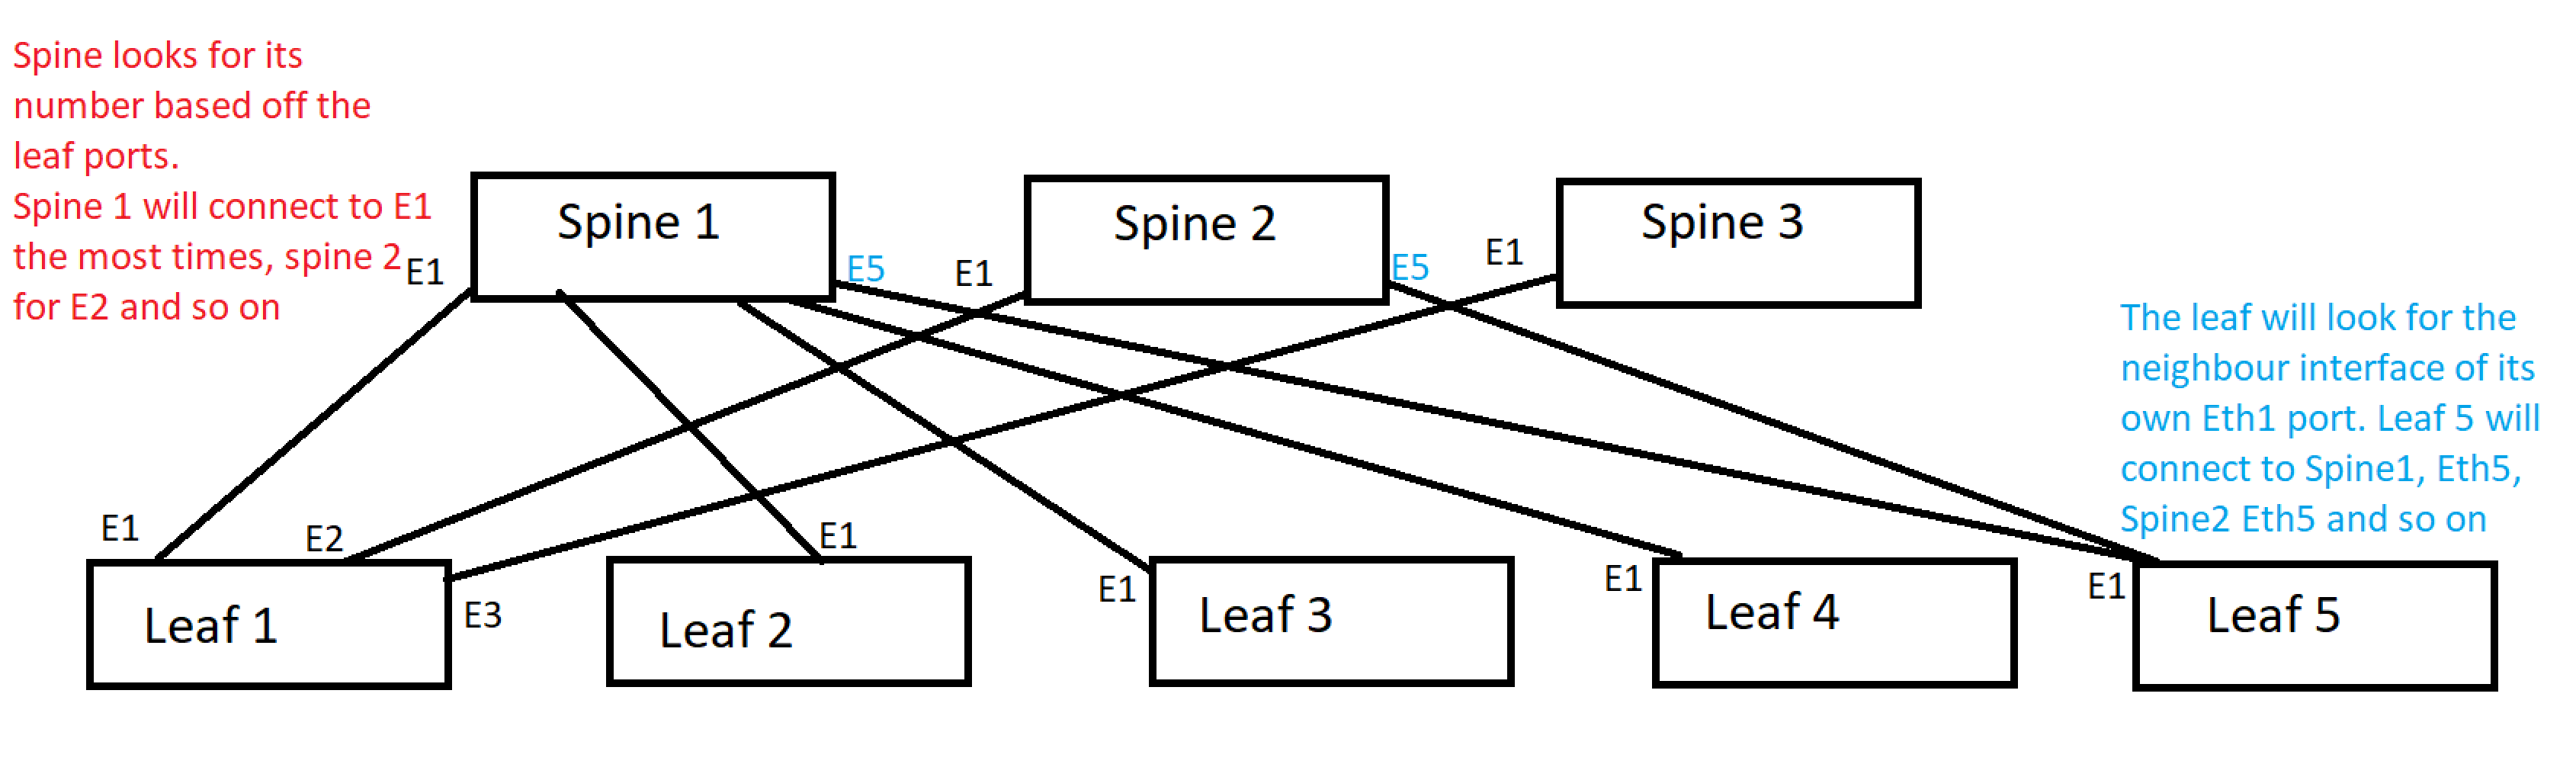
The logic for this is a spine will always see the LLDP neighbour ports as Eth1, Eth2, Eth3 or Eth4 depending on the spine number the Eth port will change.
The leaf number will always be connecting to Eth1, Eth2, Eth3, Eth4, – Eth40. These ports will be the same. So the script will look at LLDP of Eth1 neighbour for the destination port.
I had major issues getting this work successfully in a lab with Python. The script works as expected in the lab when run manually, but running the Python script in ZTP after it has downloaded results in a failure. I tried HTTP and TFTP, no difference.
I have corrected this by using a .cfg file and AEM to run the script after ZTP. The details can be found at the end of this post.
|
0 1 2 3 4 5 6 7 8 |
Dec 13 16:28:50 dhcp-172-17-3-197 ZeroTouch: %ZTP-6-DHCPv4_QUERY: Sending DHCPv4 request on [ Ethernet1, Ethernet2, Ethernet3, Ethernet4, Ethernet5, Ethernet6, Ethernet7, Ethernet8, Ethernet9, Ethernet10, Ethernet11, Ethernet12, Management1 ] Dec 13 16:28:50 dhcp-172-17-3-197 ZeroTouch: %ZTP-6-DHCPv4_SUCCESS: DHCPv4 response received on Management1 [ Ip Address: 172.17.3.197/24; Hostname: dhcp-172-17-3-197; Nameserver: 172.17.4.10; Gateway: 172.17.3.254; Boot File: http://172.17.2.10/bootstrap.py ] Dec 13 16:28:55 dhcp-172-17-3-197 ZeroTouch: %ZTP-6-CONFIG_DOWNLOAD: Attempting to download the startup-config from http://172.17.2.10/bootstrap.py Dec 13 16:28:55 dhcp-172-17-3-197 ZeroTouch: %ZTP-6-CONFIG_DOWNLOAD_SUCCESS: Successfully downloaded config script from http://172.17.2.10/bootstrap.py Dec 13 16:28:55 dhcp-172-17-3-197 ZeroTouch: %ZTP-6-EXEC_SCRIPT: Executing the downloaded config script Dec 13 16:28:55 dhcp-172-17-3-197 ZeroTouch: %ZTP-4-EXEC_SCRIPT_SIGNALED: Config script exited with an uncaught signal. Signal code: Aborted Dec 13 16:28:55 dhcp-172-17-3-197 ZeroTouch: %ZTP-6-RETRY: Retrying Zero Touch Provisioning from the beginning (attempt 121) |
The Script is below, and the results of the script when run manually are below the script.
|
0 1 2 3 4 5 6 7 8 9 10 11 12 13 14 15 16 17 18 19 20 21 22 23 24 25 26 27 28 29 30 31 32 33 34 35 36 37 38 39 40 41 42 43 44 45 46 47 48 49 50 51 |
#!/usr/bin/python from collections import Counter import subprocess import sys output = subprocess.Popen(["/usr/bin/FastCli", "-c", "show lldp neigh"], stdout=subprocess.PIPE).communicate()[0] out2 = list(iter(output.split())) # Count interfaces for spine lookup = ["Ethernet1", "Ethernet2", "Ethernet3", "Ethernet4"] all_counts = Counter(out2) counts = {k: all_counts[k] for k in lookup} # Determine if spine or leaf for value in counts.values(): if value >= 4: switch = "spine" break else: switch = "leaf" # Determine spine number for key, value in counts.items(): if value >= 4: spine_num = key[8:] break # Assign spine number hostname and IP if switch == "spine": hostname = "spine{}".format(spine_num) ip_addr = "172.17.3.10{}".format(spine_num) # Determine and assign leaf hostname and IP if switch == "leaf": out3 = list(iter(output.splitlines())) intnum = out3[8].split()[2][8:] hostname = "leaf{}".format(intnum) ip_addr = "172.17.3.{}".format(intnum) # Create startup-config file f = open("/mnt/flash/startup-config", "w") f.write("\nhostname {}".format(hostname)) f.write("\ninterface Management1\nip address {}/24".format(ip_addr)) f.write("\nip routing") f.write("\nip route 0.0.0.0/0 172.17.3.254") f.close() sys.exit( 0 ) |
To run the script manually, I will copy the file to each Arista switch and run the script from the bash shell. ZTP will be cancelled in order for me to do this.
|
0 1 2 3 4 5 6 7 8 9 10 11 12 13 14 15 16 17 18 19 20 21 22 23 24 25 26 27 28 29 30 31 32 33 34 35 36 37 38 39 40 41 42 43 44 45 46 47 48 49 50 51 52 53 54 55 56 57 58 59 60 61 |
localhost login: admin localhost>en localhost#bash Arista Networks EOS shell [admin@localhost ~]$ vi /mnt/flash/script.py [admin@localhost ~]$ tail /mnt/flash/script.py # Create startup-config file f = open("/mnt/flash/startup-config", "w") f.write("\nhostname {}".format(hostname)) f.write("\ninterface Management1\nip address {}/24".format(ip_addr)) f.write("\nip routing") f.write("\nip route 0.0.0.0/0 172.17.3.254") f.close() sys.exit( 0 ) [admin@localhost ~]$ python /mnt/flash/script.py [admin@localhost ~]$ cat /mnt/flash/startup-config hostname spine1 interface Management1 ip address 172.17.3.101/24 ip routing ip route 0.0.0.0/0 172.17.3.254 [admin@localhost ~]$ [admin@localhost ~]$ exit localhost#reload ! Image does not support next image compatibility checks. Running only checks from the current image. System configuration has been modified. Save? [yes/no/cancel/diff]:no spine1 login: admin spine1>en spine1#show ip int br Address Interface IP Address Status Protocol MTU Owner --------------- ------------------- ----------- ------------- --------- ------- Management1 172.17.3.101/24 up up 1500 spine1#sh ip route VRF: default Codes: C - connected, S - static, K - kernel, O - OSPF, IA - OSPF inter area, E1 - OSPF external type 1, E2 - OSPF external type 2, N1 - OSPF NSSA external type 1, N2 - OSPF NSSA external type2, B - BGP, B I - iBGP, B E - eBGP, R - RIP, I L1 - IS-IS level 1, I L2 - IS-IS level 2, O3 - OSPFv3, A B - BGP Aggregate, A O - OSPF Summary, NG - Nexthop Group Static Route, V - VXLAN Control Service, DH - DHCP client installed default route, M - Martian, DP - Dynamic Policy Route, L - VRF Leaked, G - gRIBI, RC - Route Cache Route Gateway of last resort: S 0.0.0.0/0 [1/0] via 172.17.3.254, Management1 C 172.17.3.0/24 is directly connected, Management1 spine1# |
|
0 1 2 3 4 5 6 7 8 9 10 11 12 13 14 15 16 17 18 19 20 21 22 23 24 25 26 27 28 29 30 31 32 33 34 35 36 37 38 |
spine2 login: admin spine2>sh ip int br Address Interface IP Address Status Protocol MTU Owner --------------- ------------------- ----------- ------------- --------- ------- Management1 172.17.3.102/24 up up 1500 leaf1 login: admin leaf1>sh ip int br Address Interface IP Address Status Protocol MTU Owner ---------------- ------------------ ----------- ------------- --------- ------- Management1 172.17.3.1/24 up up 1500 leaf2>sh ip int br Address Interface IP Address Status Protocol MTU Owner ---------------- ------------------ ----------- ------------- --------- ------- Management1 172.17.3.2/24 up up 1500 leaf3 login: admin sh ip int brsh ip int brleaf3>sh ip int br Address Interface IP Address Status Protocol MTU Owner ---------------- ------------------ ----------- ------------- --------- ------- Management1 172.17.3.3/24 up up 1500 leaf4 login: admin leaf4>sh ip int br Address Interface IP Address Status Protocol MTU Owner ---------------- ------------------ ----------- ------------- --------- ------- Management1 172.17.3.4/24 up up 1500 |
Each switch has a startup-config file that was created. It contains the basic config, below is an example from leaf4.
|
0 1 2 3 4 5 6 7 8 |
leaf4#more startup-config hostname leaf4 interface Management1 ip address 172.17.3.4/24 ip routing ip route 0.0.0.0/0 172.17.3.254 |
ZTP Fix Using AEM
The ZTP python script did fail to run when it was executed through the ZTP provisioning. I have come up with a work-around using AEM. This method requires an extra reload of the switch and an extra file to be downloaded. The steps are;
- ZTP performs DHCP
- ZTP downloads config-ztp-fix.cfg
- ZTP performs reload
- AEM ZTP1 runs on startup; downloads ZTP1.py, runs ZTP1.py, and reloads after 1 minute wait
- After reboot, the switch has the correct hostname and IP set in the way that the ZTP python script.
I have used a .cfg file for ZTP as this will work correctly and place that config into the startup-config file. The full config-ztp-fix.cfg is below.
|
0 1 2 3 4 5 6 7 8 9 10 11 12 13 14 15 |
! hostname provision-me ! ! interface Management1 description Provisioning-in-progress ip address dhcp ip route 0.0.0.0/0 172.17.3.254 ! ip routing event-handler ZTP1 trigger on-startup-config action bash `FastCli -p 15 -c 'copy tftp:172.17.2.10/ZTP1.py flash:'`; python /mnt/flash/ZTP1.py; `FastCli -p 15 -c 'reload in 1 force reason ZTP1 provisioning'` |
Now that the device has performed the ZTP configuration the next step of downloading and running the python script that will assign the correct hostname and IP address. the AEM to run the script is also removed to be sure that it does not keep running and overwrite the startup on each reload.
|
0 1 2 3 4 5 6 7 8 9 10 11 12 13 14 15 16 17 18 19 20 21 22 23 24 25 26 27 28 29 30 31 32 33 34 35 36 37 38 39 40 41 42 43 44 45 46 47 48 49 50 51 52 53 |
#!/usr/bin/python from collections import Counter import subprocess import sys output = subprocess.Popen(["/usr/bin/FastCli", "-c", "show lldp neigh"], stdout=subprocess.PIPE).communicate()[0] out2 = list(iter(output.split())) # Count interfaces for spine lookup = ["Ethernet1", "Ethernet2", "Ethernet3", "Ethernet4"] all_counts = Counter(out2) counts = {k: all_counts[k] for k in lookup} # Determine if spine or leaf for value in counts.values(): if value >= 4: switch = "spine" break else: switch = "leaf" # Determine spine number for key, value in counts.items(): if value >= 4: spine_num = key[8:] break # Assing spine number hostname and IP if switch == "spine": hostname = "spine{}".format(spine_num) ip_addr = "172.17.3.10{}".format(spine_num) # Determine and assign leaf hostname and IP if switch == "leaf": out3 = list(iter(output.splitlines())) intnum = out3[8].split()[2][8:] hostname = "leaf{}".format(intnum) ip_addr = "172.17.3.{}".format(intnum) # Create startup-config file f = open("/mnt/flash/startup-config", "w") f.write("\nhostname {}".format(hostname)) f.write("\ninterface Management1\nip address {}/24".format(ip_addr)) f.write("\nip routing") f.write("\nip route 0.0.0.0/0 172.17.3.254") # Remove AEM ZTP1 f.write("\nno event-handler ZTP1") f.close() sys.exit( 0 ) |