Cisco ACI Supports several methods of automation or infrastructure as code. For this example, I will be using Terraform to give examples of setting up different fabric policies using the Cisco ACI lab.
Setup
To get this setup, I have several things to do
- Install AnyConnect VPN
- Create a new ACI Terraform Project
- Install GitLab Runner on Mac
- Connect new GitLab runner to the GitLab Terraform project
Lab
Once the lab has been setup and VPN connected to the ACI APIC will be available at https://10.10.20.14/.
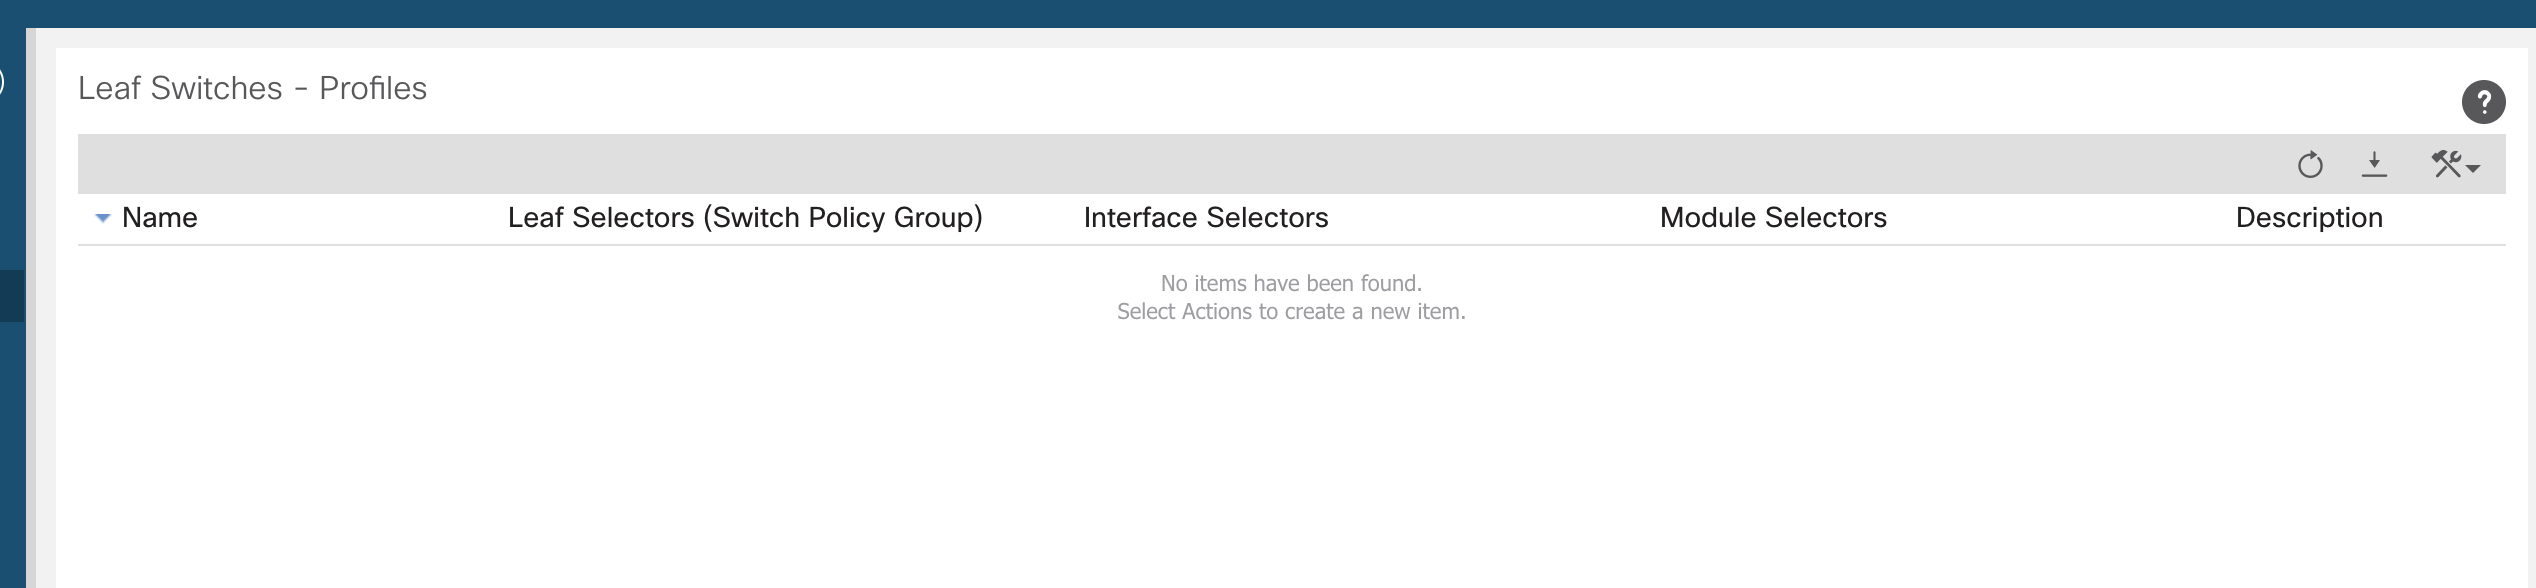
Navigate to Fabric >> Access Policies >> Switches >> Leaf Switches >> Profiles
This is just to show what is currently configured as default.
Create a New ACI Terraform Project
To get the CI/CD pipeline setup we first need a project. I have previously detailed the steps to setup the GitLab SSH key.
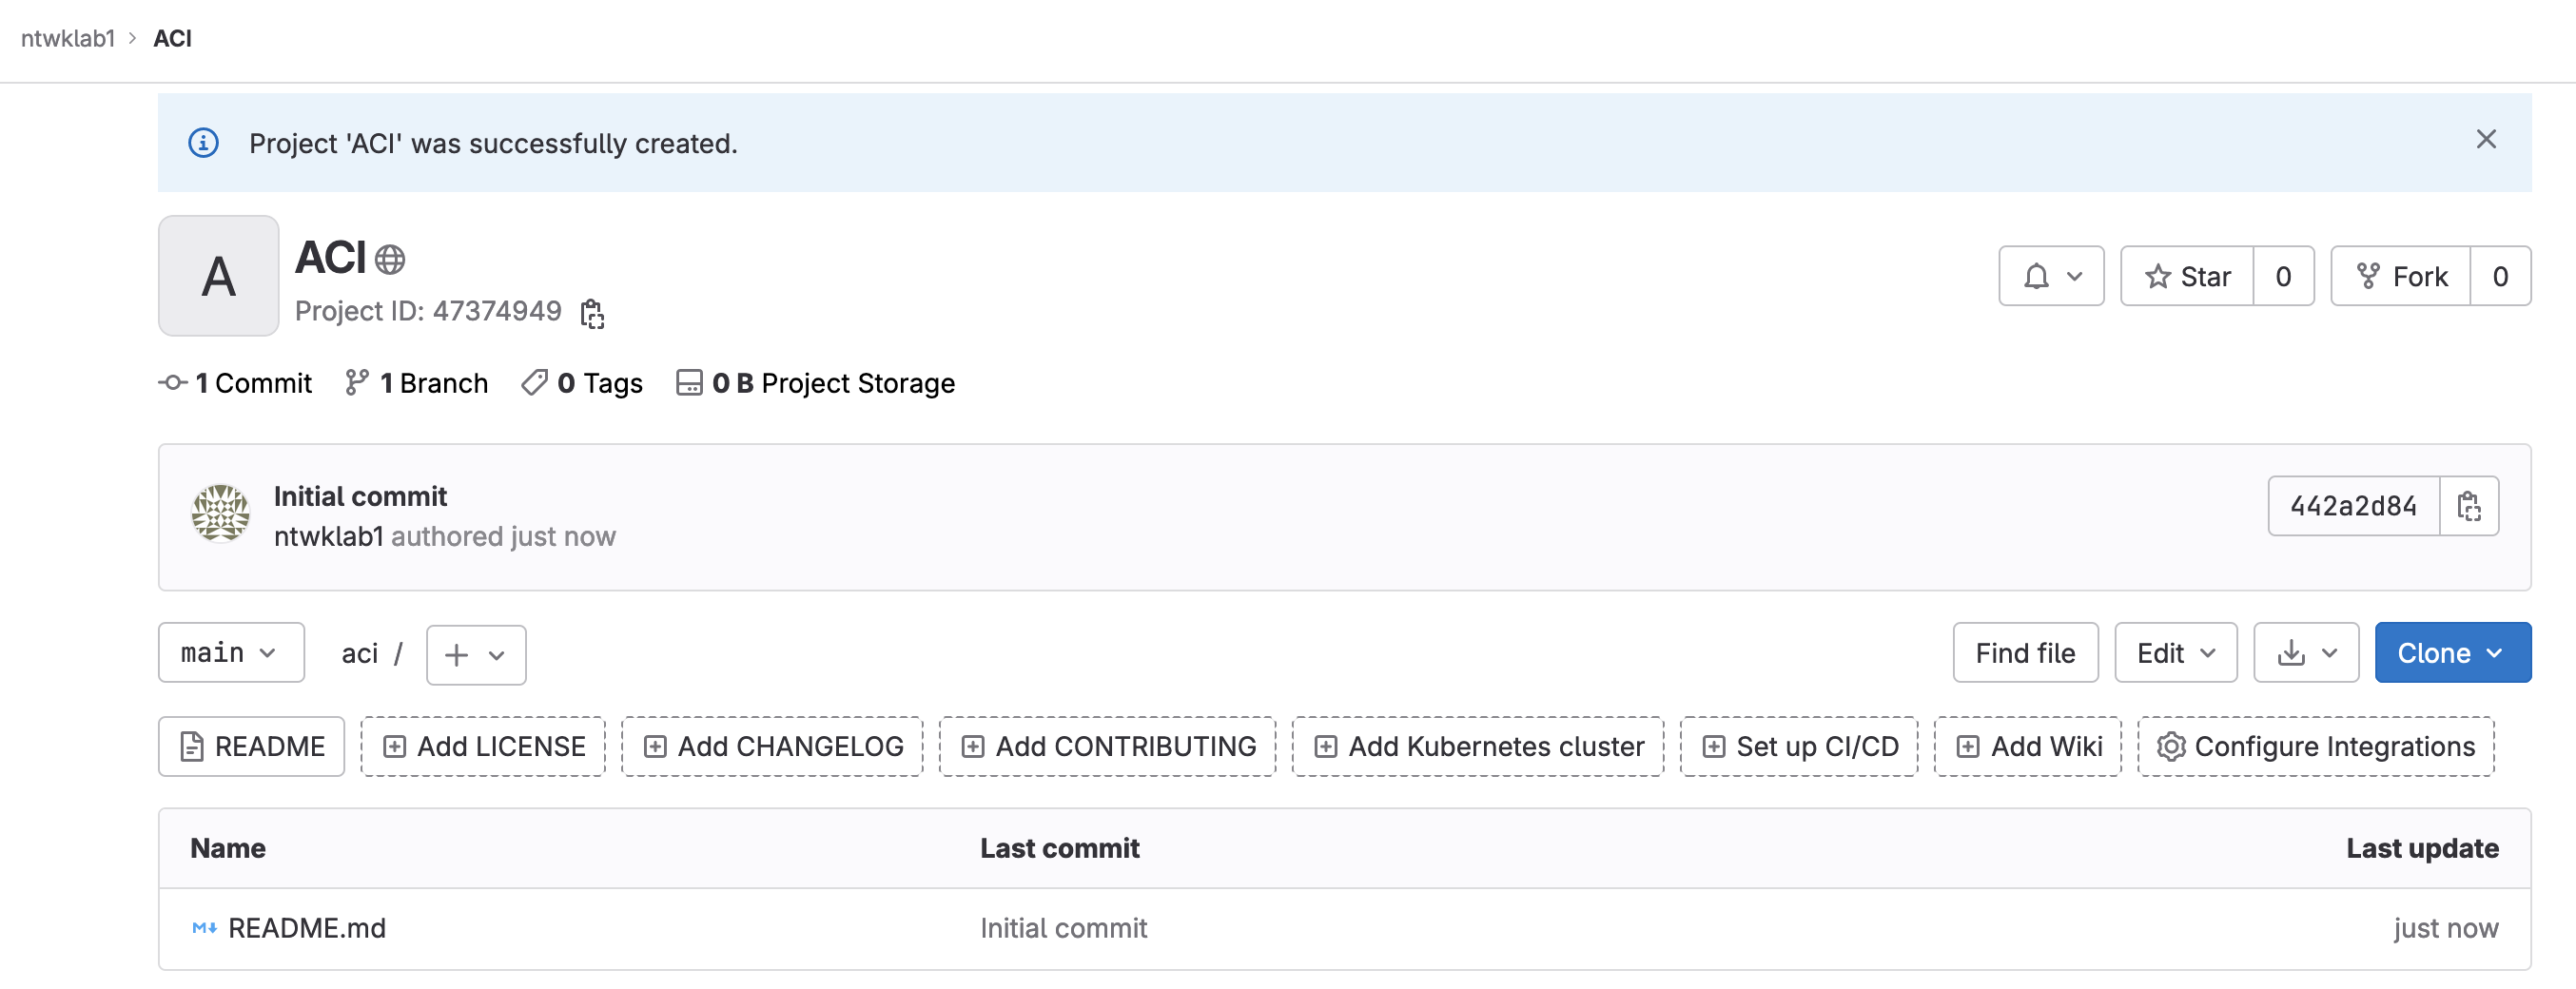
git@gitlab.com:ntwklab1/aci.git
Next is to setup all the files required. I will be using the GitLab Terraform state. I have detailed this in more detail in this post. In summary, the Terraform state files are to live on GitLab allowing all users of the repo to use the same state files. The Terraform state files need to be created first. I am not going to perform a migration, everything will be new.
Files I will create
- .gitignore
- .gitlab-ci.yml
- backend.tf
- main.tf
.gitignore
|
0 1 2 3 4 5 6 7 8 9 10 11 12 13 14 15 16 17 18 19 20 21 |
# Local .terraform directories **/.terraform/ # .tfstate files *.tfstate *.tfstate.backup *.tfstate.backup.* *.terraform.lock.* # Crash log files crash.log # Exclude sensitive variable files *.tfvars # Override file for variable definitions override.tf # Exclude any CLI configuration files cli.* |
.gitlab-ci.yml
|
0 1 2 3 4 5 6 7 8 9 10 11 12 13 14 15 16 17 18 19 20 21 22 23 24 25 26 27 28 29 30 31 32 33 34 35 36 37 38 39 40 41 42 43 44 45 46 47 |
# To contribute improvements to CI/CD templates, please follow the Development guide at: # https://docs.gitlab.com/ee/development/cicd/templates.html # This specific template is located at: # https://gitlab.com/gitlab-org/gitlab/-/blob/master/lib/gitlab/ci/templates/Terraform.gitlab-ci.yml include: - template: Terraform/Base.gitlab-ci.yml # https://gitlab.com/gitlab-org/gitlab/blob/master/lib/gitlab/ci/templates/Terraform/Base.gitlab-ci.yml - template: Jobs/SAST-IaC.gitlab-ci.yml # https://gitlab.com/gitlab-org/gitlab/blob/master/lib/gitlab/ci/templates/Jobs/SAST-IaC.gitlab-ci.yml stages: - validate - test - build - deploy - cleanup fmt: extends: .terraform:fmt needs: [] validate: extends: .terraform:validate needs: [] build: extends: .terraform:build environment: name: $TF_STATE_NAME action: prepare deploy: extends: .terraform:deploy dependencies: - build environment: name: $TF_STATE_NAME action: start cleanup: extends: .terraform:destroy dependencies: - build - deploy environment: name: $TF_STATE_NAME action: start |
backend.tf
|
0 1 2 3 4 5 |
terraform { backend "http" { } } |
main.tf
This will be a temporary file just to get the new Terraform state files created in GitLab
|
0 1 2 3 4 5 6 7 8 |
terraform { required_providers { aci = { source = "ciscodevnet/aci" } } } |
Push To GitLab
Using Git, just on the main branch, push these files up to the GitLab project.
|
0 1 2 3 4 5 6 7 8 9 10 11 12 13 14 15 16 17 18 |
stefankelly@Stefans-MacBook-Pro aci % git add . stefankelly@Stefans-MacBook-Pro aci % git commit -am "new files created" [main 4a1a3d8] new files created 4 files changed, 464 insertions(+) create mode 100644 .gitignore create mode 100644 .gitlab-ci.yml create mode 100644 backend.tf create mode 100644 main.tf stefankelly@Stefans-MacBook-Pro aci % git push Enumerating objects: 7, done. Counting objects: 100% (7/7), done. Delta compression using up to 8 threads Compressing objects: 100% (5/5), done. Writing objects: 100% (6/6), 2.64 KiB | 2.64 MiB/s, done. Total 6 (delta 0), reused 0 (delta 0), pack-reused 0 To gitlab.com:ntwklab1/aci.git 442a2d8..4a1a3d8 main -> main |
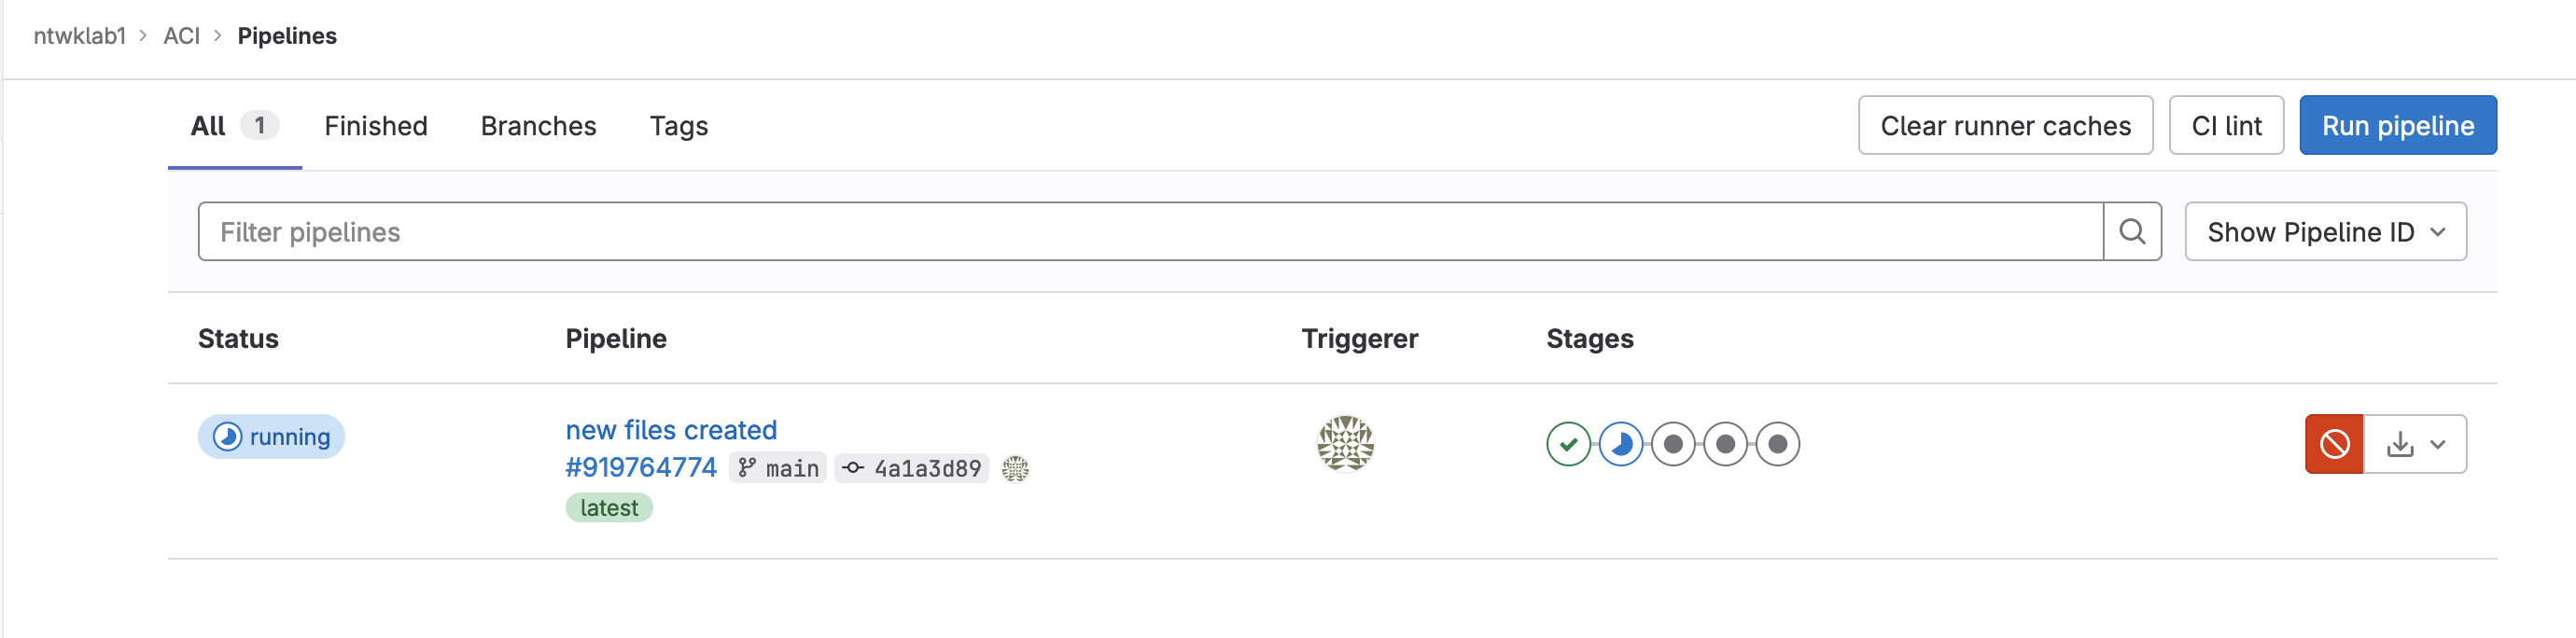
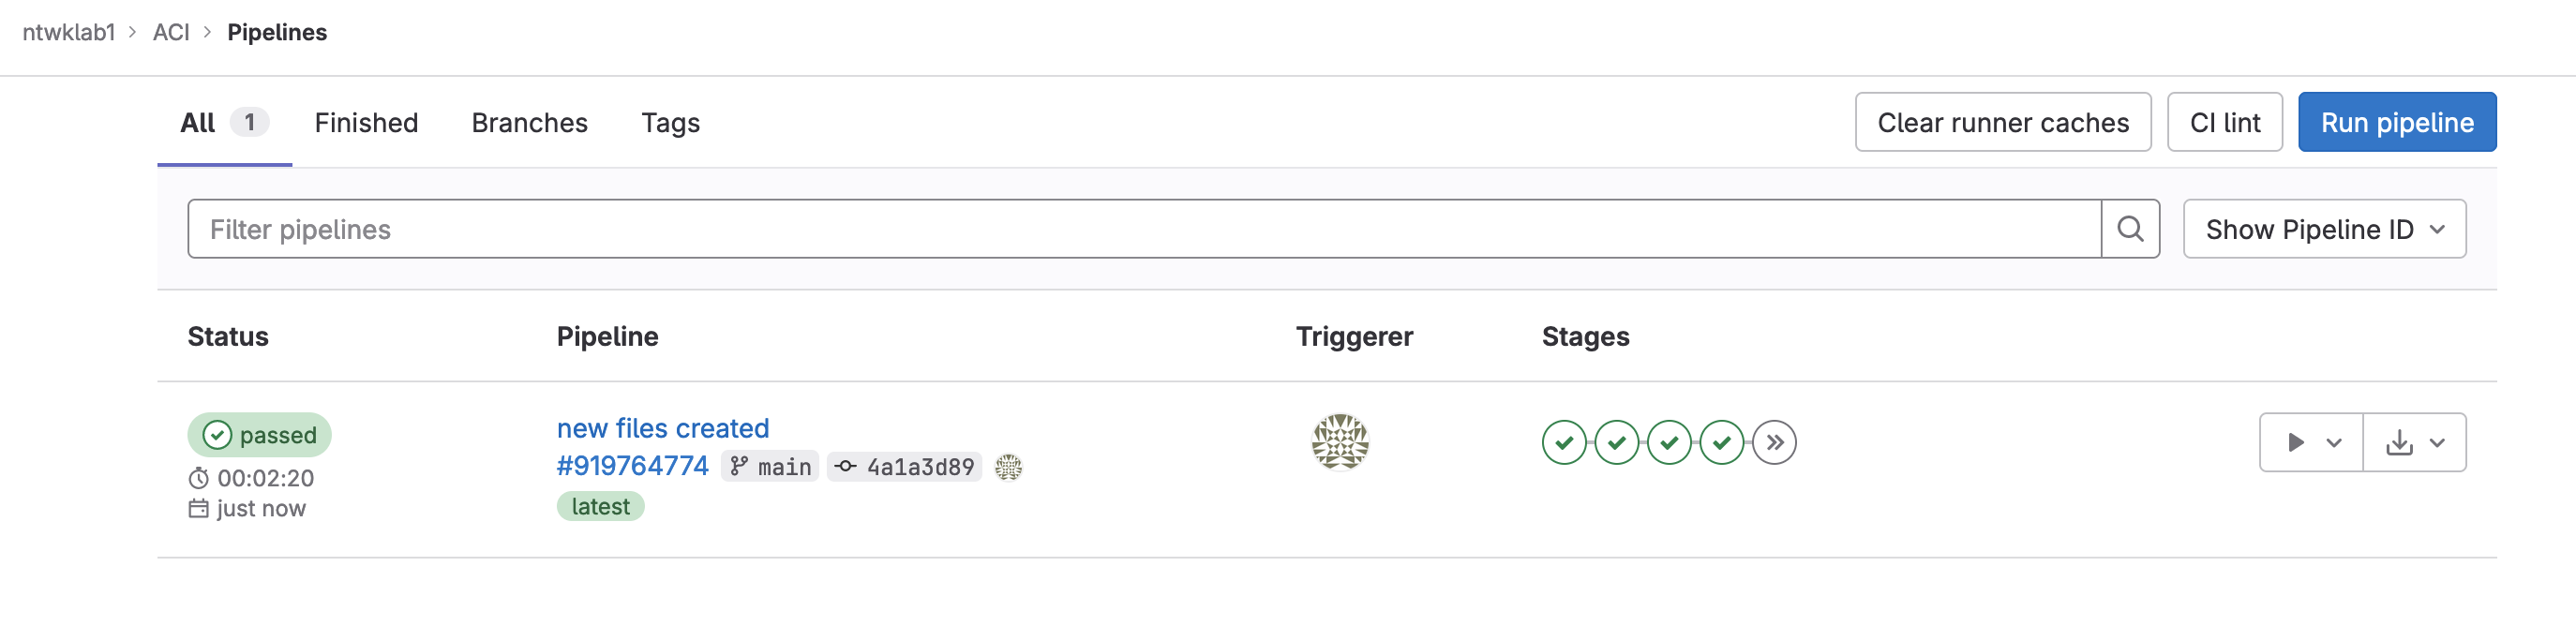
As the initial pipeline runs the Terraform state file in GitLab will be created.

Install GitLab Runner on Mac
The Terraform state was created using an already created GitLab runner on my Ubuntu VM. I will be using my Mac for this due to the VPN connection to the ACI DevNet lab.
I have created the new runner, the next steps are to install and register the runner.
As in the setup post for the GitLab runner, it is best to run this as sudo and include the networking command.
Create a new network called gitlab-runner-net
|
0 1 2 3 4 5 6 |
docker network create -d bridge gitlab-runner-net sudo docker network ls NETWORK ID NAME DRIVER SCOPE 2b47e89b06e0 gitlab-runner-net bridge local |
Next is to download and install the GitLab runner. I found the official way to install the service would only run under the user mode, but wouldn’t pick up any jobs. It needed to be run as sudo but that wouldn’t install as a service, any time it ran it was with sudo gitlab-runner run command which was nice as I could see the output, but not in the background.
To work around this, I used homebrew.
|
0 1 2 3 |
brew install gitlab-runner brew services start gitlab-runner |
Now that is installed. It is time to register the runner.
|
0 1 2 3 4 |
sudo gitlab-runner register --docker-network-mode 'gitlab-runner-net' \ --url https://gitlab.com \ --token <TOKEN> \ |
Other options include, selecting docker as the executor and alpine as the default docker image.
|
0 1 2 3 4 5 6 7 8 9 10 11 12 13 14 15 16 17 18 19 20 21 |
stefankelly@Stefans-MacBook-Pro ~ % sudo gitlab-runner register --docker-network-mode 'gitlab-runner-net' \ --url https://gitlab.com \ --token <TOKEN> \ > Runtime platform arch=amd64 os=darwin pid=48578 revision=b72e108d version=16.1.0 Running in system-mode. Created missing unique system ID system_id=s_9a3e3c61ffb8 Enter the GitLab instance URL (for example, https://gitlab.com/): [https://gitlab.com]: Verifying runner... is valid runner=LVUL_PEZn Enter a name for the runner. This is stored only in the local config.toml file: [Stefans-MacBook-Pro.local]: Enter an executor: docker-windows, parallels, shell, ssh, docker+machine, kubernetes, docker, virtualbox, docker-autoscaler, instance, custom: docker Enter the default Docker image (for example, ruby:2.7): alpine Runner registered successfully. Feel free to start it, but if it's running already the config should be automatically reloaded! Configuration (with the authentication token) was saved in "/etc/gitlab-runner/config.toml" |
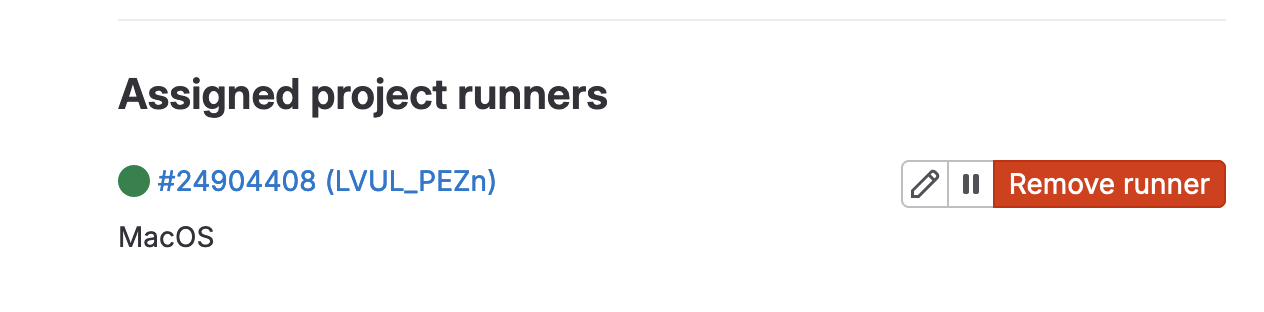
Check the newly configured file for the settings. These can be modified, just restart the runner gitlab-runner restart
|
0 1 2 3 4 5 6 7 8 9 10 11 12 13 14 15 16 17 18 19 20 21 22 23 24 25 26 27 28 29 |
sudo cat /etc/gitlab-runner/config.toml concurrent = 1 check_interval = 0 shutdown_timeout = 0 [session_server] session_timeout = 1800 [[runners]] name = "Stefans-MacBook-Pro.local" url = "https://gitlab.com" id = 24904408 token = "TOKEN" token_obtained_at = 2023-07-03T22:31:36Z token_expires_at = 0001-01-01T00:00:00Z executor = "docker" [runners.cache] MaxUploadedArchiveSize = 0 [runners.docker] tls_verify = false image = "alpine" privileged = false disable_entrypoint_overwrite = false oom_kill_disable = false disable_cache = false volumes = ["/cache"] network_mode = "gitlab-runner-net" shm_size = 0 |
Run the runner as sudo to connect, sudo gitlab-runner run
Terraform
Now the actual config is ready for the ACI lab. The main.tf contains the Terraform to configure;
- Interface Policies
- Interface Policy Groups
- Interface Profile
- Interface Selector
- Switch Profile
- VLAN Pool
- Physical Domain
- AAEP
|
0 1 2 3 4 5 6 7 8 9 10 11 12 13 14 15 16 17 18 19 20 21 22 23 24 25 26 27 28 29 30 31 32 33 34 35 36 37 38 39 40 41 42 43 44 45 46 47 48 49 50 51 52 53 54 55 56 57 58 59 60 61 62 63 64 65 66 67 68 69 70 71 72 73 74 75 76 77 78 79 80 81 82 83 84 85 86 87 88 89 90 91 92 93 94 95 96 97 98 99 100 101 102 103 104 105 106 107 108 109 110 111 112 113 114 115 116 117 118 119 120 121 122 123 124 125 126 127 128 129 130 131 132 133 134 135 136 137 138 139 140 141 142 143 144 145 146 147 148 149 150 151 152 153 154 155 156 157 158 159 160 161 162 163 164 165 166 167 168 169 170 171 172 173 174 175 176 177 178 179 180 181 182 183 184 185 186 187 188 189 190 191 192 193 194 195 196 197 198 199 200 201 202 203 204 205 206 207 208 209 210 211 212 213 214 215 216 217 218 219 220 221 222 223 224 225 226 227 228 229 230 231 232 233 234 235 236 237 238 239 240 241 242 243 244 245 246 247 248 249 250 251 252 253 254 255 256 257 258 259 260 261 262 263 264 265 266 267 268 269 270 271 272 273 274 275 276 277 278 279 280 281 282 283 284 285 286 287 288 289 290 291 292 293 294 295 296 297 298 299 300 301 302 303 304 305 306 307 308 309 310 311 312 313 314 315 316 317 318 319 320 321 322 323 324 325 326 327 328 329 330 331 332 333 334 335 336 337 338 339 340 341 342 343 344 345 346 347 348 349 350 351 352 353 354 355 356 357 358 359 360 361 362 363 364 365 366 367 368 369 370 371 372 373 374 375 376 377 378 379 380 381 382 383 384 385 386 387 388 389 390 391 392 393 394 395 |
terraform { required_providers { aci = { source = "ciscodevnet/aci" } } } #configure provider with your cisco aci credentials. provider "aci" { # cisco-aci user name username = "admin" # cisco-aci password password = "!v3G@!4@Y" # cisco-aci url url = "https://sandboxapicdc.cisco.com" insecure = true } ######################### #Interface Policies# ######################### # CDP resource "aci_cdp_interface_policy" "cdp_enabled" { name = "cdp_enabled" admin_st = "enabled" annotation = "tag_cdp" name_alias = "alias_cdp" description = "From Terraform" } resource "aci_cdp_interface_policy" "cdp_disabled" { name = "cdp_disabled" admin_st = "disabled" annotation = "tag_cdp" name_alias = "alias_cdp" description = "From Terraform" } #Port Speeds module "aci_link_level_policy" { source = "netascode/link-level-policy/aci" version = ">= 0.1.0" name = "10G" speed = "10G" auto = true fec_mode = "disable-fec" } module "aci_link_level_policy_example" { source = "netascode/link-level-policy/aci" version = ">= 0.1.0" name = "100G" speed = "100G" auto = true fec_mode = "disable-fec" } #Port Channels module "aci_port_channel_policy_LACP_ACTIVE" { source = "netascode/port-channel-policy/aci" version = ">= 0.1.0" name = "PC-LACP-ACTIVE" mode = "active" min_links = 1 max_links = 16 suspend_individual = false graceful_convergence = false fast_select_standby = false load_defer = true symmetric_hash = true hash_key = "src-ip" } module "aci_port_channel_policy_MAC_PINNING" { source = "netascode/port-channel-policy/aci" version = ">= 0.1.0" name = "PC-MAC_PINNING" mode = "mac-pin" min_links = 1 max_links = 16 suspend_individual = false graceful_convergence = false fast_select_standby = false load_defer = true symmetric_hash = true hash_key = "src-ip" } module "aci_port_channel_policy_STATIC_ON" { source = "netascode/port-channel-policy/aci" version = ">= 0.1.0" name = "PC-STATIC_ON" mode = "off" min_links = 1 max_links = 16 suspend_individual = false graceful_convergence = false fast_select_standby = false load_defer = true symmetric_hash = true hash_key = "src-ip" } resource "aci_lldp_interface_policy" "LLDP_RX-on_TX-on" { description = "example description" name = "LLDP_RX-on_TX-on" admin_rx_st = "enabled" admin_tx_st = "enabled" annotation = "tag_lldp" } resource "aci_lldp_interface_policy" "LLDP_RX-off_TX-off" { description = "example description" name = "LLDP_RX-off_TX-off" admin_rx_st = "disabled" admin_tx_st = "disabled" annotation = "tag_lldp" } resource "aci_lldp_interface_policy" "LLDP_RX-on_TX-off" { description = "example description" name = "LLDP_RX-on_TX-off" admin_rx_st = "enabled" admin_tx_st = "disabled" annotation = "tag_lldp" } resource "aci_lldp_interface_policy" "LLDP_RX-off_TX-on" { description = "example description" name = "LLDP_RX-off_TX-on" admin_rx_st = "disabled" admin_tx_st = "enabled" annotation = "tag_lldp" } #MCP module "aci_mcp_policy_off" { source = "netascode/mcp-policy/aci" version = ">= 0.1.0" name = "MCP-OFF" admin_state = false } module "aci_mcp_policy_on" { source = "netascode/mcp-policy/aci" version = ">= 0.1.0" name = "MCP-ON" admin_state = true } ######################### #Interface Policy Group# ######################### module "aci_access_leaf_interface_policy_group" { source = "netascode/access-leaf-interface-policy-group/aci" version = ">= 0.1.4" name = "10G-CDP-LLDP" description = "VPC Interface Policy Group 1" type = "access" link_level_policy = "10G" cdp_policy = "CDP-ON" lldp_policy = "LLDP-ON" aaep = "BU1_AAEP" } ######################### #Interface Profile# ######################### resource "aci_leaf_interface_profile" "IntProf-101" { description = "From Terraform" name = "IntProf-101" annotation = "tag_leaf" name_alias = "name_alias" } resource "aci_leaf_interface_profile" "IntProf-102" { description = "From Terraform" name = "IntProf-102" annotation = "tag_leaf" name_alias = "name_alias" } ######################### #Interface Selector# ######################### module "aci_access_leaf_interface_selector" { source = "netascode/access-leaf-interface-selector/aci" version = ">= 0.2.0" interface_profile = "IntProf-101" name = "E1" policy_group_type = "access" policy_group = "10G-CDP-LLDP" port_blocks = [{ name = "PB1" description = "My Description" from_port = 1 to_port = 1 }] } module "aci_access_leaf_interface_selector_E2" { source = "netascode/access-leaf-interface-selector/aci" version = ">= 0.2.0" interface_profile = "IntProf-101" name = "E2" policy_group_type = "access" policy_group = "10G-CDP-LLDP" port_blocks = [{ name = "PB2" description = "My Description" from_port = 2 to_port = 2 }] } module "aci_access_leaf_interface_selector_E3" { source = "netascode/access-leaf-interface-selector/aci" version = ">= 0.2.0" interface_profile = "IntProf-101" name = "E3" policy_group_type = "access" policy_group = "10G-CDP-LLDP" port_blocks = [{ name = "PB3" description = "My Description" from_port = 3 to_port = 3 }] } module "aci_access_leaf_interface_selector_E4" { source = "netascode/access-leaf-interface-selector/aci" version = ">= 0.2.0" interface_profile = "IntProf-101" name = "E4" policy_group_type = "access" policy_group = "10G-CDP-LLDP" port_blocks = [{ name = "PB4" description = "My Description" from_port = 4 to_port = 4 }] } ######################### #Switch Profile# ######################### module "aci_access_leaf_switch_profile_profile_101" { source = "netascode/access-leaf-switch-profile/aci" version = ">= 0.2.0" name = "SW-PROFILE-101" interface_profiles = ["IntProf-101"] selectors = [{ name = "LEAF101" # policy_group = "POL1" node_blocks = [{ name = "LEAF101" from = 101 to = 101 }] }] } module "aci_access_leaf_switch_profile_profile_102" { source = "netascode/access-leaf-switch-profile/aci" version = ">= 0.2.0" name = "SW-PROFILE-102" interface_profiles = ["IntProf-102"] selectors = [{ name = "LEAF102" # policy_group = "POL1" node_blocks = [{ name = "LEAF102" from = 102 to = 102 }] }] } module "aci_access_leaf_switch_profile_profile_101-102" { source = "netascode/access-leaf-switch-profile/aci" version = ">= 0.2.0" name = "SW-PROFILE-101-102" # interface_profiles = ["IntProf-101-102"] selectors = [{ name = "LEAF101-102" # policy_group = "POL1" node_blocks = [{ name = "LEAF101-102" from = 101 to = 102 }] }] } ######################### #VLAN Pool# ######################### module "aci_vlan_pool_BU1_BMH-VLAN" { source = "netascode/vlan-pool/aci" version = ">= 0.2.2" name = "BU1_BMH-VLAN" description = "Vlan Pool 1" allocation = "static" ranges = [{ description = "Range 1" from = 1000 to = 1000 allocation = "inherit" role = "internal" }, { description = "Range 2" from = 1001 to = 1001 allocation = "inherit" role = "internal" }] } module "aci_vlan_pool_BU1_VMM-VLAN" { source = "netascode/vlan-pool/aci" version = ">= 0.2.2" name = "BU1_VMM-VLAN" description = "Vlan Pool 2" allocation = "dynamic" ranges = [{ description = "Range 1" from = 1005 to = 1020 allocation = "inherit" role = "internal" }] } ######################### #Physical Domain# ######################### module "aci_physical_domain_BU1_BMH-Domain" { source = "netascode/physical-domain/aci" version = ">= 0.1.0" name = "BU1_BMH-Domain" vlan_pool = "BU1_BMH-VLAN" vlan_pool_allocation = "static" } ######################### #AAEP# ######################### module "aci_aaep" { source = "netascode/aaep/aci" version = ">= 0.2.0" name = "BU1_AAEP" # infra_vlan = 10 physical_domains = ["BU1_BMH-Domain"] # routed_domains = ["RD1"] # vmware_vmm_domains = ["VMM1"] # endpoint_groups = [{ # tenant = "BU1" # application_profile = "BU1_AP1" # endpoint_group = "BU1_EPG1" # primary_vlan = 10 # secondary_vlan = 20 # mode = "untagged" # deployment_immediacy = "immediate" # }] } |
Running
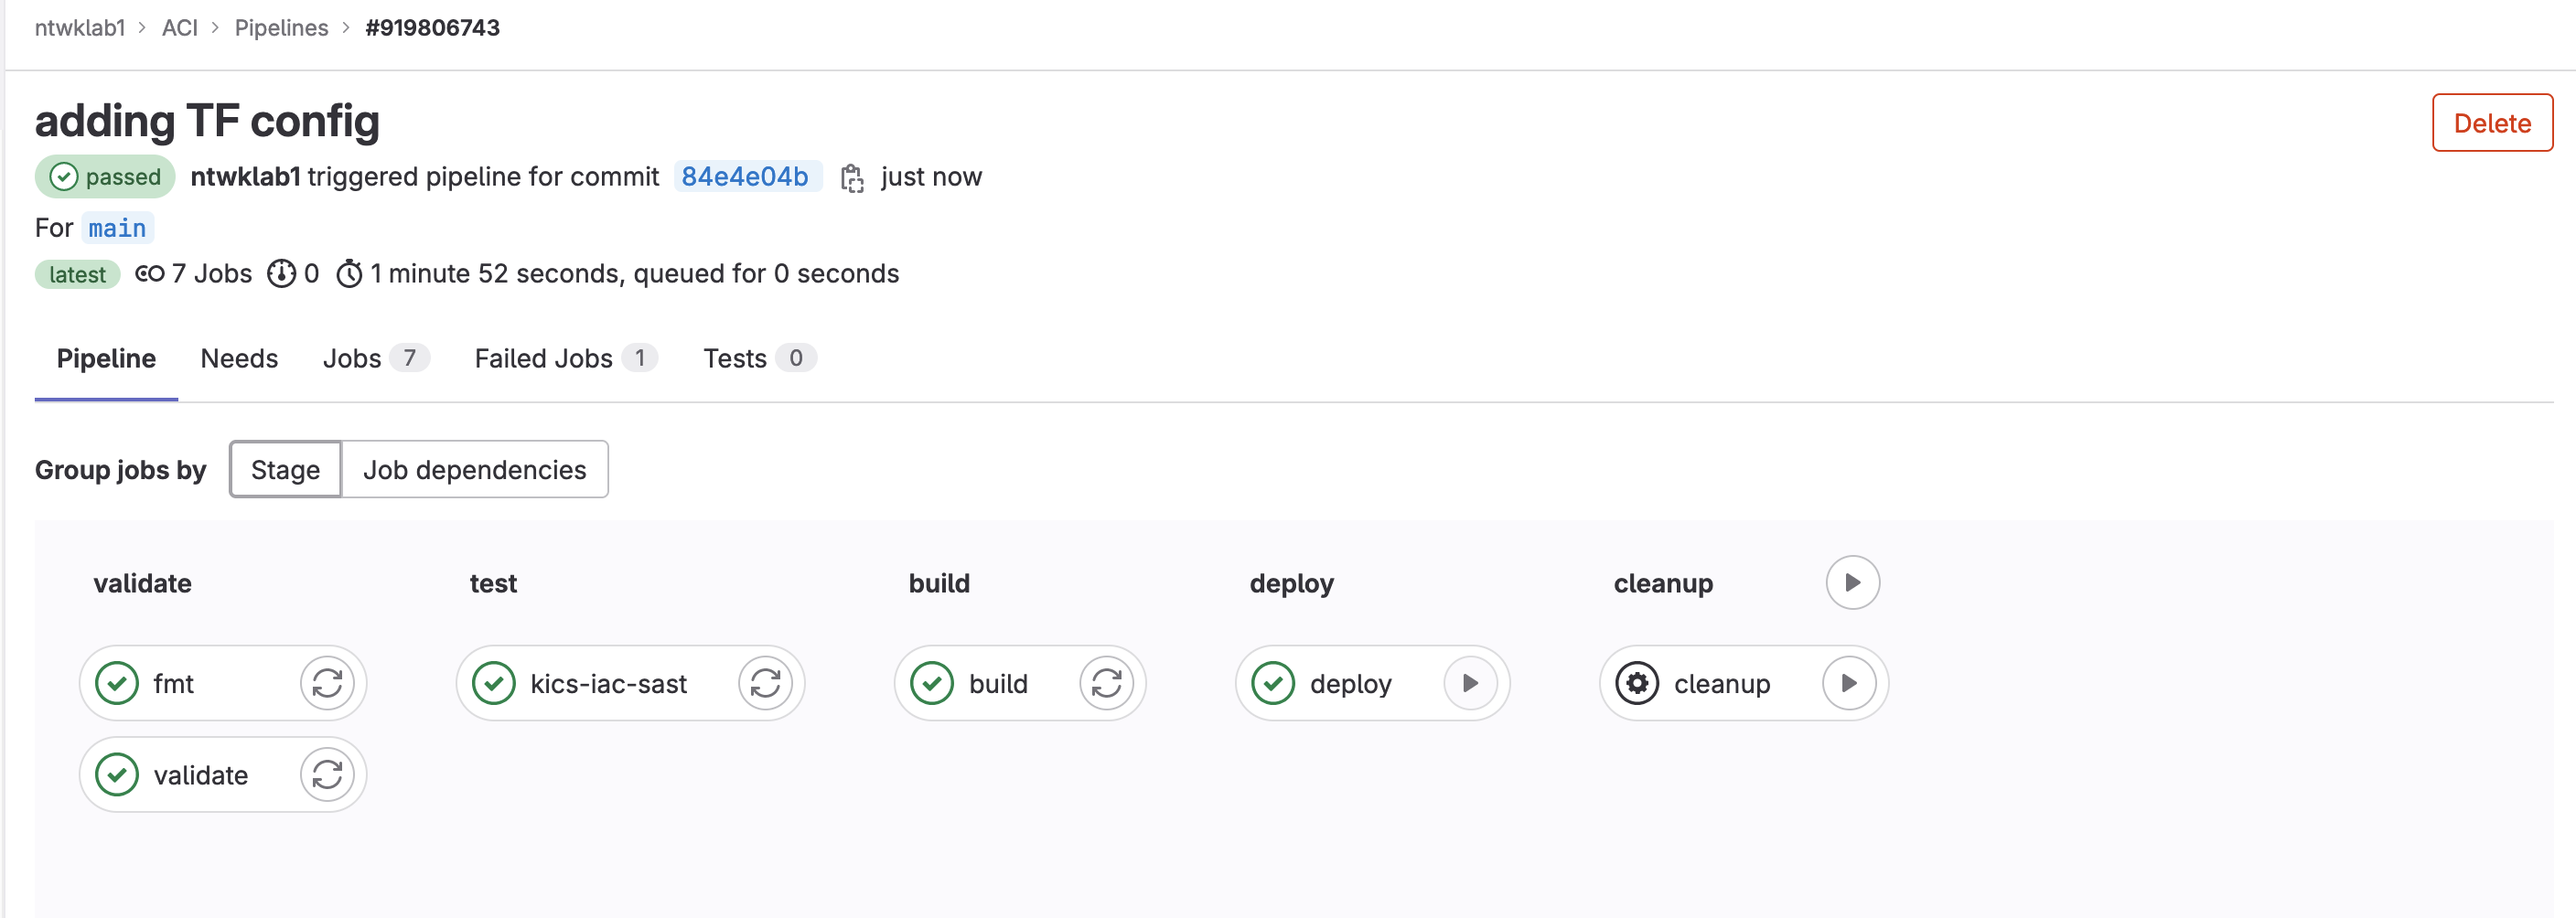
A change to the main.tf file will trigger the GitLab runner.
|
0 1 2 3 |
git commit -am "adding TF config" git push |
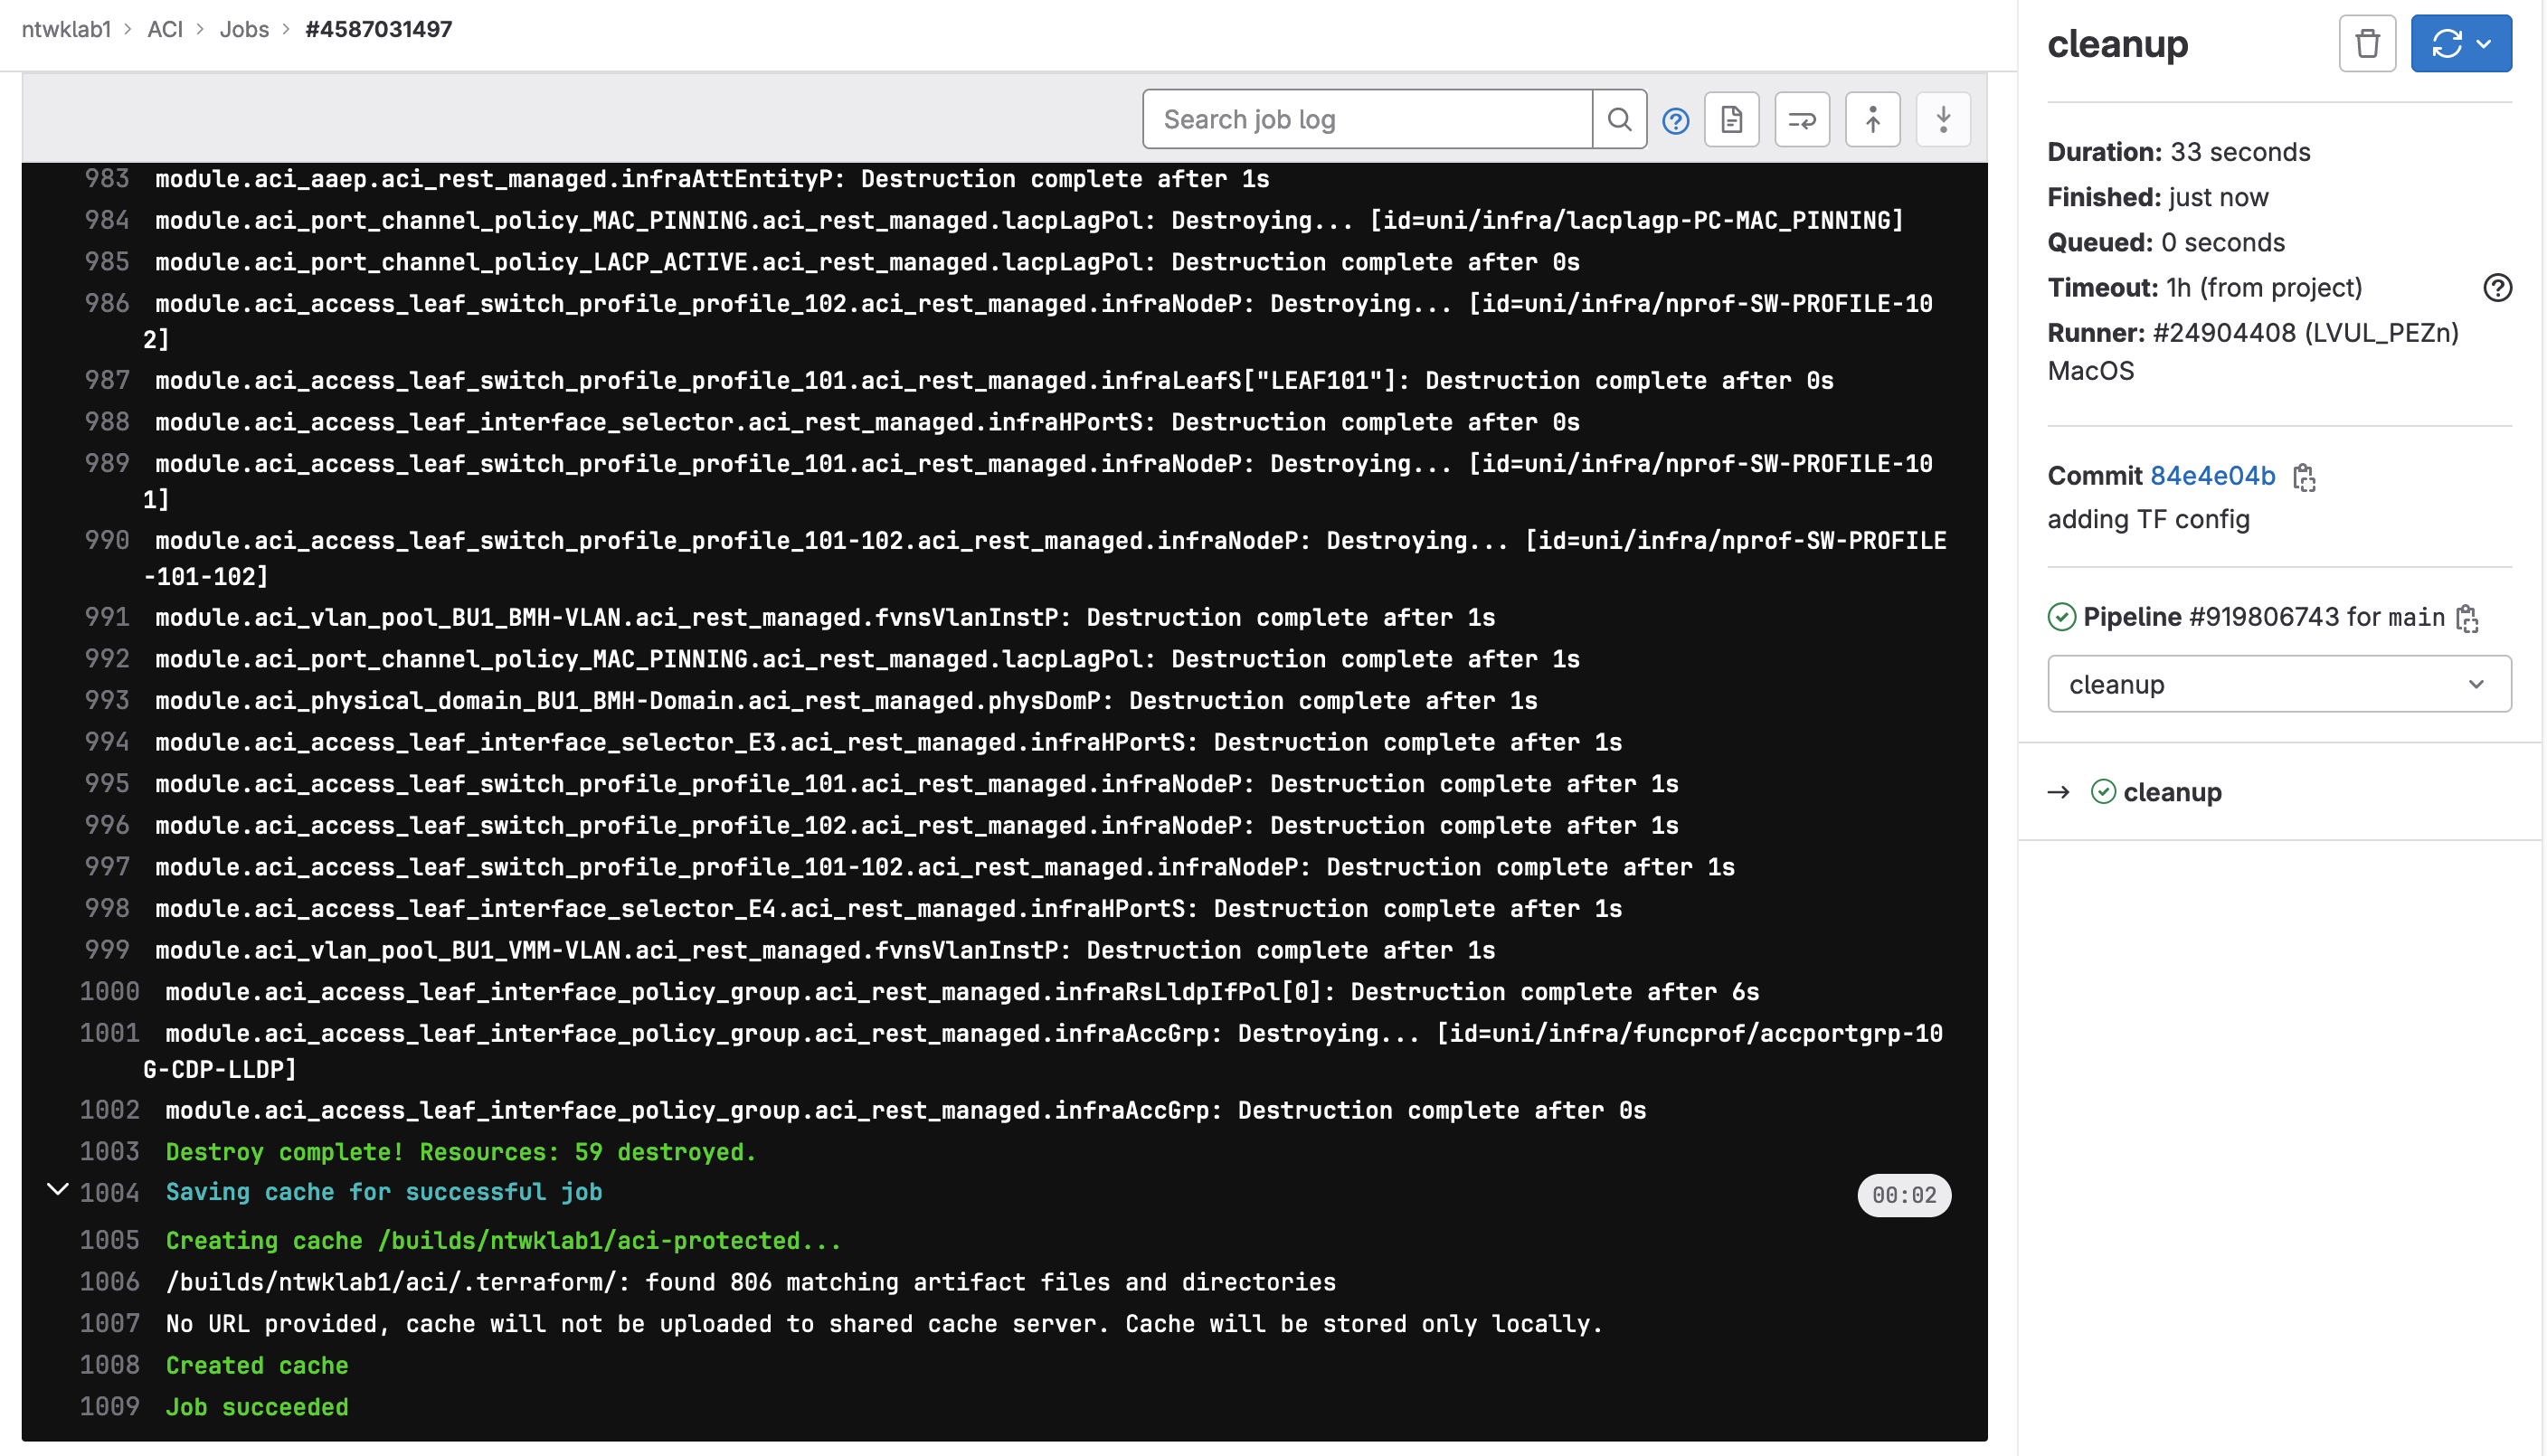
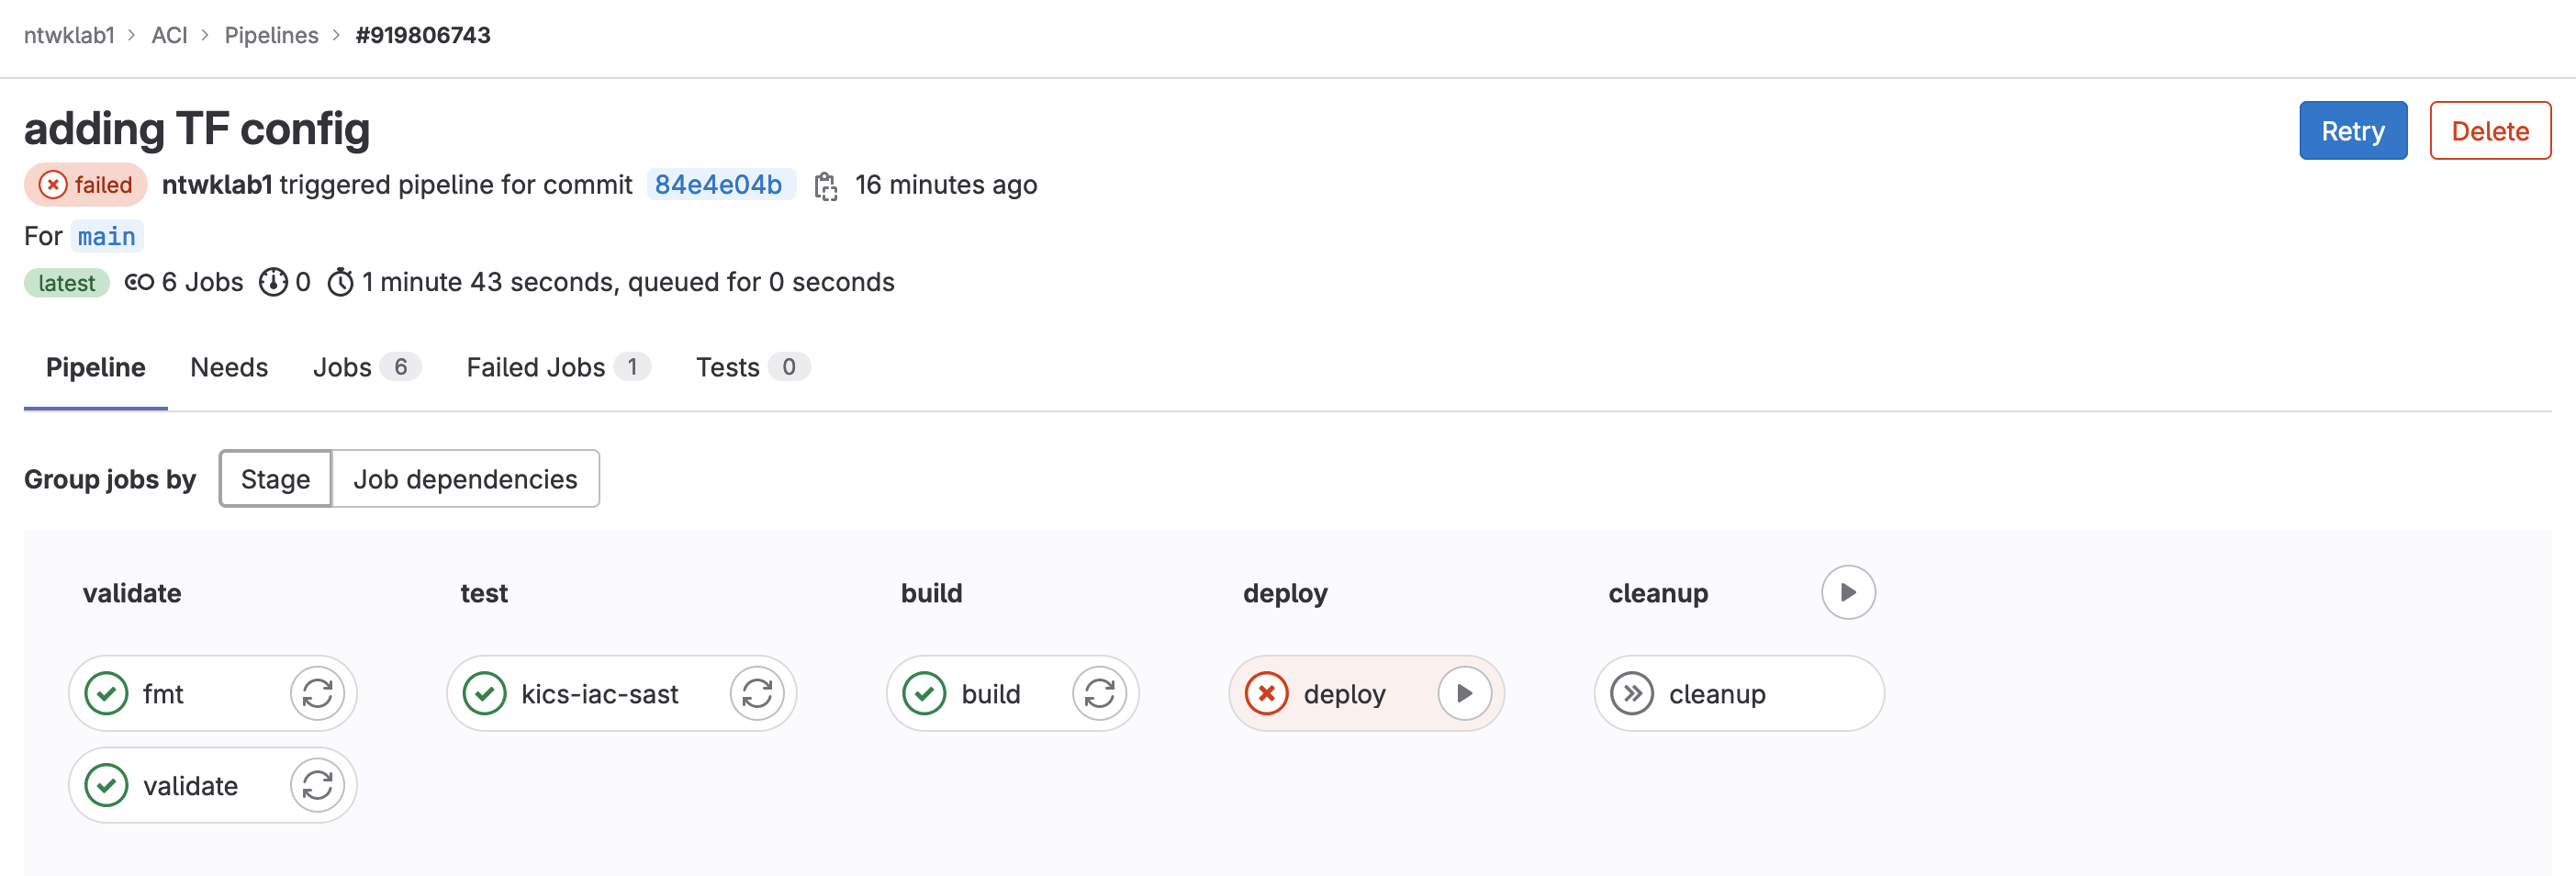
The pipeline will run the first three stages automatically and then wait for the deploy to be manually triggered.
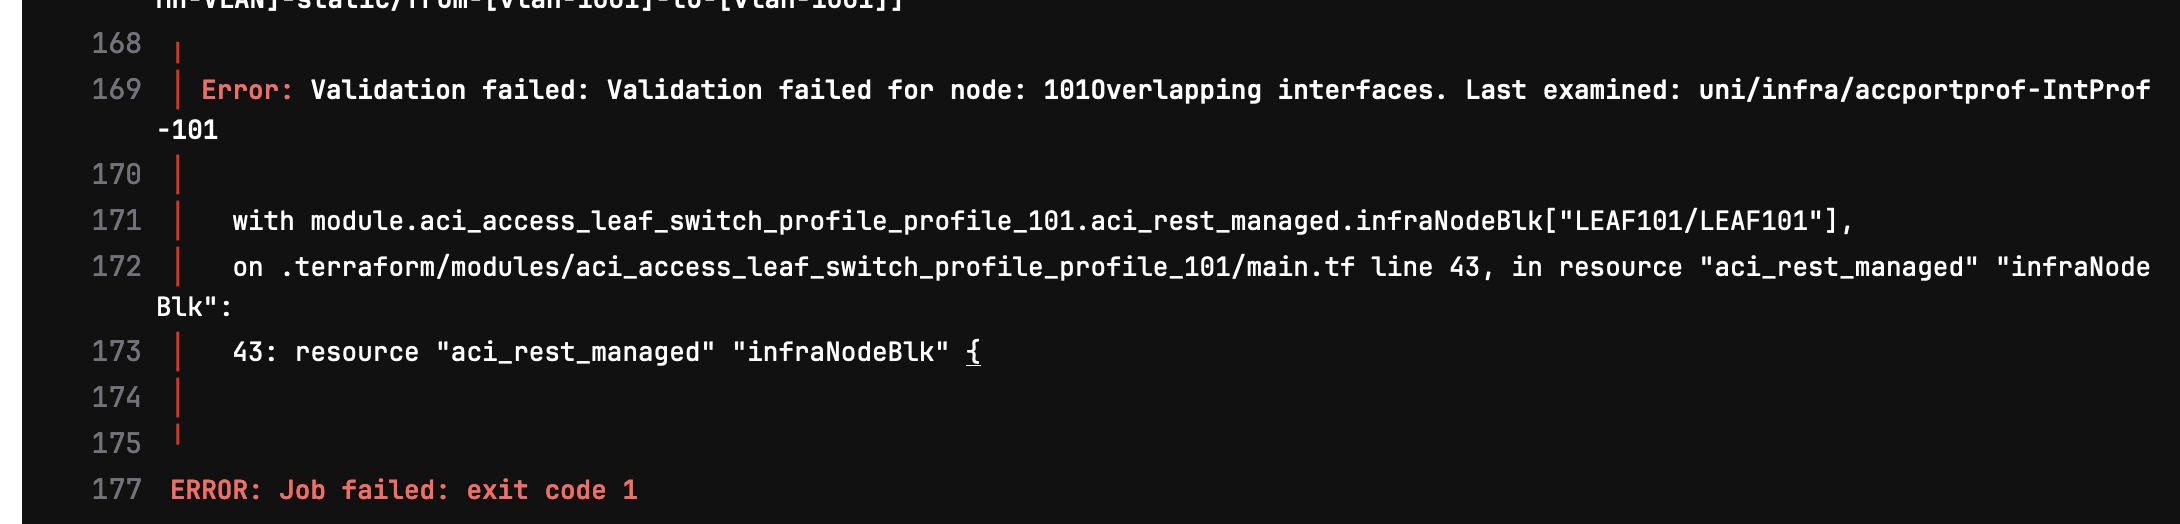
The first time I ran this, there was an error with the deploy stage due to interface overlaps. I will go on to fix this manually after.
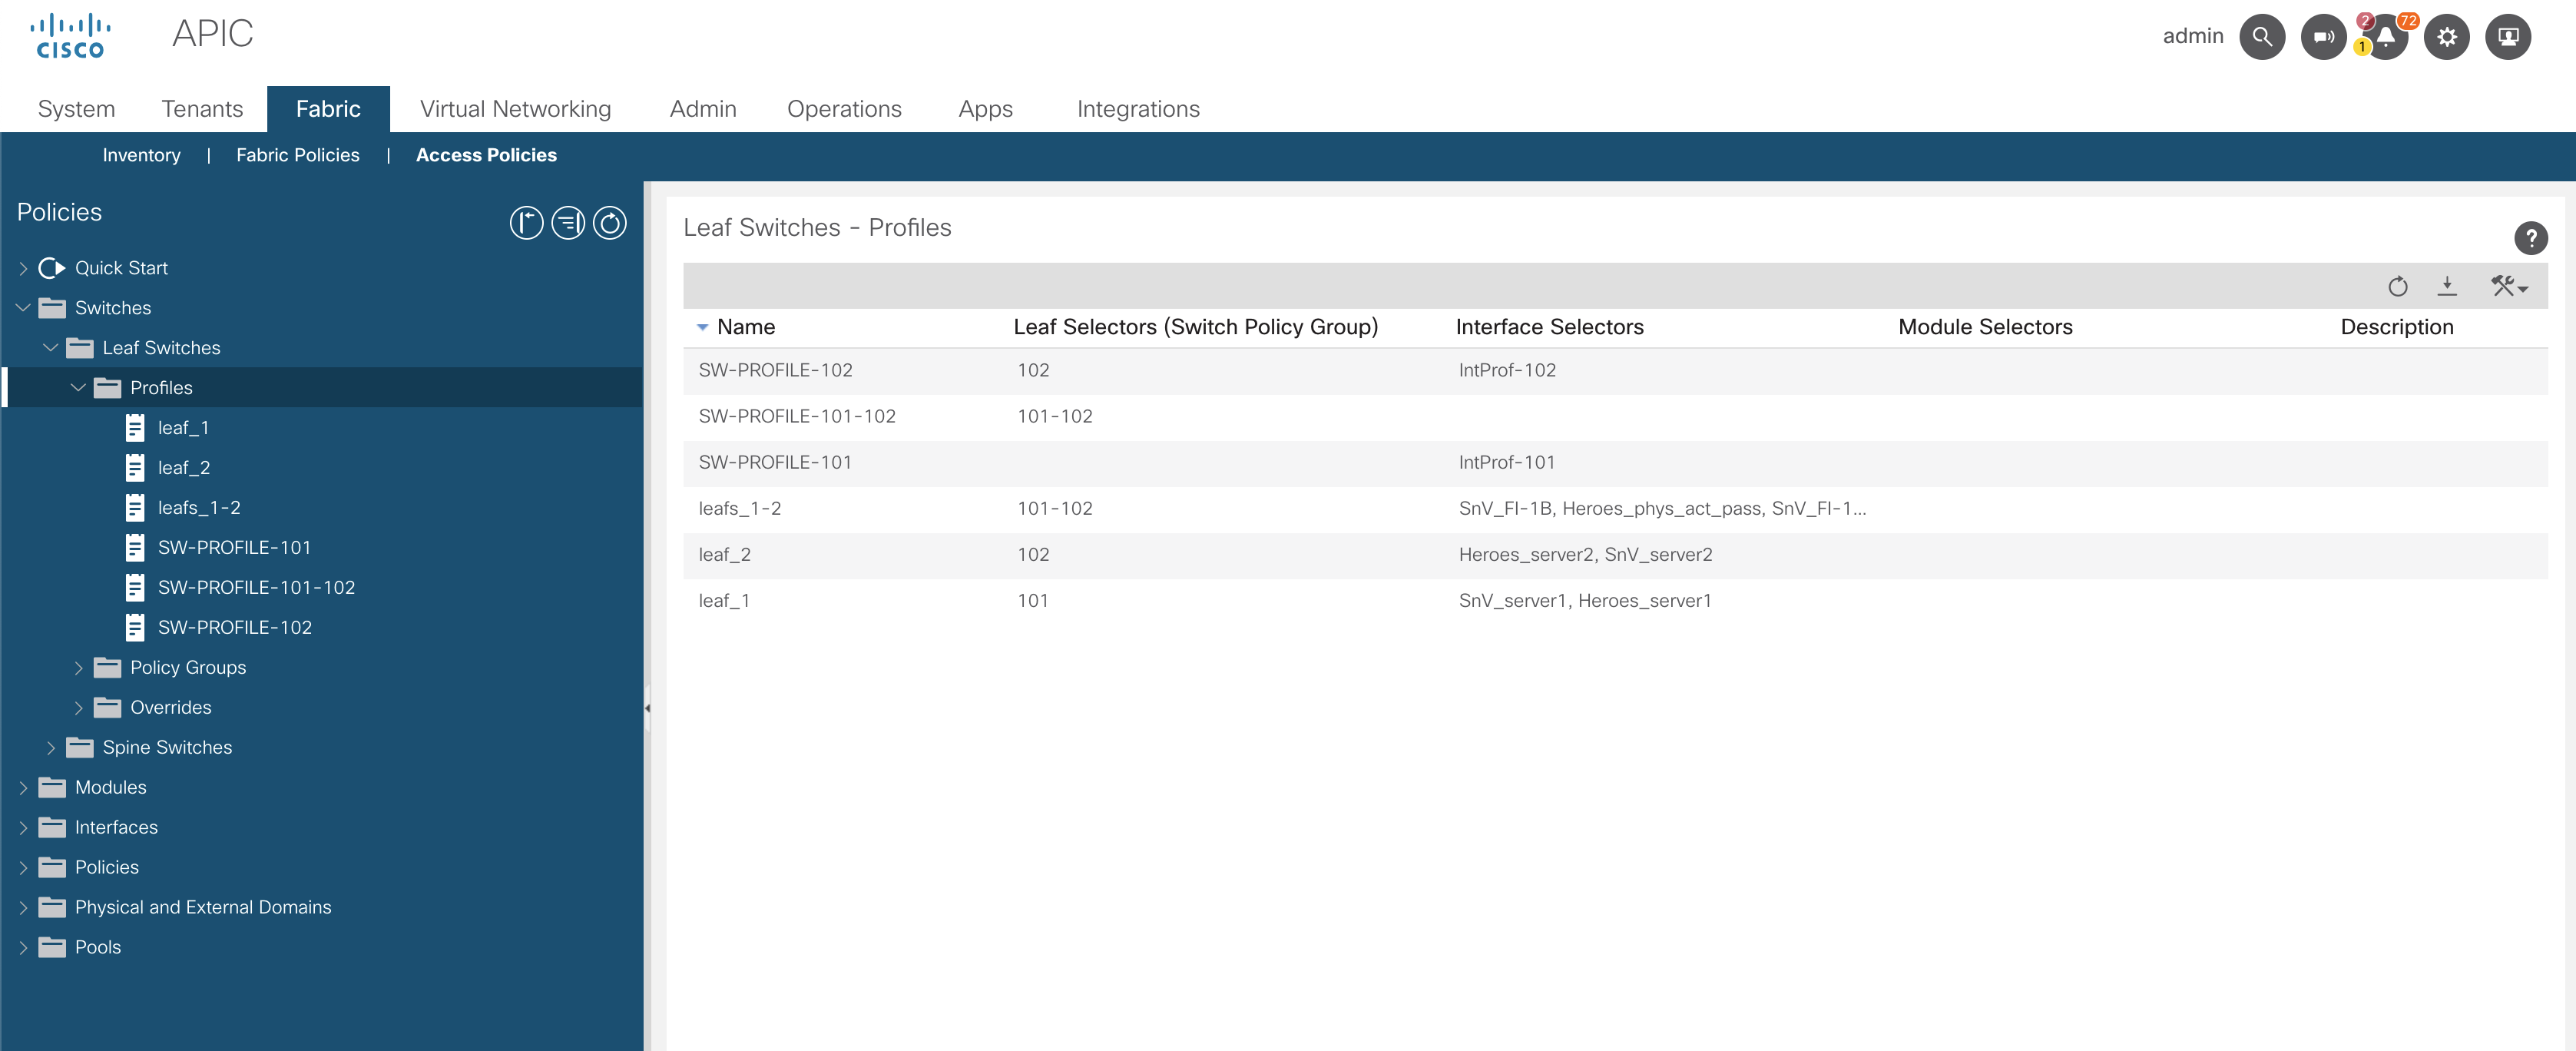
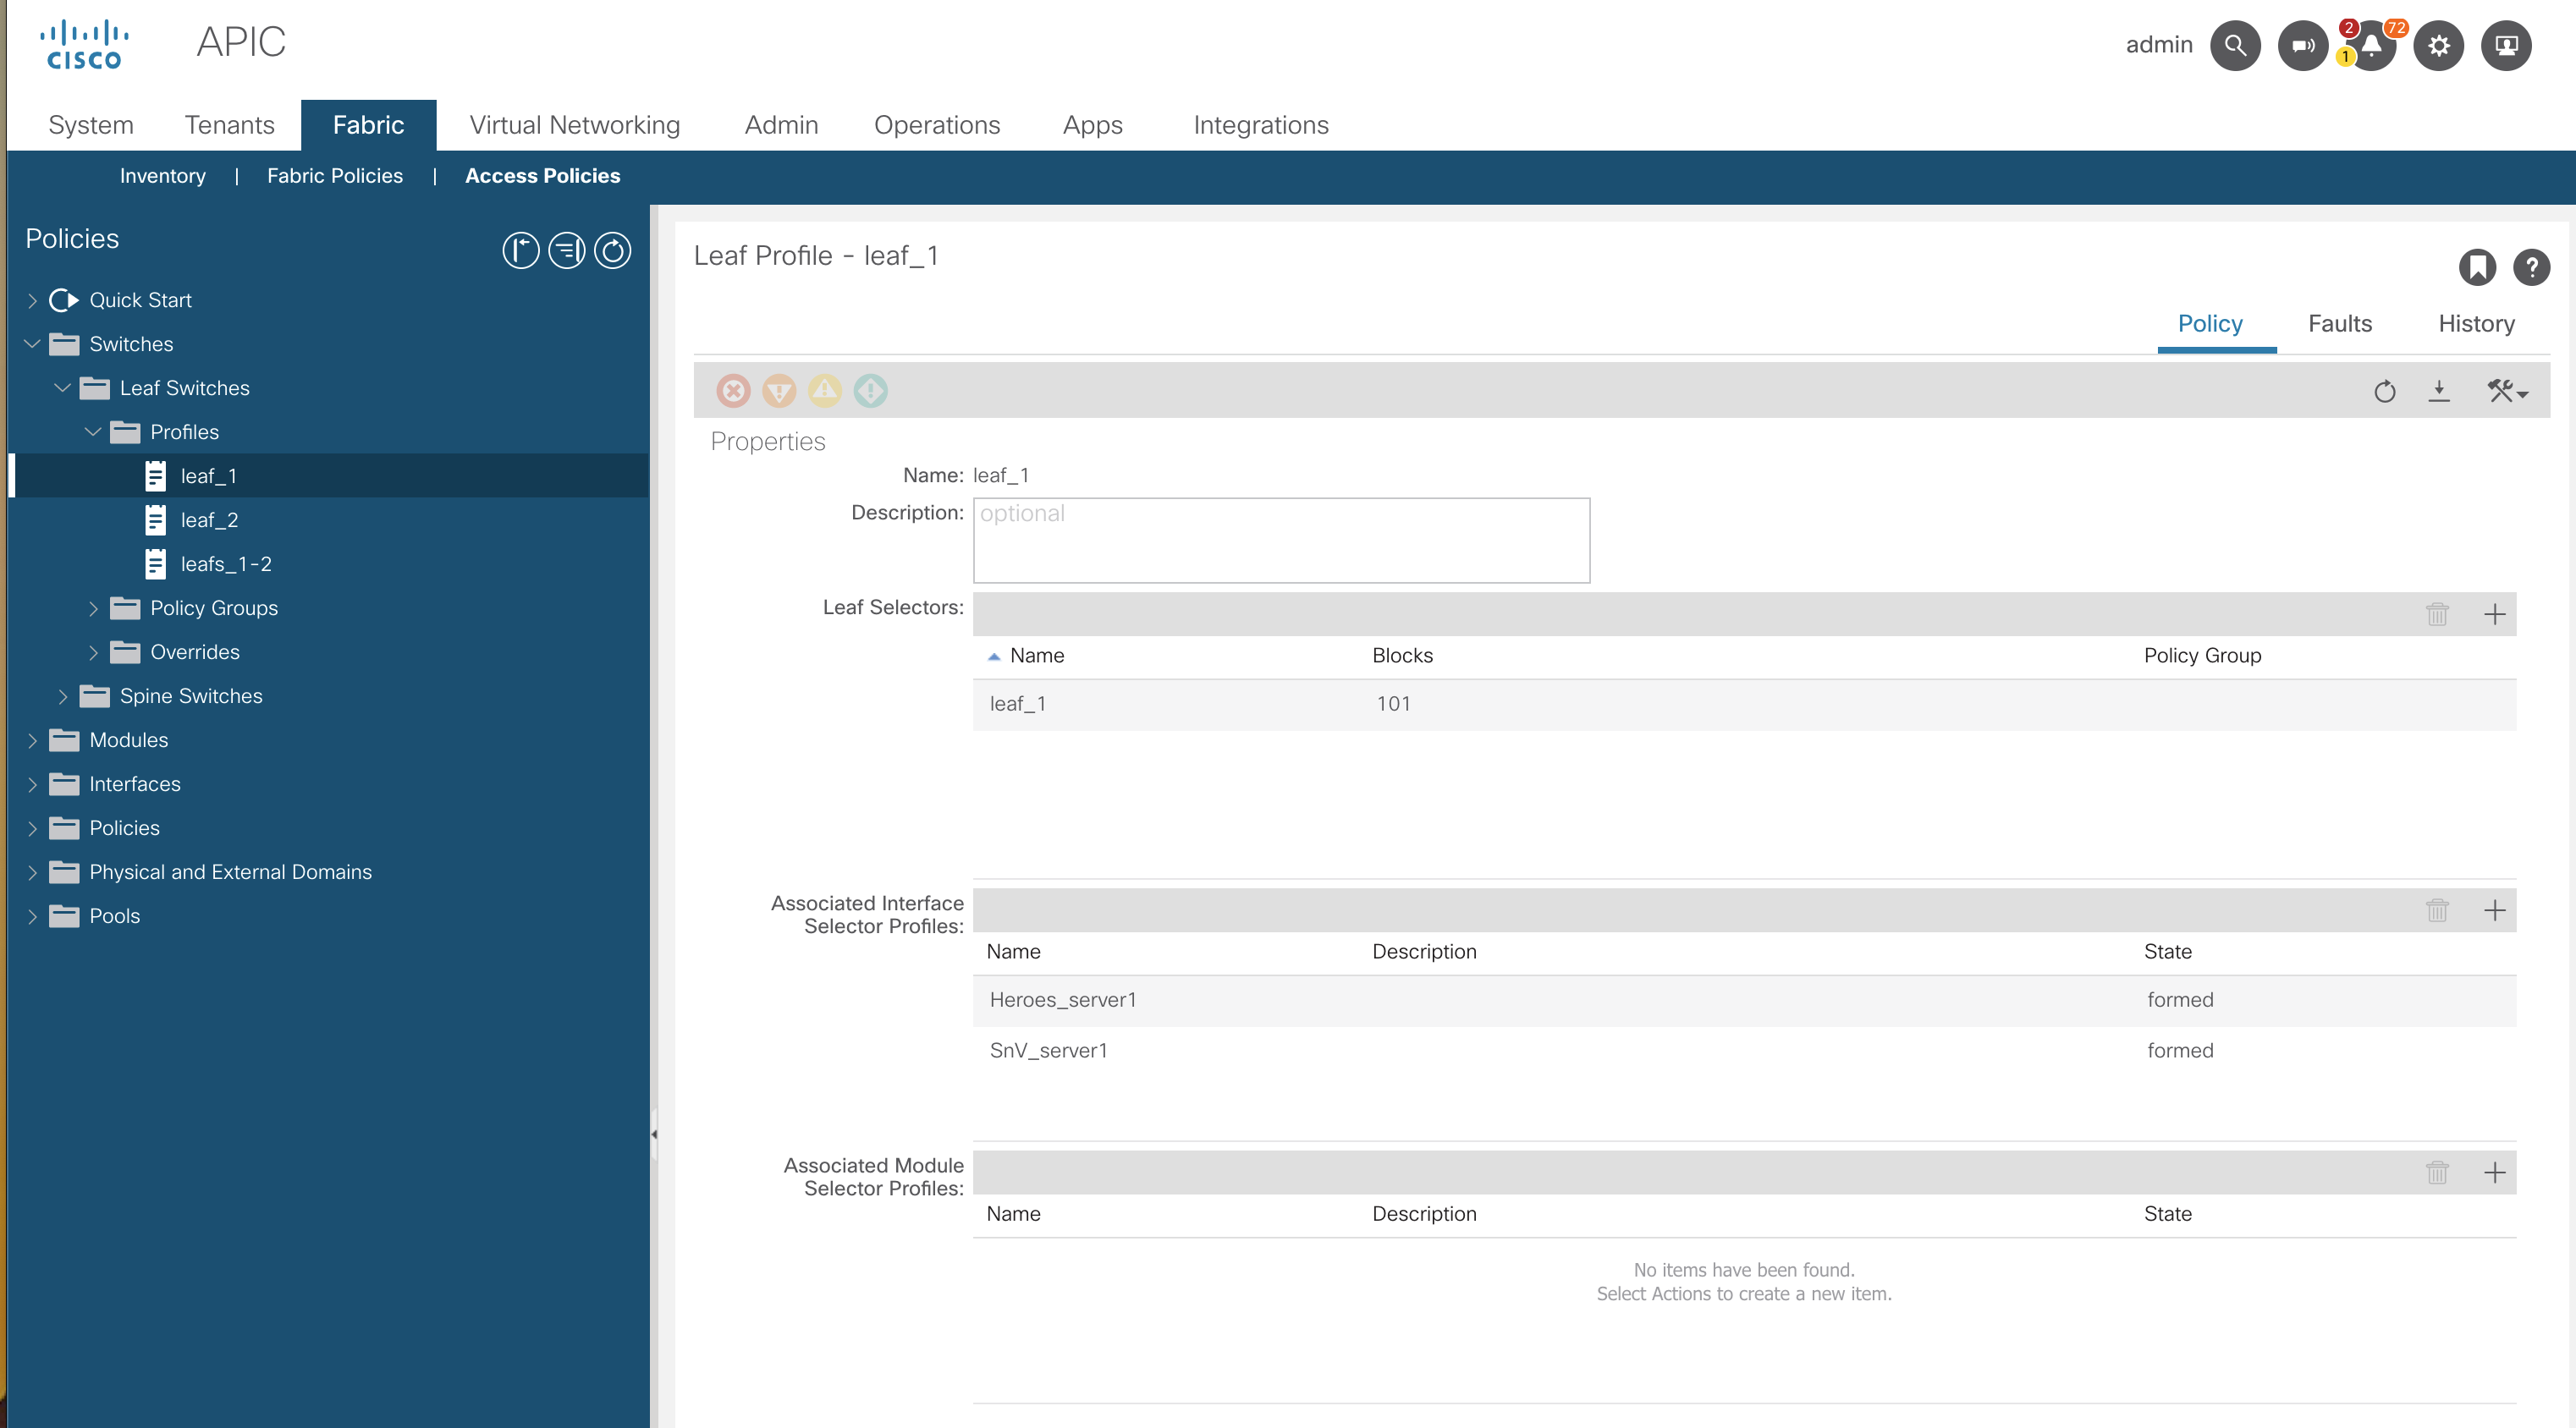
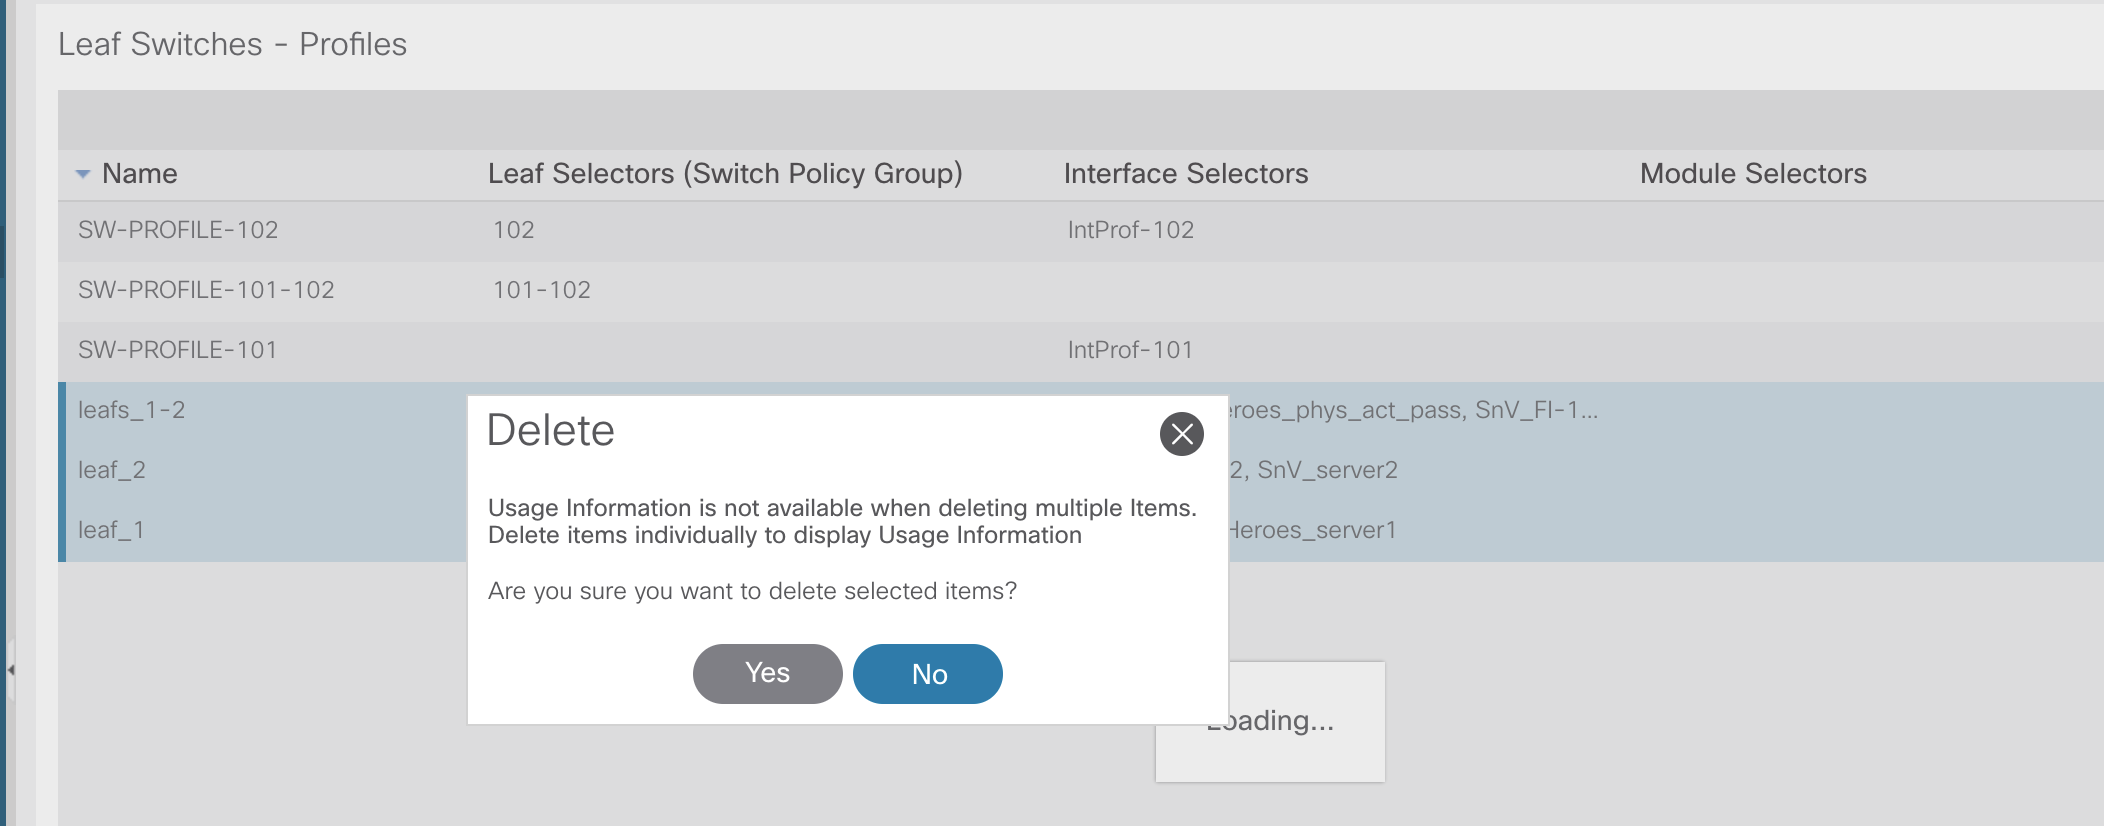
I have logged into the GUI and removed the pre-configured leaf profiles, which has cleared the conflicting configuration.
The build stage to recreate the plan needed to be rerun, so only the single change was required.

And lastly, to destroy the configuration.