This post is to briefly go over the adding of a new vEdge to a GNS3 Lab. I have created a lab as shown in the screenshot below using the guide from this website. I am not going to repeat all of it, as it is very detailed and very clear already.
However, I have changed the lab to suit my own needs, and therefore I would like to add this information in.

The main difference is that I am going to be configuring devices that are not on the same LAN as the vManage, vBond and vSmart.
Every vEdge must connect to the vBond in order to initialise and get the configuration from the vManage.
To do this I have used DNS on the Core router.
|
0 1 2 3 4 5 |
ip dns server ip host vbond.networkinglab.xyz 172.16.1.11 ip host vmanage.networkinglab.xyz 172.16.1.10 ip host vsmart.networkinglab.xyz 172.16.1.12 |
Setup A New vEdge
As the vManage should already be setup by this point, there will be a root CA cert named ROOTCA.pem that is found on the vManage. Copy the contents of this file and paste it in a notepad.
Boot up the vEdge router and enter the vshell, create a new file named ROOTCA.pem and then paste in the certificate text.
|
0 1 2 3 4 5 |
vshell vim ROOTCA.pem !!!! Paste in the certificate contents and save!!! exit |
Back in the vEdge Cisco shell, install the certificate
|
0 1 2 3 4 5 6 |
vedge# request root-cert-chain install /home/admin/ROOTCA.pem Uploading root-ca-cert-chain via VPN 0 Copying ... /home/admin/ROOTCA.pem via VPN 0 Updating the root certificate chain.. Successfully installed the root certificate chain |
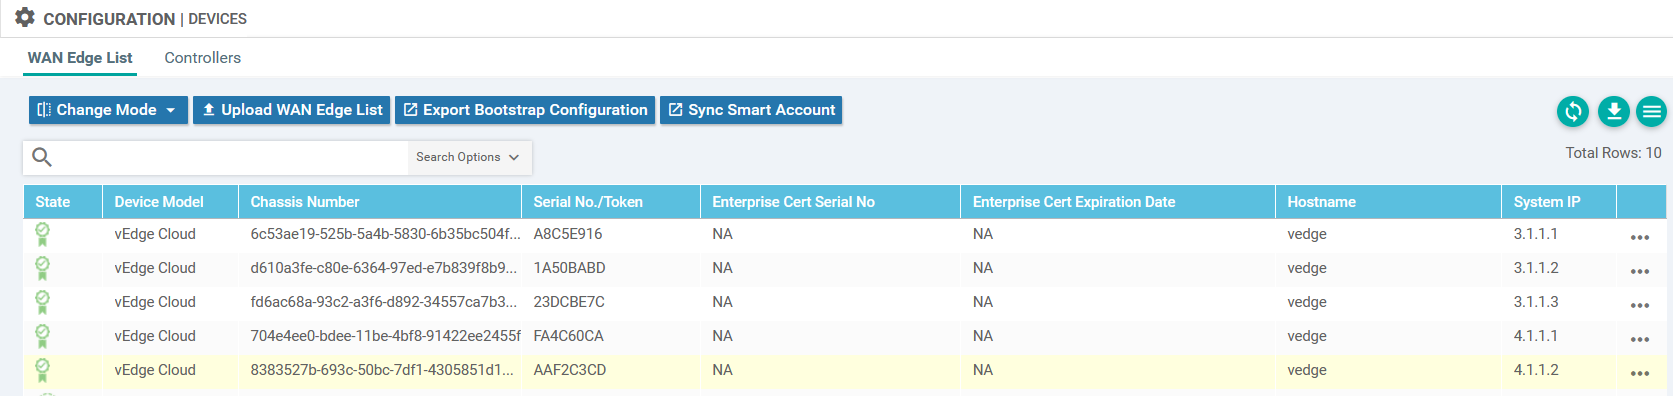
Navigate to the vManage web interface, https://172.16.1.10 in my lab.
From here, navigate to Configuration >>> Devices >>> WAN Edge List >>> ... >>> Generate Bootstrap Configuration

Select Cloud-init

Copy the uuid and the otp to a notepad, close this dialogue box, it is no longer required.
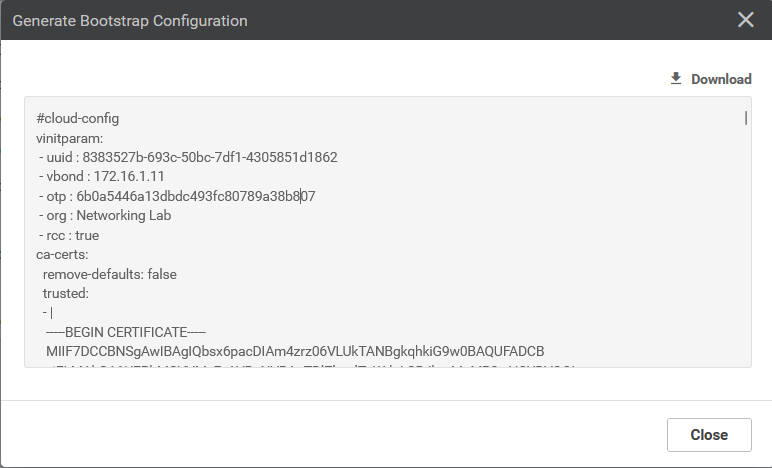
Back in the vEdge router terminal, paste in the following command using the uuid and the otp
|
0 1 2 3 |
request vedge-cloud activate chassis-number [UUID] token [OTP] request vedge-cloud activate chassis-number 8383527b-693c-50bc-7df1-4305851d1862 token 6b0a5446a13dbdc493fc80789a38b807 |
Paste in the configuration to the vEdge, change the parameters such as IPs etc as required. The key point here is that the vbond is now the hostname vbond.networkinglab.xyz. This will be resolved by the Core router to the IP address 172.16.1.11
|
0 1 2 3 4 5 6 7 8 9 10 11 12 13 14 15 16 17 18 19 20 21 22 23 24 25 26 |
config system system-ip 4.1.1.2 site-id 1 organization-name "Networking Lab" vbond vbond.networkinglab.xyz ! vpn 0 dns 172.16.1.1 primary interface ge0/0 tunnel-interface encapsulation ipsec ip address 192.168.2.22/24 no shutdown ! ip route 0.0.0.0/0 192.168.2.1 ! ! vpn 512 interface eth0 ip dhcp-client no shutdown ! commit and-quit ! |
Testing vEDGE
|
0 1 2 3 4 5 6 7 8 9 10 11 12 13 14 15 16 17 18 19 20 21 22 23 24 25 26 27 28 29 30 |
vedge# ping 192.168.2.1 Ping in VPN 0 PING 192.168.2.1 (192.168.2.1) 56(84) bytes of data. 64 bytes from 192.168.2.1: icmp_seq=1 ttl=255 time=1.86 ms 64 bytes from 192.168.2.1: icmp_seq=2 ttl=255 time=2.23 ms ^C --- 192.168.2.1 ping statistics --- 2 packets transmitted, 2 received, 0% packet loss, time 1001ms rtt min/avg/max/mdev = 1.863/2.046/2.230/0.188 ms vedge# ping 172.16.1.1 Ping in VPN 0 PING 172.16.1.1 (172.16.1.1) 56(84) bytes of data. 64 bytes from 172.16.1.1: icmp_seq=1 ttl=254 time=3.52 ms 64 bytes from 172.16.1.1: icmp_seq=2 ttl=254 time=2.94 ms ^C --- 172.16.1.1 ping statistics --- 2 packets transmitted, 2 received, 0% packet loss, time 1000ms rtt min/avg/max/mdev = 2.943/3.234/3.525/0.291 ms vedge# vedge# vedge# ping vbond.networkinglab.xyz Ping in VPN 0 PING vbond.networkinglab.xyz (172.16.1.11) 56(84) bytes of data. 64 bytes from vbond.networkinglab.xyz (172.16.1.11): icmp_seq=1 ttl=62 time=27.0 ms ^C --- vbond.networkinglab.xyz ping statistics --- 1 packets transmitted, 1 received, 0% packet loss, time 0ms rtt min/avg/max/mdev = 27.000/27.000/27.000/0.000 ms vedge# |
|
0 1 2 3 4 5 6 7 8 9 |
vedge# show control connections PEER PEER CONTROLLER PEER PEER PEER SITE DOMAIN PEER PRIV PEER PUB GROUP TYPE PROT SYSTEM IP ID ID PRIVATE IP PORT PUBLIC IP PORT LOCAL COLOR PROXY STATE UPTIME ID ---------------------------------------------------------------------------------------------------------------------------------------------------------------------------------------- vsmart dtls 1.1.1.3 1000 1 172.16.1.12 12446 172.16.1.12 12446 default No connect 0 vbond dtls 0.0.0.0 0 0 172.16.1.11 12346 172.16.1.11 12346 default - up 0:00:02:06 0 vmanage dtls 1.1.1.1 1000 0 172.16.1.10 12446 172.16.1.10 12446 default No up 0:00:02:05 0 |